動畫很酷,它們是 iOS Human Interface Guidelines(介面設計指南)的重要組成部分。動畫可以幫助開發者吸引使用者注意重要的事情,或者替 App 添加一些樂趣。
在 iOS 中,有幾個方法可以實作動畫,最常見到的可能就是 UIView.animate(withDuration:animations:)。你亦可以使用 CABasicAnimation 為視圖的圖層設置動畫。此外,UIKit 允許你使用UIViewControllerTransitioningDelegate,來自定義視圖控制器呈現的動畫。
在本教程中,我想與讀者討論另一種為視圖製作動畫的方式,就是 UIViewPropertyAnimator。這個類別比它的前身 UIView.animate 提供更多控制方法。有了它,開發者可以構建自定義計時、交互方式和中斷動畫,更可以在動畫運行時作出變動。
很困惑嗎?別擔心,你很快就會明白的了。
從 UIViewPropertyAnimator 開始
UIViewPropertyAnimator 是在 iOS 10 推出的,它允許你以物件導向方式創建動畫。讓我們看看使用 UIViewPropertyAnimator 創建的範例動畫。

這是你用 UIView 實作的方法。
UIView.animate(withDuration: 0.3) {
    view.frame = view.frame.offsetBy(dx: 100, dy: 0)
}
而這是使用 UIViewPropertyAnimator 實作的方法:
 let animator = UIViewPropertyAnimator(duration:0.3, curve: .linear) {
     view.frame = view.frame.offsetBy(dx:100, dy:0)
 }
 animator.startAnimation()
如果要測試動畫,只需創建一個 Playground 專案並運行下列程式碼,兩段程式碼都會產生相同的動畫。
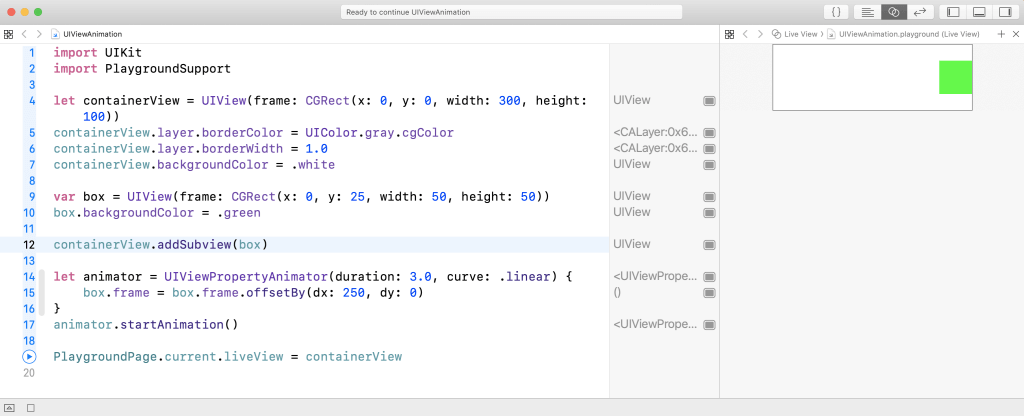
你可能會認為兩者沒甚麼區別,那為甚麼要介紹另一種創建動畫的新方法呢?但當你想要創建交互式動畫時,UIViewPropertyAnimator 就大派用場了。
交互式 (Interactive) 和可中斷 (Interruptible) 的動畫
你還記得經典的 “Slide to Unlock(滑動解鎖)” 手勢嗎?或是打開控制中心的 “Swipe from bottom(底部上滑)” 手勢?這些都是交互式和可中斷動畫的完美範例,你可以用手指開始移動視圖,然後釋放它,讓視圖返回其原始位置。或者,你可以在動畫期間捕捉視圖,並繼續用手指拖動它。
但是,UIView 動畫就無法讓我們完全控制動畫。你不能在動畫循環中間暫停,並在中斷後繼續執行動畫。
這就是 UIViewPropertyAnimator 的優勢。一起看看我們如何透過幾個步驟,構建一個完整的交互式、可中斷、可倒轉動畫吧!
準備起始專案
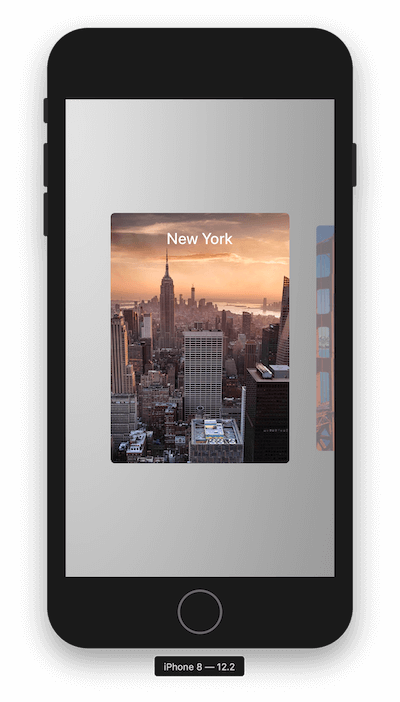
首先,請下載起始專案開始作業。解壓縮文件後,你會找到 CityGuide App,它可幫助使用者計劃假期。使用者可以在城市列表中滑動,然後選擇喜歡的城市,打開卡片去閱讀詳細信息。
讓我們在創建動畫前稍微探索一下專案程式碼。你可以在 Xcode 專案中找到以下內容:
ViewController.swift:App 的主視圖控制器帶有一個UICollectionView,用來顯示City物件的陣列。CityCollectionViewCell.swift:用於顯示City的 Cell。實際上,在本教程中,大多數改動都將應用於此類別。你可能會注意到,我們在類別中有定義descriptionLabel和closeButton。但是,如果運行 App 卻不會看到這兩個物件。別擔心,我們稍後會將它們顯示出來。在這類別中,我們還有collectionView和index屬性。同樣地,我們稍後會將它們用於動畫之中。CityCollectionViewFlowLayout.swift:這個類別負責水平滾動,但我們不會接觸到它。City.swift:App 的主要模型。這裡還有一個工廠方法,我們將會在ViewController中用到它。Main.storyboard:你可以在此找到ViewController和CityCollectionViewCell的 UI。
嘗試構建程式碼並執行範例 App,你應該會看到以下畫面。
實作展開和折疊動畫
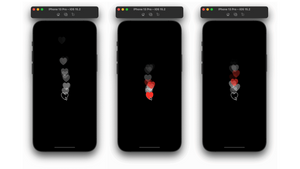
啟動 App 後,它會顯示一個城市列表,但是使用者無法與 Cell 互動。現在,我們希望在使用者點擊其中一個 Cell 時顯示該城市的資訊。先看看最後應該要呈現的結果,這是我們想要構建的動畫:
這個動畫看起來不錯吧?但這裡沒什麼特別的,只是一些基本的 UIViewPropertyAnimator 邏輯。 讓我們看看如何實作這種類型的動畫吧!插入以下程式碼片段到 ViewController 檔案的末尾,以創建 collectionView(_:didSelectItemAt)方法:
func collectionView(_ collectionView: UICollectionView, didSelectItemAt indexPath: IndexPath) {
    let selectedCell = collectionView.cellForItem(at: indexPath)! as! CityCollectionViewCell
    selectedCell.toggle()
}
現在我們需要實作 toggle 方法。讓我們切換到 CityCollectionViewCell.swift 並實作這個方法。
首先,在CityCollectionViewCell的類別宣告前,將 State enum 添加到檔案的頂部,這個 enum 允許我們追蹤 Cell 的狀態:
private enum State {
    case expanded
    case collapsed

    var change: State {
        switch self {
        case .expanded: return .collapsed
        case .collapsed: return .expanded
        }
    }
}
接下來,讓我們為 CityCollectionViewCell 類別添加一些用於控制動畫的屬性:
private var initialFrame: CGRect?
private var state: State = .collapsed
private lazy var animator: UIViewPropertyAnimator = {
    return UIViewPropertyAnimator(duration: 0.3, curve: .easeInOut)
}()
initialFrame 變數是用於在動畫之前儲存 Cell 的框架 (frame);state 是用於追蹤 Cell 為展開或折疊;而 animator 變數是用於驅動和控制動畫。
現在添加 toggle 方法,並從 close 這個函式中調用它,像是這樣:
@IBAction func close(_ sender: Any) {
    toggle()
}

func toggle() {
    switch state {
    case .expanded:
        collapse()
    case .collapsed:
        expand()
    }
}這裡再添加了兩個方法:expand() 以及 collapse()。讓我們繼續實作它們,首先,從 expansion d() 方法開始:
private func expand() {
    guard let collectionView = self.collectionView, let index = self.index else { return }

    animator.addAnimations {
        self.initialFrame = self.frame

        self.descriptionLabel.alpha = 1
        self.closeButton.alpha = 1

        self.layer.cornerRadius = 0
        self.frame = CGRect(x: collectionView.contentOffset.x, y:0 , width: collectionView.frame.width, height: collectionView.frame.height)

        if let leftCell = collectionView.cellForItem(at: IndexPath(row: index - 1, section: 0)) {
            leftCell.center.x -= 50
        }

        if let rightCell = collectionView.cellForItem(at: IndexPath(row: index + 1, section: 0)) {
            rightCell.center.x += 50
        }

        self.layoutIfNeeded()
    }

    animator.addCompletion { position in
        switch position {
        case .end:
            self.state = self.state.change
            collectionView.isScrollEnabled = false
            collectionView.allowsSelection = false
        default:
            ()
        }
    }

    animator.startAnimation()
}
嘩!這裡程式碼很多,讓我一步一步向你解釋:
- 首先,我們檢查
collectionView和index不是 nil。否則,我們將無法運行動畫。 - 下一步,我們呼叫
animator.addAnimations來開始創建動畫。 - 接著,我們儲存當前的框架,這是用於在折疊動畫上恢復它。
- 然後,我們設置
descriptionLabel和closeButton的 alpha 值使其可見。 - 接著,我們刪除圓角並為 Cell 設置新框架。Cell 將以全屏顯示。
- 然後,我們移動相鄰的 Cell。
- 最後,我們呼叫
animator.addComplete()方法來禁止 collectionView 的交互,這可以預防使用者在 Cell 擴展時滾動它。我們也改變了 Cell 的當前狀態,這一點很重要,因為我們只在動畫完成時作出變動。
現在我們要添加折疊動畫。簡單來說,我們只是將 Cell 恢復到之前的狀態:
private func collapse() {
    guard let collectionView = self.collectionView, let index = self.index else { return }

    animator.addAnimations {
        self.descriptionLabel.alpha = 0
        self.closeButton.alpha = 0

        self.layer.cornerRadius = self.cornerRadius
        self.frame = self.initialFrame!

        if let leftCell = collectionView.cellForItem(at: IndexPath(row: index - 1, section: 0)) {
            leftCell.center.x += 50
        }

        if let rightCell = collectionView.cellForItem(at: IndexPath(row: index + 1, section: 0)) {
            rightCell.center.x -= 50
        }

        self.layoutIfNeeded()
    }

    animator.addCompletion { position in
        switch position {
        case .end:
            self.state = self.state.change
            collectionView.isScrollEnabled = true
            collectionView.allowsSelection = true
        default:
            ()
        }
    }

    animator.startAnimation()
}
現在,是時候運行我們的 App 了。你可以試試點擊 Cell,應該會看到動畫。要關閉視圖,請點擊右上角的十字圖標。
添加拖曳手勢 (Pan Gesture)
你可能會說,我們明明可以使用 UIView.animate 來獲得相同的結果,為甚麼要使用 UIViewPropertyAnimator 呢?
好,是時候讓動畫變為互動式了!我們將添加一個 UIPanGestureRecognizer 和一個名為 popupOffset 的新屬性,以追蹤我們可拖曳的 Cell 數量。讓我們在 CityCollectionViewCell 類別中宣告這些變數:
private let popupOffset: CGFloat = (UIScreen.main.bounds.height - cellSize.height)/2.0
private lazy var panRecognizer: UIPanGestureRecognizer = {
    let recognizer = UIPanGestureRecognizer()
    recognizer.addTarget(self, action: #selector(popupViewPanned(recognizer:)))

    return recognizer

}()
接下來,添加下列方法來註冊拖曳手勢:
override func awakeFromNib() {
    self.addGestureRecognizer(panRecognizer)
}
然後,我們需要添加 popupViewPanned 方法來追蹤拖曳手勢。在 CityCollectionViewCell 中插入以下程式碼:
@objc func popupViewPanned(recognizer: UIPanGestureRecognizer) {
    switch recognizer.state {
    case .began:
        toggle()
        animator.pauseAnimation()

    case .changed:
        let translation = recognizer.translation(in: collectionView)
        var fraction = -translation.y / popupOffset
        if state == .expanded { fraction *= -1 }
        animator.fractionComplete = fraction

    case .ended:
        animator.continueAnimation(withTimingParameters: nil, durationFactor: 0)

    default:
        ()
    }
}
我們這裡有三個狀態。在手勢開始時,我們使用 toggle 方法初始化 animator,並立即暫停它。當使用者拖動 Cell 時,我們透過設置 animator 的 fractionComplete 屬性來更新動畫;這就是 animator 的魔法所在,讓我們可以控制 animator。最後,當使用者釋放手指時,我們呼叫 animator 的 continueAnimation 方法繼續執行動畫,然後 Cell 將進入目標位置。
運行這個 App,你將可以向上拖動 Cell 來展開它,然後向下拖動展開的 Cell 來折疊它。
現在這個動畫看起來很不錯,但還不能在中間中斷動畫。因此,為了使動畫完全交互,我們必須添加一個功能:interruption。使用者可以像往常一樣啟動展開/折疊動畫,但是一旦使用者在動畫運行期間點擊 Cell,動畫就應該會立即暫停。
為了實作它,我們必須儲存動畫運行的進度,然後依據該值來計算動畫的完成百分比。
首先,我們向 CityCollectionViewCell 宣告一個新屬性:
private var animationProgress: CGFloat = 0接下來,使用以下程式碼更新 popupViewPanned 方法的 .began 來記住進度:
animationProgress = animator.fractionComplete針對 .changed case,你需要更新以下行程式碼以正確計算完成百分比:
animator.fractionComplete = fraction + animationProgress現在我們已經準備好,可以測試這個 App 了。請運行專案看看成果如何,如果你有正確遵循每個步驟,動畫看起來應該像這樣:
倒轉動畫
你可能發現目前實作成果還有一個的缺點:當你將 Cell 向上拖動一點後再將其恢復到原始位置時,即使你釋放手指,Cell 仍然繼續展開。我們接下來將會解決這個問題,讓交互式動畫變得更好。
請參考下面程式碼,更新 popupViewPanned 方法的 .end case:
let velocity = recognizer.velocity(in: self)
let shouldComplete = velocity.y > 0

if velocity.y == 0 {
    animator.continueAnimation(withTimingParameters: nil, durationFactor: 0)
    break
}

switch state {
case .expanded:
    if !shouldComplete && !animator.isReversed { animator.isReversed = !animator.isReversed }
    if shouldComplete && animator.isReversed { animator.isReversed = !animator.isReversed }
case .collapsed:
    if shouldComplete && !animator.isReversed { animator.isReversed = !animator.isReversed }
    if !shouldComplete && animator.isReversed { animator.isReversed = !animator.isReversed }
}
animator.continueAnimation(withTimingParameters: nil, durationFactor: 0)
現在我們會根據拖曳手勢的速度來決定是否應該倒轉動畫。
最後,在 .changedcase 中再插入一行程式碼,正確計算 animator.fractionComplete。
if animator.isReversed { fraction *= -1 }讓我們再次運行 App,現在一切都應該順利進行。

修復拖曳手勢
還有一件事!我們用 UIViewPropertyAnimator 完成了動畫的實作,但還有一個討厭的錯誤。也許你在測試 App 時已經看過它,就是我們無法水平滾動Cell。試試在 Cell 上向左/向右滑動,你就會看到問題所在。
根本原因是由於我們創建了 UIPanGestureRecognizer,它也捕獲與 UICollectionView 的內置手勢識別器 (gesture recogniser) 有衝突的滑動手勢。
雖然使用者仍然可以滑動 Cell 的上下部分、或是 Cell 之間的空間,以水平滾動來瀏覽城市,但我不喜歡這種糟糕的使用者體驗,所以接下來會修復這個問題。
要解決這些衝突,我們需要實作一個名為 gestureRecognizerShouldBegin(_ :) 的委託方法 (delegate method),該方法會控制手勢識別器是否應該繼續處理觸控事件。如果在方法中返回 false,則手勢識別器將忽略觸控事件。所以,我們要做的就是讓 pan recognizer 忽略水平滑動。
為此,讓我們設置 pan recognizer 的 delegate。在 panRecognizer 的初始化中插入以下程式碼,你可以在 return recognizer 之前放置這行程式碼 。
recognizer.delegate = self 接下來,如此實作 gestureRecognizerShouldBegin(_:) 方法:
override func gestureRecognizerShouldBegin(_ gestureRecognizer: UIGestureRecognizer) -> Bool {
    return abs((panRecognizer.velocity(in: panRecognizer.view)).y) > abs((panRecognizer.velocity(in: panRecognizer.view)).x)
}
如果其垂直速度大於其水平對應物, 我們將開始打開/關閉拖曳手勢 。
完成了!讓我們再次測試 App,你現在應該可以透過向左/向右滑動 Cell 來瀏覽城市記錄。
Bonus : 自定義計時功能
在我們結束本教程之前,讓我們談談自定義時間函式,還記得上一次設計師要求你為動畫實作自定義計時功能的情況嗎?
通常你必須將 UIView.animation 改為 CABasicAnimation ,或將它包裝在 CATransaction 中。使用UIViewPropertyAnimator,你就可以輕鬆實作自定義計時功能。
用這個自定義計時功能替換 animator 初始化(嘗試繪製你自己的 cubic-bezier 曲線) ,像這樣 :
private lazy var animator: UIViewPropertyAnimator = {
    let cubicTiming = UICubicTimingParameters(controlPoint1: CGPoint(x: 0.17, y: 0.67), controlPoint2: CGPoint(x: 0.76, y: 1.0))

    return UIViewPropertyAnimator(duration: 0.3, timingParameters: cubicTiming)
}()
或者,你也可以使用下面的 springTiming,來取代 cubicTiming 參數 :
let springTiming = UISpringTimingParameters(mass: 1.0, stiffness: 2.0, damping: 0.2, initialVelocity: .zero)嘗試再次運行專案,看看成果如何。
總結
藉由 UIViewPropertyAnimator,你可以使用交互式動畫增強使用者體驗。
我知道你迫不及待想把學到的東西實作到自己的專案中,若你在專案中應用這個技術,歡迎在下面留言與我分享。
以供參考,你可以在這裡下載最終完整專案。
相關連結參考
- Advanced Animations with UIKit(透過 UIKit 實作進階動畫)
- UIViewPropertyAnimator Apple Developer Documentation(UIViewPropertyAnimator 官方文件)
FB : https://www.facebook.com/yishen.chen.54
Twitter : https://twitter.com/YeEeEsS
原文:Advanced Animations with UIViewPropertyAnimator