

本篇原文(標題: SwiftUI: Creating a Chat Bubble (like iMessage) using Path and Shape)刊登於作者 Medium,由 Prafulla Singh 所著,並授權翻譯及轉載。
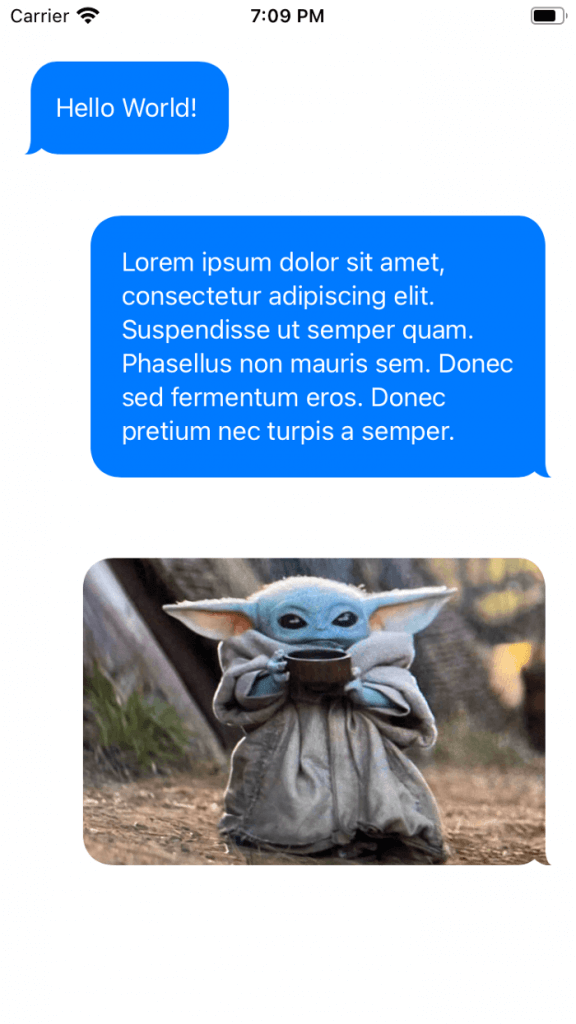
在這篇教學文章中,我們會學習建立 iMessage 那種有尾巴 (tail) 的對話框 (chat bubble)。這篇文章不是旨在建立一個端對端 (End-to-End) 的聊天 UI。讓我們先看看完成的範例:
實作邏輯
- 在 Shape Struct 中建立對話框的 Path。
- 這個 Shape 會以尾巴為參數,來定義形狀。
- 建立一個 Container View,這個視圖會包含訊息/圖像,並為訊息/圖像賦予形狀。
- 這個 Container View 也會管理視圖的方向,也就是向左或向右對齊對話框。
建立對話框 Path
雖然,我們可以直接寫程式碼來建立對話框 Path,但這次我們會用 Paintcodeapp 繪製 Shape,並即時進行測試。
要建立對話框 Path,我們先要是取得四個角,其中三個角設定為圓角,而剩下的一個角,就創建一個倒轉的心型。
struct ChatBubbleShape: Shape {
    enum Direction {
        case left
        case right
    }

    let direction: Direction

    func path(in rect: CGRect) -> Path {
        return (direction == .left) ? getLeftBubblePath(in: rect) : getRightBubblePath(in: rect)
    }

    private func getLeftBubblePath(in rect: CGRect) -> Path {
        let width = rect.width
        let height = rect.height
        let path = Path { p in
            p.move(to: CGPoint(x: 25, y: height))
            p.addLine(to: CGPoint(x: width - 20, y: height))
            p.addCurve(to: CGPoint(x: width, y: height - 20),
                       control1: CGPoint(x: width - 8, y: height),
                       control2: CGPoint(x: width, y: height - 8))
            p.addLine(to: CGPoint(x: width, y: 20))
            p.addCurve(to: CGPoint(x: width - 20, y: 0),
                       control1: CGPoint(x: width, y: 8),
                       control2: CGPoint(x: width - 8, y: 0))
            p.addLine(to: CGPoint(x: 21, y: 0))
            p.addCurve(to: CGPoint(x: 4, y: 20),
                       control1: CGPoint(x: 12, y: 0),
                       control2: CGPoint(x: 4, y: 8))
            p.addLine(to: CGPoint(x: 4, y: height - 11))
            p.addCurve(to: CGPoint(x: 0, y: height),
                       control1: CGPoint(x: 4, y: height - 1),
                       control2: CGPoint(x: 0, y: height))
            p.addLine(to: CGPoint(x: -0.05, y: height - 0.01))
            p.addCurve(to: CGPoint(x: 11.0, y: height - 4.0),
                       control1: CGPoint(x: 4.0, y: height + 0.5),
                       control2: CGPoint(x: 8, y: height - 1))
            p.addCurve(to: CGPoint(x: 25, y: height),
                       control1: CGPoint(x: 16, y: height),
                       control2: CGPoint(x: 20, y: height))

        }
        return path
    }

    private func getRightBubblePath(in rect: CGRect) -> Path {
        let width = rect.width
        let height = rect.height
        let path = Path { p in
            p.move(to: CGPoint(x: 25, y: height))
            p.addLine(to: CGPoint(x:  20, y: height))
            p.addCurve(to: CGPoint(x: 0, y: height - 20),
                       control1: CGPoint(x: 8, y: height),
                       control2: CGPoint(x: 0, y: height - 8))
            p.addLine(to: CGPoint(x: 0, y: 20))
            p.addCurve(to: CGPoint(x: 20, y: 0),
                       control1: CGPoint(x: 0, y: 8),
                       control2: CGPoint(x: 8, y: 0))
            p.addLine(to: CGPoint(x: width - 21, y: 0))
            p.addCurve(to: CGPoint(x: width - 4, y: 20),
                       control1: CGPoint(x: width - 12, y: 0),
                       control2: CGPoint(x: width - 4, y: 8))
            p.addLine(to: CGPoint(x: width - 4, y: height - 11))
            p.addCurve(to: CGPoint(x: width, y: height),
                       control1: CGPoint(x: width - 4, y: height - 1),
                       control2: CGPoint(x: width, y: height))
            p.addLine(to: CGPoint(x: width + 0.05, y: height - 0.01))
            p.addCurve(to: CGPoint(x: width - 11, y: height - 4),
                       control1: CGPoint(x: width - 4, y: height + 0.5),
                       control2: CGPoint(x: width - 8, y: height - 1))
            p.addCurve(to: CGPoint(x: width - 25, y: height),
                       control1: CGPoint(x: width - 16, y: height),
                       control2: CGPoint(x: width - 20, y: height))

        }
        return path
    }
}
建立 Container View
這個 View 會以子內容 (Child Content) 和對話框尾巴的方向為參數。現在,我們使用 ‘clipShape’ 將 child view 切成一個對話框的樣子。
struct ChatBubble<Content>: View where Content: View {
    let direction: ChatBubbleShape.Direction
    let content: () -> Content
    init(direction: ChatBubbleShape.Direction, @ViewBuilder content: @escaping () -> Content) {
            self.content = content
            self.direction = direction
    }

    var body: some View {
        HStack {
            if direction == .right {
                Spacer()
            }
            content().clipShape(ChatBubbleShape(direction: direction))
            if direction == .left {
                Spacer()
            }
        }.padding([(direction == .left) ? .leading : .trailing, .top, .bottom], 20)
        .padding((direction == .right) ? .leading : .trailing, 50)
    }
}
完整範例
//
//  ChatBubble.swift
//  ios14-demo
//
//  Created by Prafulla Singh on 25/7/20.
//
import SwiftUI

struct ChatBubble<Content>: View where Content: View {
    let direction: ChatBubbleShape.Direction
    let content: () -> Content
    init(direction: ChatBubbleShape.Direction, @ViewBuilder content: @escaping () -> Content) {
            self.content = content
            self.direction = direction
    }

    var body: some View {
        HStack {
            if direction == .right {
                Spacer()
            }
            content().clipShape(ChatBubbleShape(direction: direction))
            if direction == .left {
                Spacer()
            }
        }.padding([(direction == .left) ? .leading : .trailing, .top, .bottom], 20)
        .padding((direction == .right) ? .leading : .trailing, 50)
    }
}

struct ChatBubbleShape: Shape {
    enum Direction {
        case left
        case right
    }

    let direction: Direction

    func path(in rect: CGRect) -> Path {
        return (direction == .left) ? getLeftBubblePath(in: rect) : getRightBubblePath(in: rect)
    }

    private func getLeftBubblePath(in rect: CGRect) -> Path {
        let width = rect.width
        let height = rect.height
        let path = Path { p in
            p.move(to: CGPoint(x: 25, y: height))
            p.addLine(to: CGPoint(x: width - 20, y: height))
            p.addCurve(to: CGPoint(x: width, y: height - 20),
                       control1: CGPoint(x: width - 8, y: height),
                       control2: CGPoint(x: width, y: height - 8))
            p.addLine(to: CGPoint(x: width, y: 20))
            p.addCurve(to: CGPoint(x: width - 20, y: 0),
                       control1: CGPoint(x: width, y: 8),
                       control2: CGPoint(x: width - 8, y: 0))
            p.addLine(to: CGPoint(x: 21, y: 0))
            p.addCurve(to: CGPoint(x: 4, y: 20),
                       control1: CGPoint(x: 12, y: 0),
                       control2: CGPoint(x: 4, y: 8))
            p.addLine(to: CGPoint(x: 4, y: height - 11))
            p.addCurve(to: CGPoint(x: 0, y: height),
                       control1: CGPoint(x: 4, y: height - 1),
                       control2: CGPoint(x: 0, y: height))
            p.addLine(to: CGPoint(x: -0.05, y: height - 0.01))
            p.addCurve(to: CGPoint(x: 11.0, y: height - 4.0),
                       control1: CGPoint(x: 4.0, y: height + 0.5),
                       control2: CGPoint(x: 8, y: height - 1))
            p.addCurve(to: CGPoint(x: 25, y: height),
                       control1: CGPoint(x: 16, y: height),
                       control2: CGPoint(x: 20, y: height))

        }
        return path
    }

    private func getRightBubblePath(in rect: CGRect) -> Path {
        let width = rect.width
        let height = rect.height
        let path = Path { p in
            p.move(to: CGPoint(x: 25, y: height))
            p.addLine(to: CGPoint(x:  20, y: height))
            p.addCurve(to: CGPoint(x: 0, y: height - 20),
                       control1: CGPoint(x: 8, y: height),
                       control2: CGPoint(x: 0, y: height - 8))
            p.addLine(to: CGPoint(x: 0, y: 20))
            p.addCurve(to: CGPoint(x: 20, y: 0),
                       control1: CGPoint(x: 0, y: 8),
                       control2: CGPoint(x: 8, y: 0))
            p.addLine(to: CGPoint(x: width - 21, y: 0))
            p.addCurve(to: CGPoint(x: width - 4, y: 20),
                       control1: CGPoint(x: width - 12, y: 0),
                       control2: CGPoint(x: width - 4, y: 8))
            p.addLine(to: CGPoint(x: width - 4, y: height - 11))
            p.addCurve(to: CGPoint(x: width, y: height),
                       control1: CGPoint(x: width - 4, y: height - 1),
                       control2: CGPoint(x: width, y: height))
            p.addLine(to: CGPoint(x: width + 0.05, y: height - 0.01))
            p.addCurve(to: CGPoint(x: width - 11, y: height - 4),
                       control1: CGPoint(x: width - 4, y: height + 0.5),
                       control2: CGPoint(x: width - 8, y: height - 1))
            p.addCurve(to: CGPoint(x: width - 25, y: height),
                       control1: CGPoint(x: width - 16, y: height),
                       control2: CGPoint(x: width - 20, y: height))

        }
        return path
    }
}

struct Demo: View {
    var body: some View {
        ScrollView {
            VStack {
                ChatBubble(direction: .left) {
                    Text("Hello!")
                        .padding(.all, 20)
                        .foregroundColor(Color.white)
                        .background(Color.blue)
                }
                ChatBubble(direction: .right) {
                    Text("Lorem ipsum dolor sit amet, consectetur adipiscing elit. Suspendisse ut semper quam. Phasellus non mauris sem. Donec sed fermentum eros. Donec pretium nec turpis a semper. ")
                        .padding(.all, 20)
                        .foregroundColor(Color.white)
                        .background(Color.blue)
                }
                ChatBubble(direction: .right) {
                    Image.init("dummyImage")
                        .resizable()
                        .frame(width: UIScreen.main.bounds.width - 70,
                               height: 200).aspectRatio(contentMode: .fill)
                }
            }
        }
    }
}

struct ChatBubble_Previews: PreviewProvider {
    static var previews: some View {
        Demo()
    }
}
本篇原文(標題:SwiftUI: Creating a Chat Bubble (like iMessage) using Path and Shape)刊登於作者 Medium,由 Prafulla Singh 所著,並授權翻譯及轉載。
作者簡介:Prafulla Singh,Block.one 的 iOS 開發者
譯者簡介:Kelly Chan-AppCoda 編輯小姐。


