

在我開始編寫程式碼的時候,還沒有框架可以使用。如果我們想在螢幕畫一個圓圈,比現在要多編寫幾十行以上的程式碼。隨著科學的發展,抽象 (abstraction) 和框架的概念已經變成了大方向。
今天,我們利用 SwiftUI 框架,只需要幾行程式碼即可。這樣當然很好,但還是會有缺點:抽象層次越高,其靈活性就會相對降低。這是我們需要取捨的地方。
當 Apple 推出 SwiftUI 時,其中一個目標,就是希望簡化過去 20 年 UIKit 的螢幕 layout。SwiftUI 引入了 3 個主要容器來構建螢幕 layout:HStack、VStack、和 ZStack。但有些人已經習慣了在 UIKit 構建螢幕 layout,對於他們來說,SwiftUI 的螢幕 layout 既複雜又凌亂,轉到 SwiftUI 實作要花太多時間了。
Apple 推出了 layout 協定 (protocol) 來嘗試解決這個問題,暴露了這些主要容器的弱點,讓我們可以更改它們的行為方式。在這篇文章中,讓我們一起來看看這個新協定的實際用途和實作方法,並用它們的 layout 規則創建自己的容器。
模版 (Template)
讓我們從這個模版開始,我們可以在裡面切換不同的 layout,並在過程中定義新的 layout:
import SwiftUI
enum Algo: String, CaseIterable, Identifiable {
case vstack
case hstack
case zstack
var layout: any Layout {
switch self {
case .vstack: return _VStackLayout()
case .hstack: return _HStackLayout()
case .zstack: return _ZStackLayout()
}
}
var id: Self { self }
}
struct ContentView: View {
@State var algo = Algo.hstack
var body: some View {
VStack {
Picker("Algo", selection: $algo) {
ForEach(Algo.allCases) { algo in
Text("\(algo.rawValue)")
}
}.pickerStyle(.segmented)
let layout = AnyLayout(algo.layout)
layout {
ForEach(0..<4) { ix in
Text("Mark \(ix)")
.padding()
.background(Capsule()
.fill(Color(hue: .init(ix)/10, saturation: 0.8, brightness: 0.8)))
}
}.animation(.default.speed(0.2), value: algo)
.frame(maxHeight: .infinity)
}
}
}
struct ContentView_Previews: PreviewProvider {
static var previews: some View {
ContentView()
}
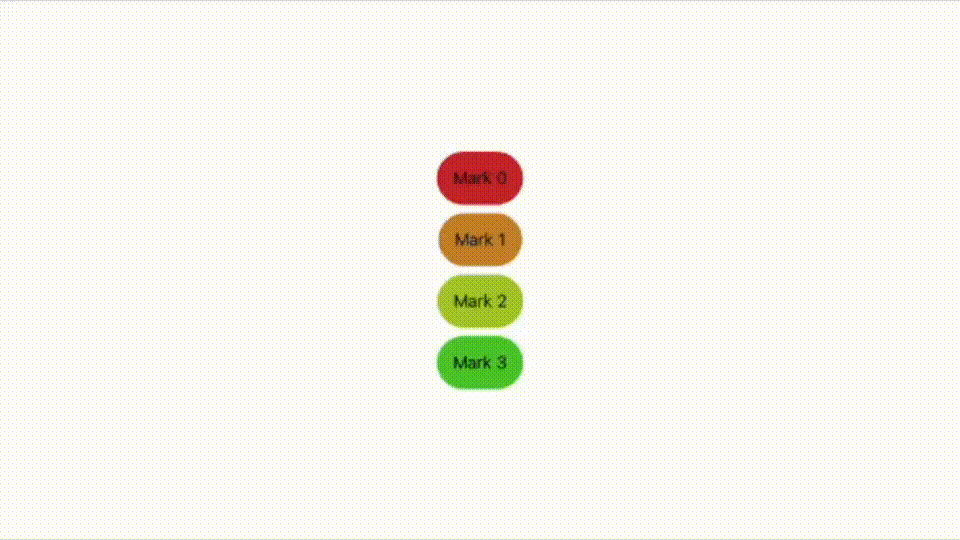
}上面的程式碼構建了一個視圖,我們可以在視圖選擇任何標準 layout,並使用 layout 協定來切換不同 layout。
直到這裡,我們都還沒有用到任何新的功能。
接下來,讓我們添加一些程式碼來建立新的 layout。我們希望實作的,是把 4 個視圖放在一個正方形中。我們需要在 lauout 協定中定義兩個方法。以下是基本的程式碼:
struct CornerLayout: Layout {
    func sizeThatFits(proposal: ProposedViewSize, subviews: Subviews, cache: inout ()) -> CGSize {
        let idealViewSizes = subviews.map { $0.sizeThatFits(.unspecified) }

        let spacing = CGFloat(subviews.count - 1)
        let width:CGFloat = CGFloat(spacing + CGFloat(idealViewSizes.reduce(0) { $0 + Int($1.width) }))
        let height:CGFloat = idealViewSizes.reduce(0) { max($0, $1.height) }

        return CGSize(width: width, height: height)
    }

    func placeSubviews(in bounds: CGRect, proposal: ProposedViewSize, subviews: Subviews, cache: inout ())
        {
            var pt = CGPoint(x: bounds.midX, y: bounds.midY)

            let places = [UnitPoint.topLeading, UnitPoint.topTrailing, UnitPoint.bottomLeading, UnitPoint.bottomTrailing, UnitPoint.top, UnitPoint.bottom, UnitPoint.leading, UnitPoint.trailing,UnitPoint.center]

            if subviews.count > places.count { assert(false,"No more then \(places.count) views supported") }

            var c = 0
            for v in subviews {
                v.place(at: pt, anchor: places[c], proposal: .unspecified)
                c += 1
            }
        }
}
現在,讓我們把這些程式碼添加到 Algo 列舉:
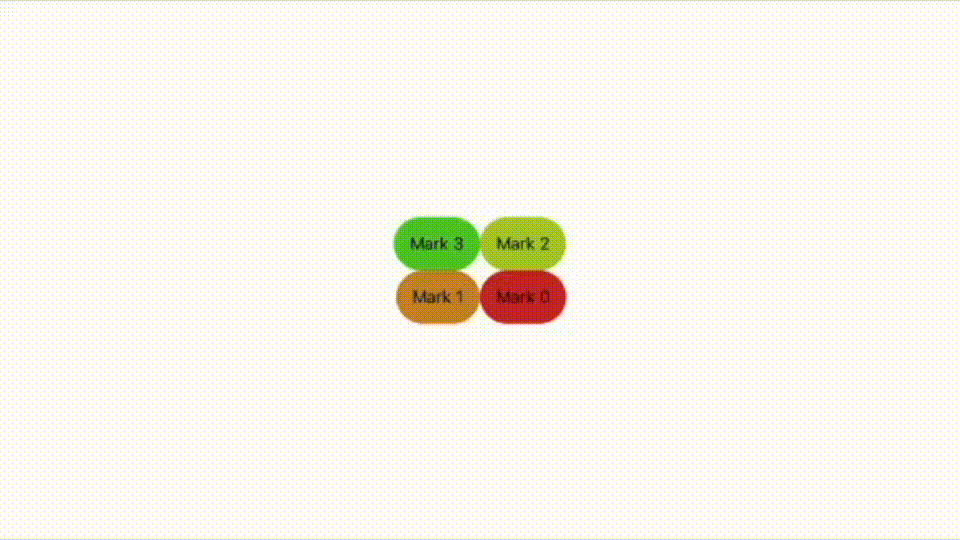
這就是抽象的神奇之處 ── 其實沒有 layout 協定,我們還是可以實作出同一個效果,但程式碼就會相對複雜。
不過,視圖現在不是放在 4 個角落。如果我們想把視圖放在角落,可以如此編寫程式碼:
struct CornerLayout: Layout {
let spacing: CGFloat
func sizeThatFits(proposal: ProposedViewSize, subviews: Subviews, cache: inout ()) -> CGSize {
let idealViewSizes = subviews.map { $0.sizeThatFits(.unspecified) }
let spacing = spacing * CGFloat(subviews.count - 1)
let width = spacing + idealViewSizes.reduce(0) { $0 + $1.width }
let height = spacing + idealViewSizes.reduce(0) { $0 + $1.height }
return CGSize(width: width, height: height)
}
func placeSubviews(in bounds: CGRect, proposal: ProposedViewSize, subviews: Subviews, cache: inout ())
{
var pt = CGPoint(x: bounds.minX, y: bounds.maxY)
let places = [UnitPoint.topLeading, UnitPoint.topTrailing, UnitPoint.bottomLeading, UnitPoint.bottomTrailing]
if subviews.count > places.count { assert(false,"No more then \(places.count) views supported") }
var c = 0
for v in subviews {
switch places[c] {
case .topLeading: // 0
pt = CGPoint(x: bounds.minX, y: bounds.minY)
v.place(at: pt, anchor: places[c], proposal: .unspecified)
case .topTrailing: // 1
pt = CGPoint(x: bounds.maxX, y: bounds.minY)
v.place(at: pt, anchor: places[c], proposal: .unspecified)
case .bottomLeading: // 2
pt = CGPoint(x: bounds.minX, y: bounds.maxY)
v.place(at: pt, anchor: places[c], proposal: .unspecified)
case .bottomTrailing: // 3
pt = CGPoint(x: bounds.maxX, y: bounds.maxY)
v.place(at: pt, anchor: places[c], proposal: .unspecified)
default:
assert(false,"neverHappens")
}
c += 1
}
}
func placeSubviewsY(in bounds: CGRect, proposal: ProposedViewSize, subviews: Subviews, cache: inout ())
{
var pt = CGPoint(x: bounds.minX, y: bounds.minY)
for v in subviews {
v.place(at: pt, anchor: .topLeading, proposal: .unspecified)
pt.x += v.sizeThatFits(.unspecified).width + spacing
}
}
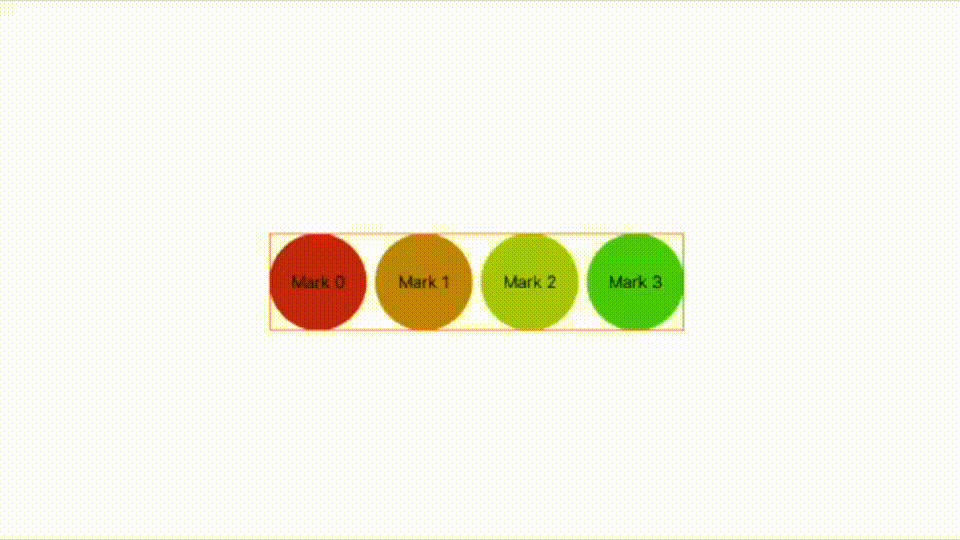
}如此一來,視圖就會分別被放在 4 個角落。我為容器設置了一個邊框,讓我們可以清楚看到切換容器時的變化。
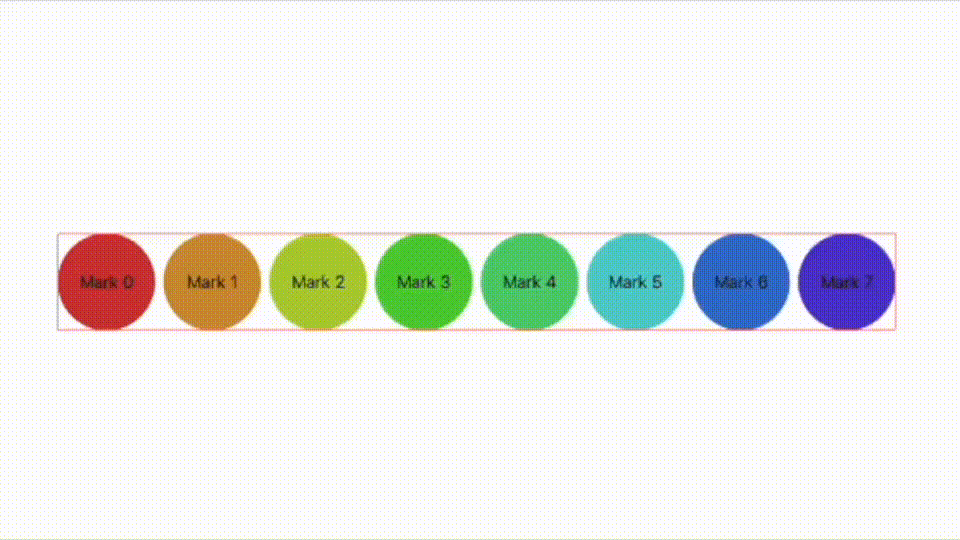
當然,如果你有看過 WWDC20 的相關影片,就會發現他們用來做例子的 layout 更加複雜,是一個圓形的 layout。以下就是實作的程式碼:
struct CircleLayout: Layout {
    var radius: CGFloat
    var rotation: Angle

    func sizeThatFits(proposal: ProposedViewSize, subviews: Subviews, cache: inout ()) -> CGSize {

        let maxSize = subviews.map { $0.sizeThatFits(proposal) }.reduce(CGSize.zero) {

            return CGSize(width: max($0.width, $1.width), height: max($0.height, $1.height))

        }

        return CGSize(width: (maxSize.width / 2 + radius) * 2,
                      height: (maxSize.height / 2 + radius) * 2)
    }

    func placeSubviews(in bounds: CGRect, proposal: ProposedViewSize, subviews: Subviews, cache: inout ())
    {
        let angleStep = (Angle.degrees(360).radians / Double(subviews.count))

        for (index, subview) in subviews.enumerated() {
            let angle = angleStep * CGFloat(index) + rotation.radians

            var point = CGPoint(x: 0, y: -radius).applying(CGAffineTransform(rotationAngle: angle))

            point.x += bounds.midX
            point.y += bounds.midY

            subview.place(at: point, anchor: .center, proposal: .unspecified)
        }
    }
}
完成後,視圖會是這樣的:
這篇文章到此為止。我在寫這篇文章的過程中都有所得著,希望你在閱讀時也有同樣的感覺。


