

本篇原文(標題:SwiftUI: How to draw playing Cards shades using Path API?)刊登於作者 Medium,由 Prafulla Singh 所著,並授權翻譯及轉載。
在 SwiftUI 中,我們可以利用 Path 和 Shape 來客製化渲染 (rendering),而 Path 又可以用來製作 Shape,也就是說,Path 就是基本的繪圖元素。
在這篇教學文章中,我們將會使用 SwiftUI Path 來建立撲克牌的四種花色。首先,讓我們來看看可以繪製甚麼類型的 Path。
- Line 會添加一條直線。
func addLine(to point: CGPoint)- Arc 會從中心添加一條圓弧,需要角度、半徑、中心點、和方向的資料。
func addArc(withCenter center: CGPoint,
     radius: CGFloat,
 startAngle: CGFloat,
   endAngle: CGFloat,
clockwise: Bool)- Quad Curve 會添加一元二次方程式的曲線。一元二次方程式需要三個點,來繪製一條 Path。
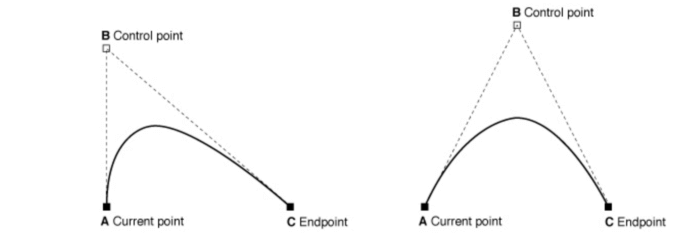
func addQuadCurve(to endPoint: CGPoint,
controlPoint: CGPoint)- Cubic Curve 會添加三次方程式的曲線。一個三次方程式需要四個點,來繪製一條 Path。
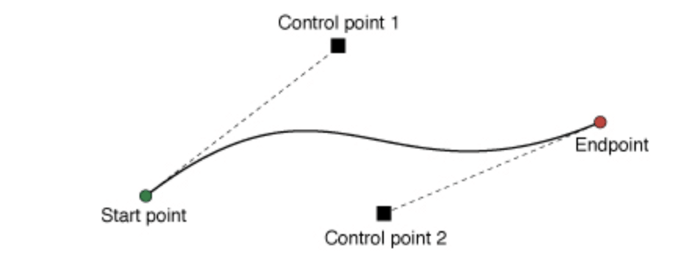
func addCurve(to endPoint: CGPoint,
controlPoint1: CGPoint,
controlPoint2: CGPoint)
現在,讓我們嘗試使用上面的方法,來創建撲克牌花色的圖案。 但是在開始繪製之前,先來介紹一些我們將會在練習中多次使用的函式。
import SwiftUI

extension CGRect {
    /// center of rect
    var center: CGPoint {
        return CGPoint(x: self.midX, y: self.midY)
    }
    /// if rect is not square take centered square to draw
    var centeredSquare: CGRect {
        let width = ceil(min(size.width, size.height))
        let height = width

        let newOrigin = CGPoint(x: origin.x + (size.width - width) / 2, y: origin.y + (size.height - height) / 2)
        let newSize = CGSize(width: width, height: height)
        return CGRect(origin: newOrigin, size: newSize)
    }

    func flatten() -> (CGFloat, CGFloat, CGFloat, CGFloat) {
        return (origin.x, origin.y, size.width, size.height)
    }
}

extension Angle {

    static let A180 = Angle(radians: .pi) //180

    static let A90 = Angle(radians: .pi/2) //90

    static let A270 = Angle(radians: (.pi/2) * 3) //270

    static let A360 = Angle(radians: .pi * 2) //360
}
方塊花色 (diamond shade) 是最容易繪製的花色。我們可以使用簡單的 Line、Curve、或 Arc 來繪製。在這個範例中,我們會使用 Arc。
- 移動到底部的中間,或任何一條邊的中間(左側、右側、或頂部)。
- 以角落為中心,向下一條邊的中心繪製圓弧。
import SwiftUI

struct Diamond: Shape {

    func path(in rect: CGRect) -> Path {
        let (x, y, width, height) = rect.centeredSquare.flatten()
        let lowerPoint = CGPoint(x: x + width / 2, y: (y + height ))

        let path = Path { p in
            p.move(to: lowerPoint)
            p.addArc(center: CGPoint(x: x, y: (y + height)),
                radius: (width / 2),
                startAngle: .A360,
                endAngle: .A270,
                clockwise: true)
            p.addArc(center: CGPoint(x: x, y: y),
                radius: (width / 2),
                startAngle: .A90,
                endAngle: .zero,
                clockwise: true)
            p.addArc(center: CGPoint(x: x + width, y: y),
                radius: (width / 2),
                startAngle: .A180,
                endAngle: .A90,
                clockwise: true)
            p.addArc(center: CGPoint(x: x + width, y: y + height),
                radius: (width / 2),
                startAngle: .A270 ,
                endAngle: .A180,
                clockwise: true)
        }
        return path
    }

}
紅心花色 (heart shade) 是兩條 Cubic Curve 和兩條 Arc 的組合。
- 移動到底部的中間。
- 向左邊或右邊中間繪製 Cubic Curve,保持角度在45度。
- 從上一點繪製一條 180° 的 Arc,半徑為寬度的 25%,中心則為長度和寬度的 25%。
- 反向重複,也就是重複第三步、第二步。
import SwiftUI

struct Heart: Shape {
    func path(in rect: CGRect) -> Path {

        let (x, y, width, height) = rect.centeredSquare.flatten()
        let lowerPoint = CGPoint(x: x + width / 2, y: (y + height ))

        let path = Path { p in
            p.move(to: lowerPoint)
            p.addCurve(to: CGPoint(x: x, y: (y + (height / 4))),
                  control1: CGPoint(x: (x + (width / 2)), y: (y + (height * 3 / 4))),
                  control2: CGPoint(x: x, y: (y + (height / 2))))
            p.addArc(center: CGPoint(x: (x + (width / 4)), y: (y + (height / 4))),
                radius: (width / 4),
                startAngle: .A180,
                endAngle: .zero,
                clockwise: false)
            p.addArc(center: CGPoint(x: (x + (width * 3 / 4)), y: (y + (height / 4))),
                radius: (width / 4),
                startAngle: .A180,
                endAngle: .zero,
                clockwise: false)
            p.addCurve(to: lowerPoint,
                  control1: CGPoint(x: (x + width), y: (y + (height / 2))),
                  control2: CGPoint(x: (x + (width / 2)), y: (y + (height * 3 / 4))))
        }
        return path
    }

}我們可以組合紅心花色和長方型,來完成黑桃花色 (Spade Shade)。
- 利用 90% 高度建立一個心形。
- 把心形旋轉 180°,並獲取 Path。
- 從中心到底部的中心建立一個長方形,並設定適當的寬度。
- 合併兩條 Path。
import SwiftUI

struct Spade: Shape {
    func path(in rect: CGRect) -> Path {

        let (x, y, width, height) = rect.centeredSquare.flatten()

        var heartPath = Heart().rotation(.A180).path(in: CGRect(x: x, y: y, width: width, height: height * 0.9)) //take 10% for bottom rect
        let rectPath = Rectangle().path(in: CGRect(x: x + width * 0.4, y: y + height * 0.5, width: width * 0.2, height: height * 0.5))

        heartPath.addPath(rectPath)
        return heartPath
    }
}
梅花花色 (Club Shade) 就是由三個圓形和一個三角形組成的。
- 將 rect 分成 2×2 網格
- 以 0-1 網格的交叉點為直徑,繪製一個圓形
- 以 0-2 網格的交叉點為直徑,繪製一個圓形
- 以 1-3 網格的交叉點為直徑,繪製一個圓形
- 從中心到底部繪製一個 60° 的等邊三角形
import SwiftUI

struct Club: Shape {
    func path(in rect: CGRect) -> Path {

        let (x, y, width, height) = rect.centeredSquare.flatten()
        let center = rect.centeredSquare.center

        let center1 = CGPoint(x: x + width / 2, y: (y + height/4 ))
        let center2 = CGPoint(x: x + width / 4, y: (y + height/2 ))
        let center3 = CGPoint(x: x + width * 3 / 4, y: (y + height/2 ) )
        let radius =  (width / 4)
        let path = Path { p in
            p.move(to: center)
            p.addArc(center: center1,
                     radius: radius,
                startAngle: .A360,
                endAngle: .zero,
                clockwise: true)
            p.addArc(center: center2,
                    radius: radius,
                    startAngle: .A360,
                    endAngle: .zero,
                    clockwise: true)
            p.addArc(center: center3,
                     radius: radius,
                 startAngle: .A360,
                    endAngle: .zero,
                    clockwise: true)
            p.move(to: center)
            p.addLine(to: CGPoint(x: x + width / 4, y: y + height))
            p.addLine(to: CGPoint(x: x + width * 3 / 4, y: y + height))
            p.addLine(to: center)
        }

        return path
    }
}
你可以在 GitHub 上參考完整範例。
本篇原文(標題:SwiftUI: How to draw playing Cards shades using Path API?)刊登於作者 Medium,由 Prafulla Singh 所著,並授權翻譯及轉載。
作者簡介:Prafulla Singh,Block.one 的 iOS 開發者
譯者簡介:Kelly Chan-AppCoda 編輯小姐。


