

Live Activities 首次於 iOS 16 推出,是 Apple 最令人興奮的更新之一,能讓 App 與使用者在即時互動上更有連結。它不再需要使用者不斷打開 App,Live Activities 可以讓資訊直接顯示在鎖定畫面和 Dynamic Island 上。無論是追蹤外送進度、查看比賽比分,或是監測目標的完成進度,這個功能都能讓重要資訊一目了然。
在 iOS 17 中,Apple 進一步擴展了 Live Activities,支援從伺服器端推送更新,使其在需要即時資訊的 App 中更強大。但即使沒有伺服器推送更新,Live Activities 對於需要在用戶端提升互動、及時提供回饋的 App 來說,也非常有用。
在這個教學中,我們會透過建立一個 Water Tracker App 來學習如何實作 Live Activities。這個 App 讓使用者記錄每日的飲水量,並能立即在鎖定畫面或 Dynamic Island 上看到進度更新。完成本教程後,你將了解如何把 Live Activities 整合到自己的 SwiftUI App 裡。
Demo App 簡介
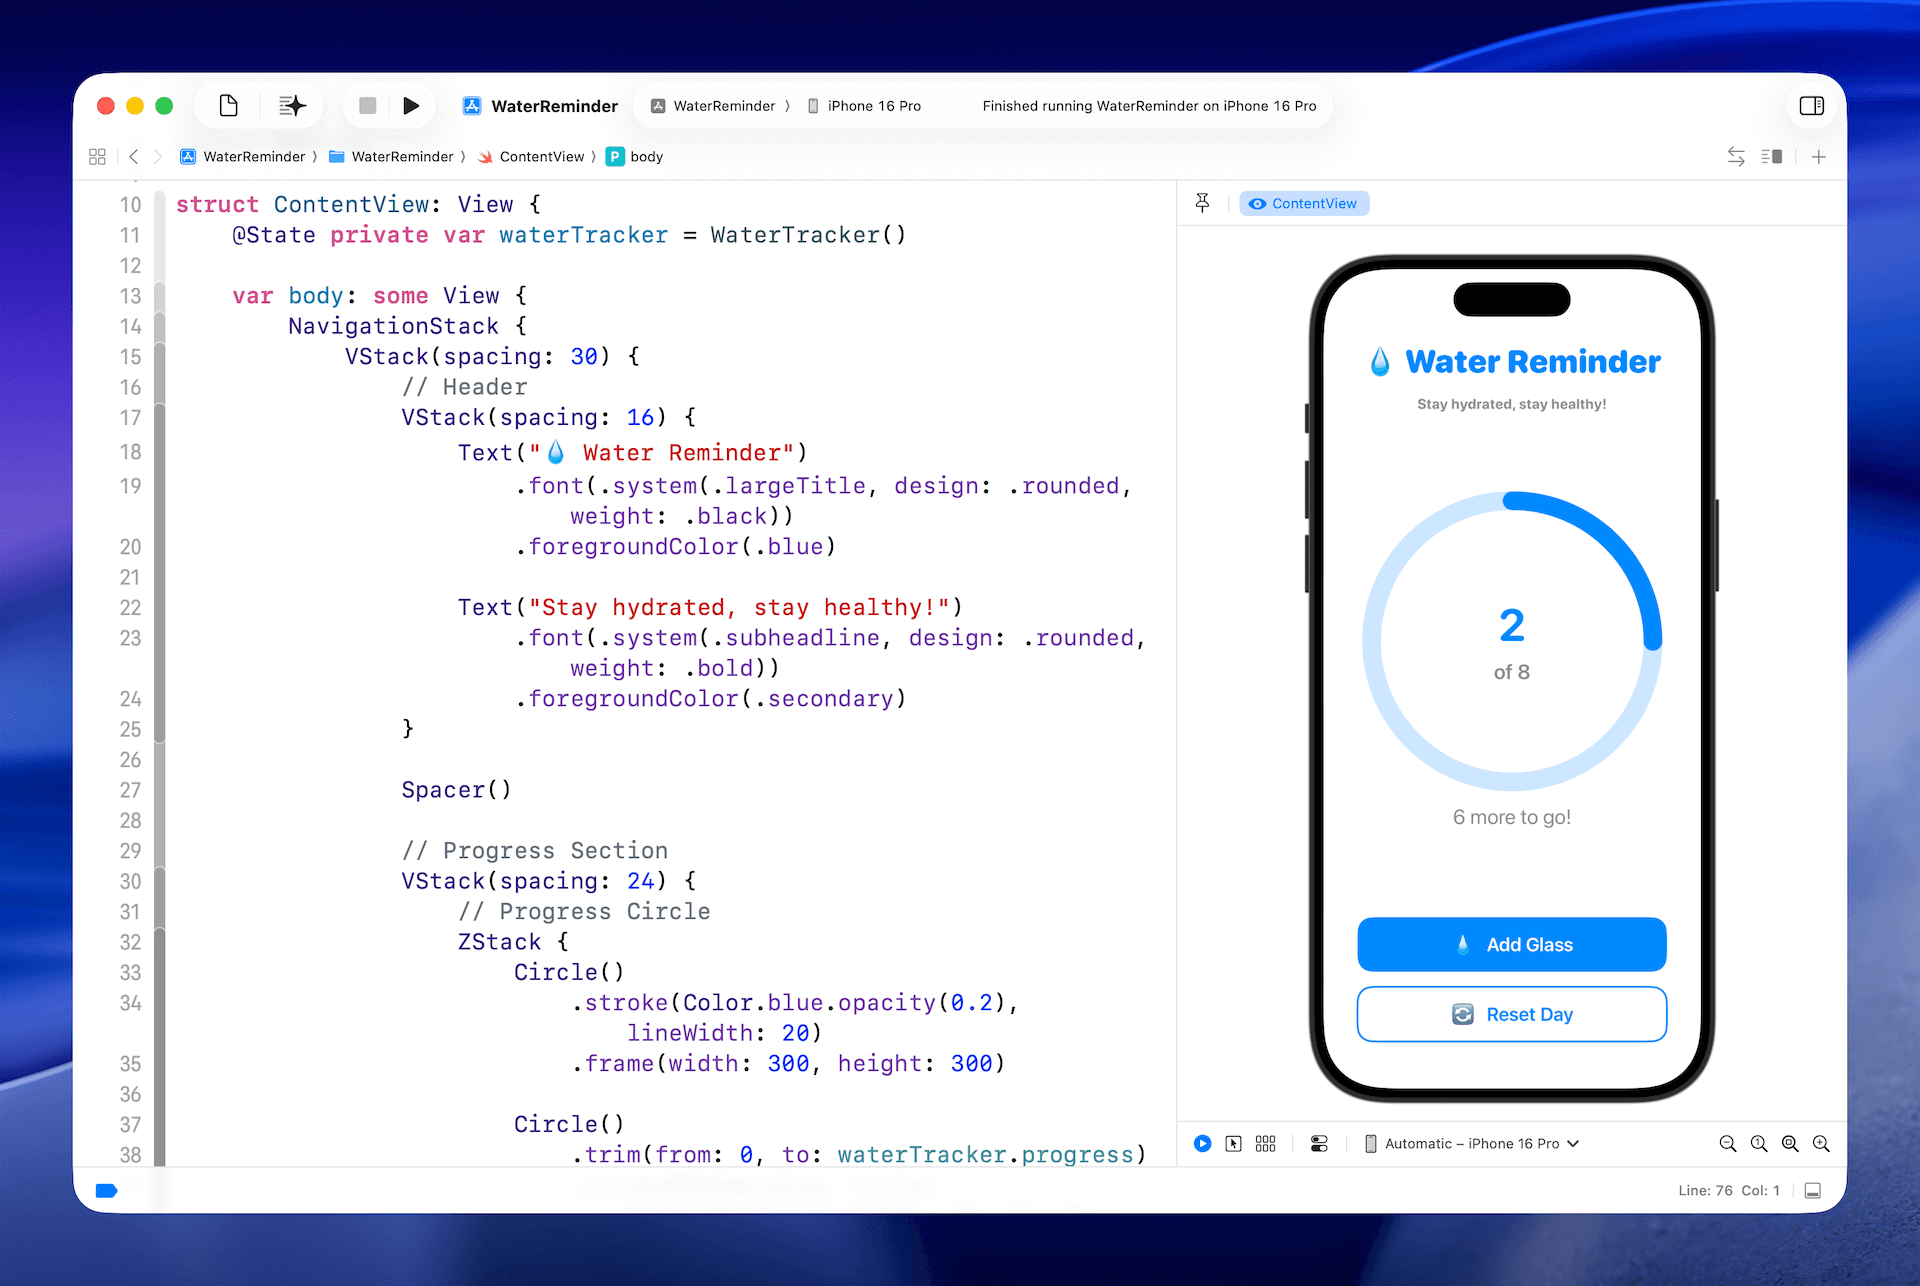
我們的 Demo App - Water Tracker,是一個簡單有趣的方式來追蹤每日的飲水量。你或許聽過每天喝八杯水是個好習慣,而這個 App 就能幫助你時刻關注這個目標。設計上特意保持極簡風格:有一個圓形進度條顯示完成度,每當你點擊 Add Glass 按鈕時,計數就會加一,進度條也會再填滿一些。
在背後,App 使用了一個 WaterTracker 類別來管理邏輯。這個類別會追蹤你已經記錄的杯數以及每日目標,讓 UI 總是能反映當前進度。以下是相關程式碼:
import Observation

@Observable
class WaterTracker {
    var currentGlasses: Int = 0
    var dailyGoal: Int = 8

    func addGlass() {
        guard currentGlasses < dailyGoal else { return }

        currentGlasses += 1
    }

    func resetDaily() {
        currentGlasses = 0
    }

    var progress: Double {
        Double(currentGlasses) / Double(dailyGoal)
    }

    var isGoalReached: Bool {
        currentGlasses >= dailyGoal
    }

}
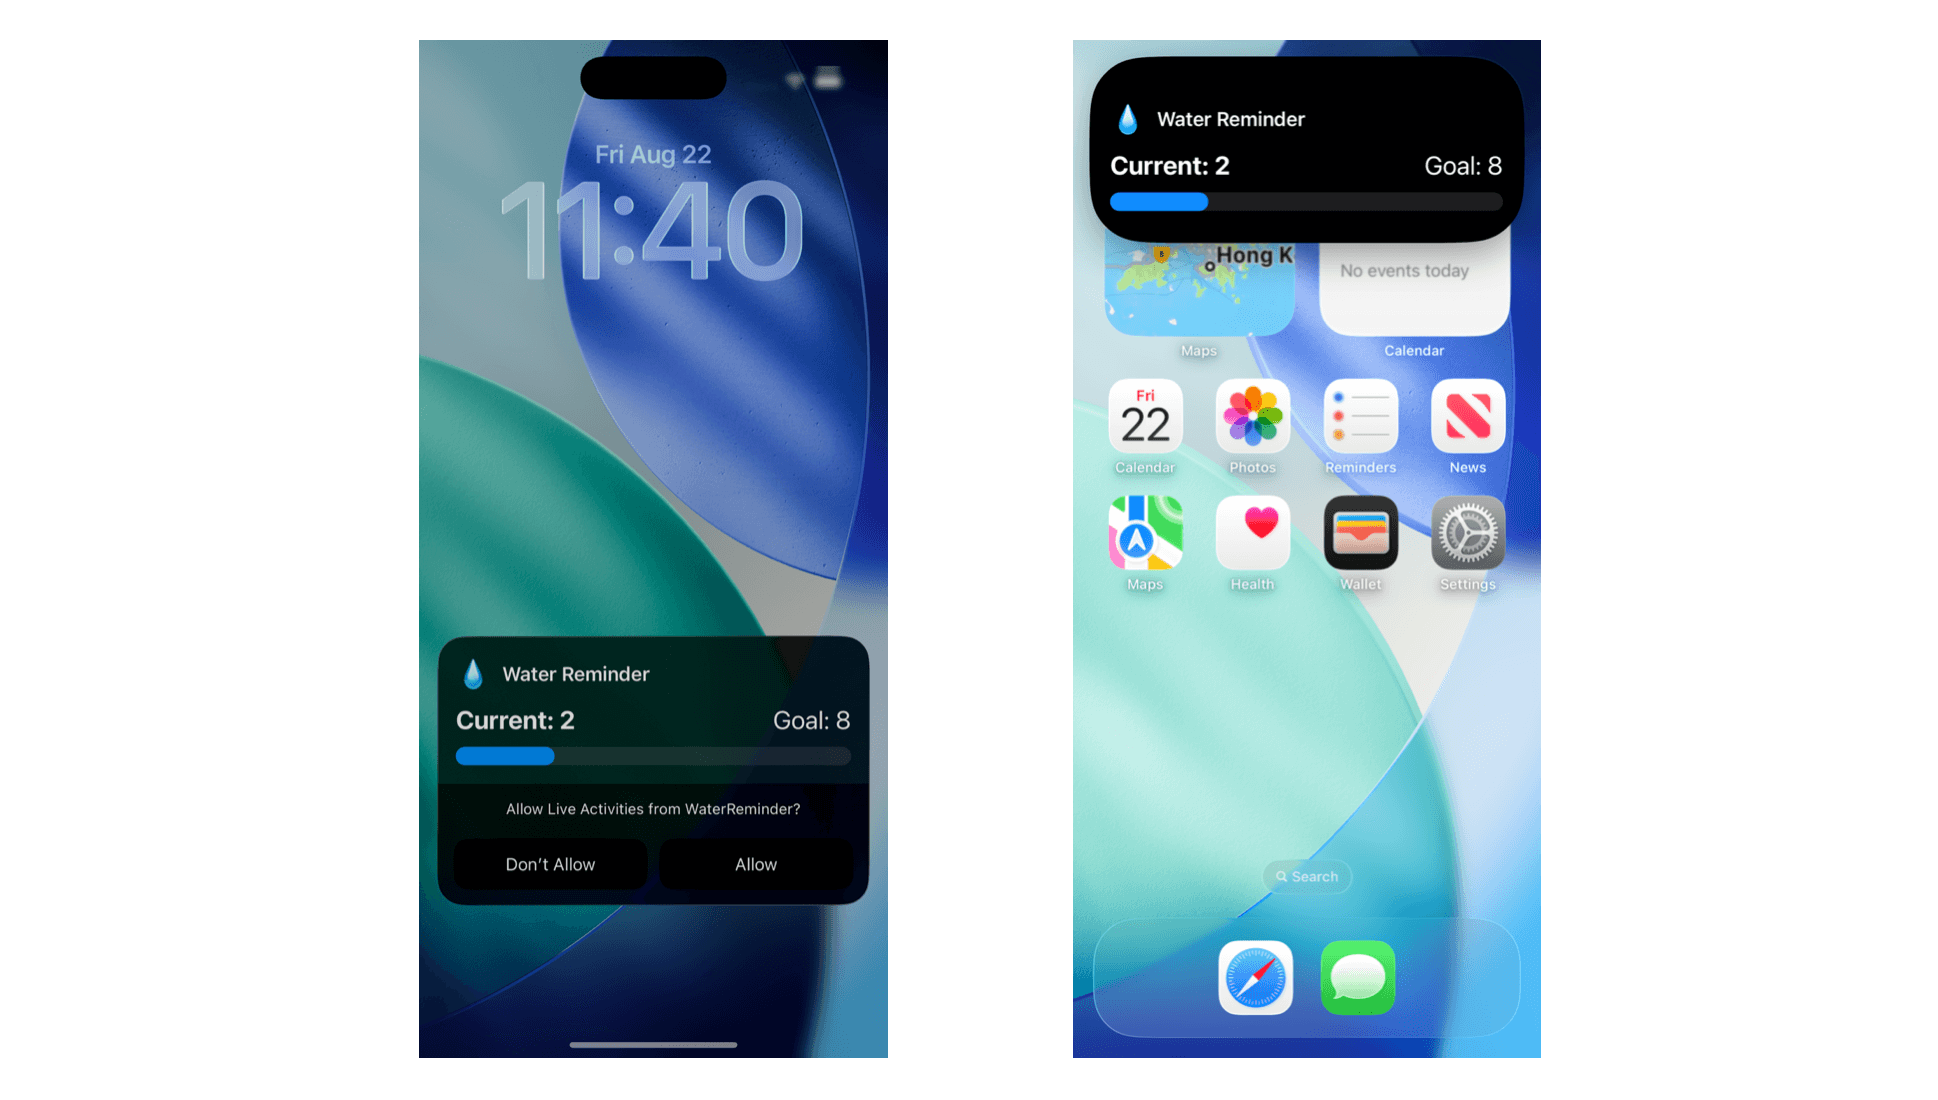
我們要做的是替這個 App 加上 Live Activities 支援。實作完成後,使用者就能直接在鎖定畫面和 Dynamic Island 上看到飲水進度。Live Activity 會清楚簡單地顯示當前的飲水量與每日目標。
建立 Live Activities 的 Widget Extension
Live Activities 是 App 的 widget extension 的一部分,所以第一步是在 Xcode 專案中加入一個 widget extension。
在這個 Demo 中,專案名稱是 WaterReminder。要建立 extension,選取專案,進入選單 Editor > Target > Add Target。在模板視窗中選擇 Widget Extension,輸入名稱,並勾選 Include Live Activity。
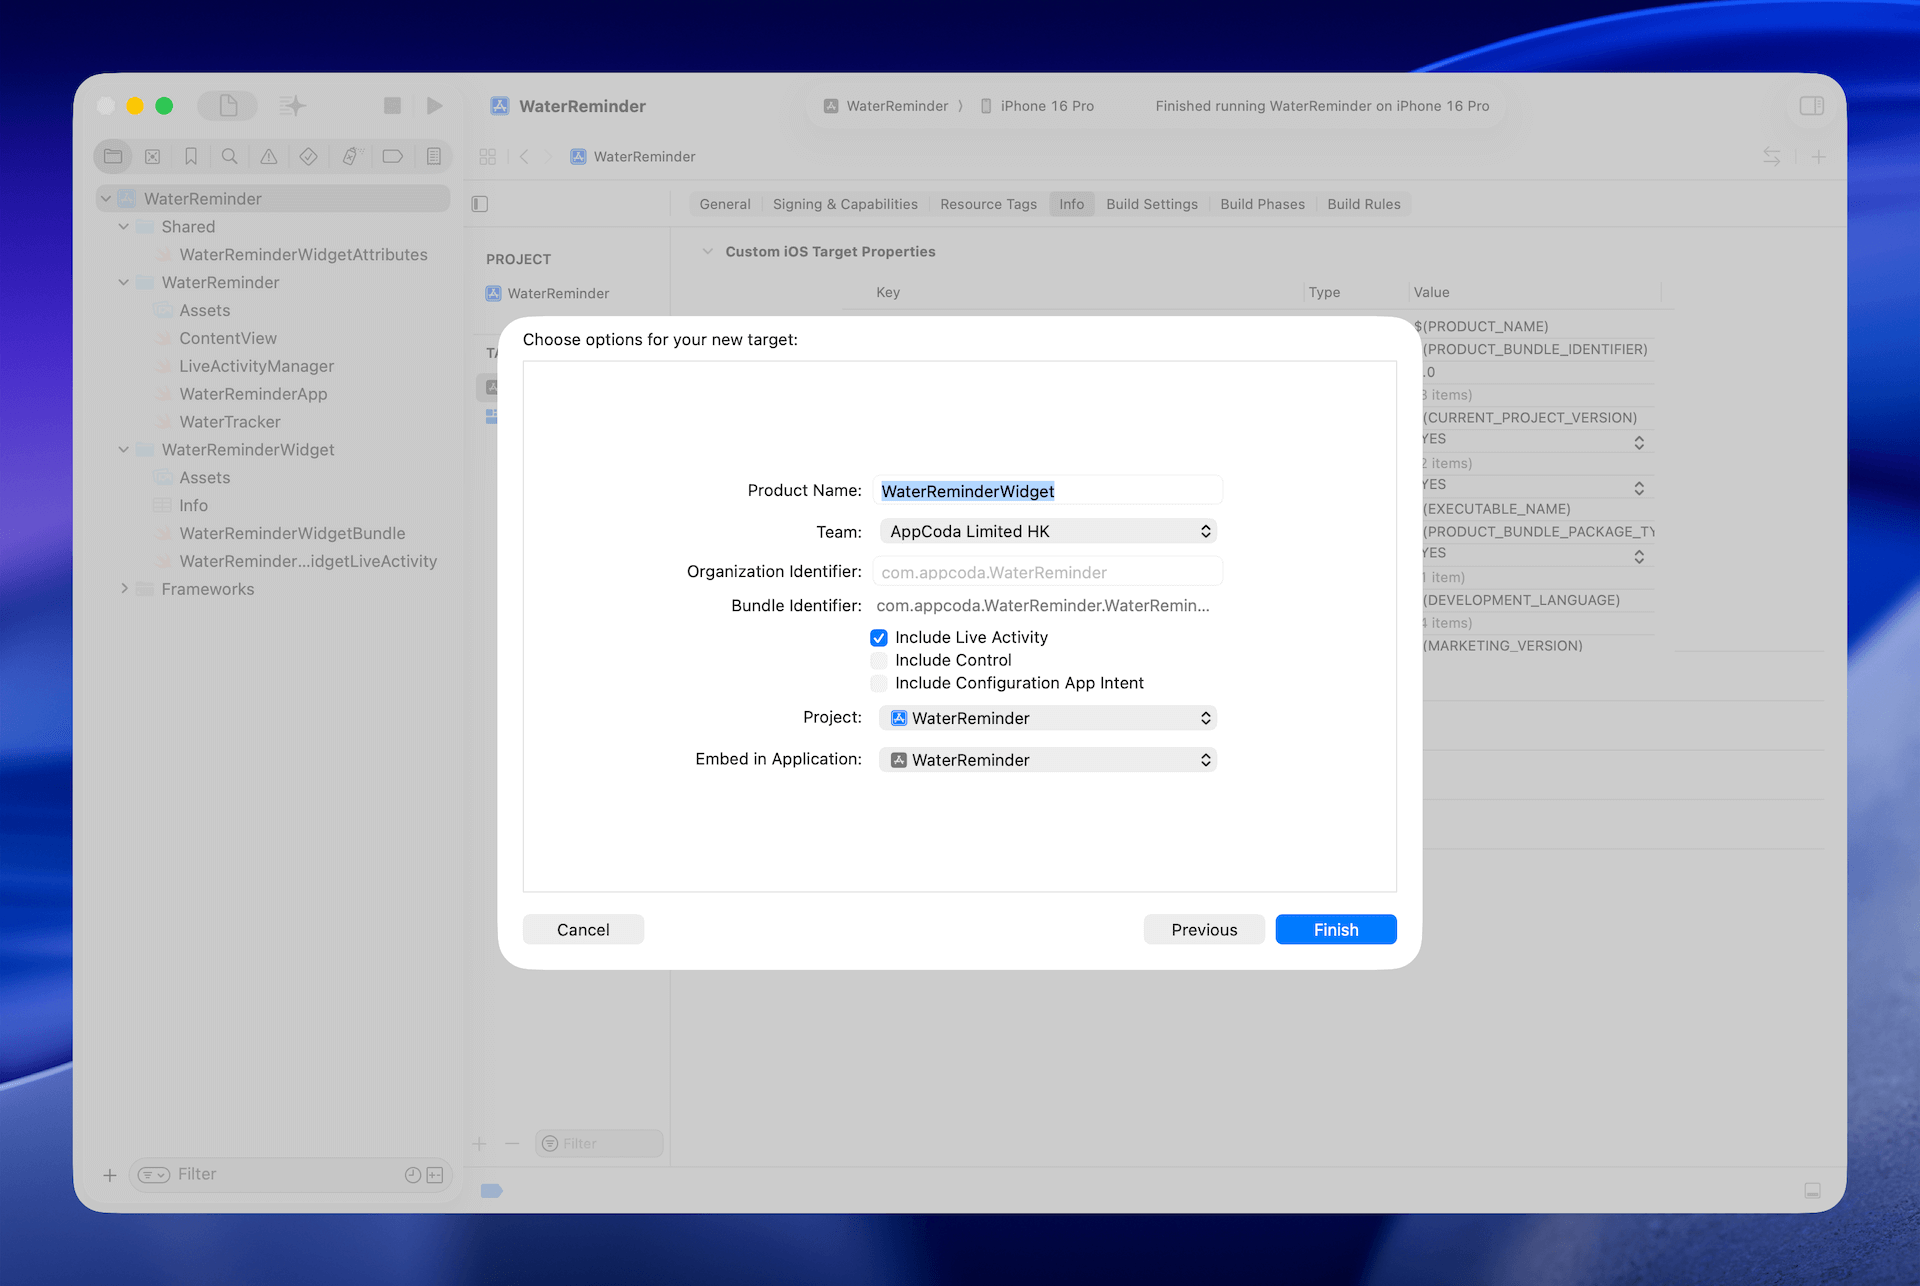
當 Xcode 詢問時,記得啟用新的 scheme。這樣它就會幫你產生 widget extension,在專案中新增一個資料夾,內含 Live Activity 和 widget 的初始程式碼。
接下來我們會完全重寫 WaterReminderWidgetLiveActivity.swift,所以建議先把裡面的程式碼清空。
由於 Live Activity 並不依賴 widget,你也可以選擇刪除 WaterReminderWidget.swift,並將 WaterReminderWidgetBundle 結構更新如下:
struct WaterReminderWidgetBundle: WidgetBundle {
    var body: some Widget {
        WaterReminderWidgetLiveActivity()
    }
}
定義 ActivityAttributes 結構
ActivityAttributes 協議描述了會出現在 Live Activity 裡的內容。我們需要實作這個協議,並定義活動的動態內容。
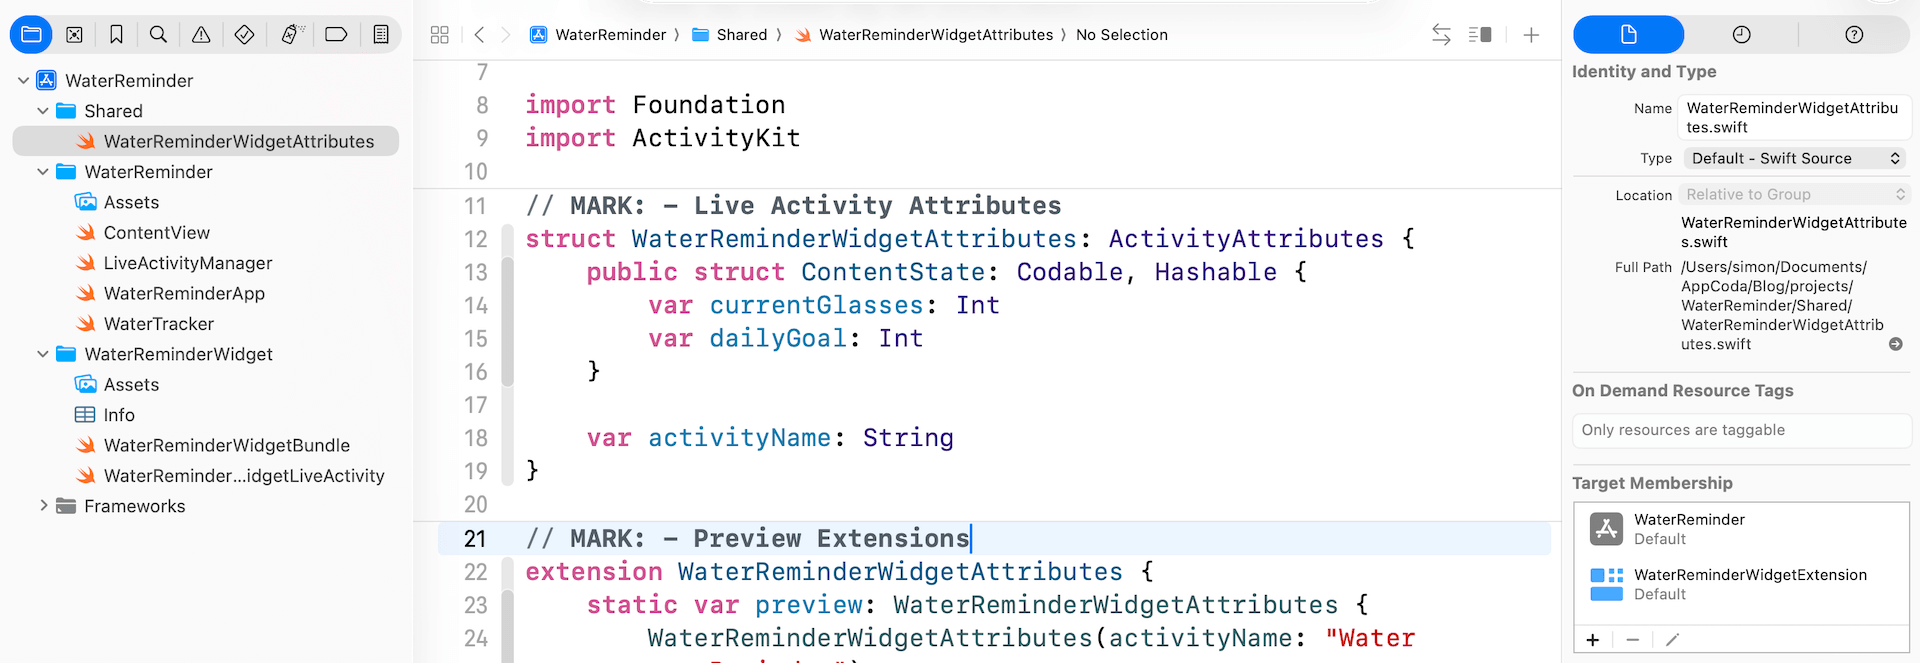
由於這個屬性結構通常會在主 App 和 widget extension 之間共用,我建議建立一個共享資料夾來放置這個 Swift 檔案。在專案資料夾中,建立一個名為 Shared 的新資料夾,然後新增一個名為 WaterReminderWidgetAttributes.swift 的 Swift 檔案。
把內容更新為以下程式碼:
import Foundation
import ActivityKit

struct WaterReminderWidgetAttributes: ActivityAttributes {
    public struct ContentState: Codable, Hashable {
        var currentGlasses: Int
        var dailyGoal: Int
    }

    var activityName: String
}

extension WaterReminderWidgetAttributes {
    static var preview: WaterReminderWidgetAttributes {
        WaterReminderWidgetAttributes(activityName: "Water Reminder")
    }
}

extension WaterReminderWidgetAttributes.ContentState {
     static var sample: WaterReminderWidgetAttributes.ContentState {
        WaterReminderWidgetAttributes.ContentState(currentGlasses: 3, dailyGoal: 8)
     }

    static var goalReached: WaterReminderWidgetAttributes.ContentState {
        WaterReminderWidgetAttributes.ContentState(currentGlasses: 8, dailyGoal: 8)
     }
}
WaterReminderWidgetAttributes 結構採用了 ActivityAttributes 協議,並包含一個 activityName 屬性來識別活動。為了符合協議,我們定義了一個巢狀的 ContentState 結構,用來存放會顯示在 Live Activity 中的資料——特別是已經喝了多少杯水,以及每日目標。
這些 extensions 則是用於 SwiftUI 的預覽,提供範例資料以便視覺化顯示。
請注意,這個檔案的 Target Membership 必須同時讓主 App 和 widget extension 可以存取。你可以在 Xcode 的檔案檢視器中確認這一點。
實作 Live Activity View
接下來,我們要實作 Live Activity View,它負責在不同情境下的使用者介面。
打開 WaterReminderWidgetLiveActivity.swift 檔案,並輸入以下程式碼:
import ActivityKit
import WidgetKit
import SwiftUI

struct WaterReminderLiveActivityView: View {

    let context: ActivityViewContext<WaterReminderWidgetAttributes>

    var body: some View {
        VStack(alignment: .leading, spacing: 10) {
            HStack {
                Text("💧")
                    .font(.title)
                Text("Water Reminder")
                    .font(.headline)
                    .fontWeight(.semibold)
                Spacer()
            }

            HStack {
                Text("Current: \(context.state.currentGlasses)")
                    .font(.title2)
                    .fontWeight(.bold)
                Spacer()
                Text("Goal: \(context.state.dailyGoal)")
                    .font(.title2)
            }

            // Progress bar
            Gauge(value: Double(context.state.currentGlasses), in: 0...Double(context.state.dailyGoal)) {
                EmptyView()
            }
            .gaugeStyle(.linearCapacity)
        }

    }
}
這個 view 定義了 Live Activity 的主要介面,會同時顯示在鎖定畫面和 Dynamic Island 上。它包含一個進度條,用來視覺化顯示飲水量,並搭配目前已喝的杯數與每日目標。
接下來,建立一個 WaterReminderWidgetLiveActivity 結構,如下所示:
struct WaterReminderWidgetLiveActivity: Widget {
    var body: some WidgetConfiguration {
        ActivityConfiguration(for: WaterReminderWidgetAttributes.self) { context in
            // Lock screen/banner UI goes here
            WaterReminderLiveActivityView(context: context)
                .padding()
        } dynamicIsland: { context in
            DynamicIsland {
                // Expanded UI goes here.  Compose the expanded UI through
                DynamicIslandExpandedRegion(.center) {
                    WaterReminderLiveActivityView(context: context)
                        .padding(.bottom)
                }
            } compactLeading: {
                Text("💧")
                    .font(.title3)
            } compactTrailing: {

                if context.state.currentGlasses == context.state.dailyGoal {
                    Image(systemName: "checkmark.circle")
                        .foregroundColor(.green)
                } else {
                    ZStack {
                        Circle()
                            .fill(Color.blue.opacity(0.2))
                            .frame(width: 24, height: 24)

                        Text("\(context.state.dailyGoal - context.state.currentGlasses)")
                            .font(.caption2)
                            .fontWeight(.bold)
                            .foregroundColor(.blue)
                    }
                }

            } minimal: {
                Text("💧")
                    .font(.title2)
            }
        }
    }
}
上面的程式碼定義了這個 App 的 Live Activity widget 配置。換句話說,你在這裡設定了 Live Activity 在不同情境下應該如何顯示。
為了保持簡單,我們讓鎖定畫面和 Dynamic Island 都顯示相同的 Live Activity view。
dynamicIsland 閉包則指定了 Live Activity 在 Dynamic Island 裡的顯示方式:
- 在展開的視圖中,中央區域會顯示相同的
WaterReminderLiveActivityView。 - 在精簡視圖中,左側顯示水滴 emoji,而右側會依據進度動態改變:如果達成每日目標,會顯示綠色的勾號;否則會顯示一個小圓形指示器,顯示剩餘的杯數。
- 在最小化視圖中,則只會顯示水滴 emoji。
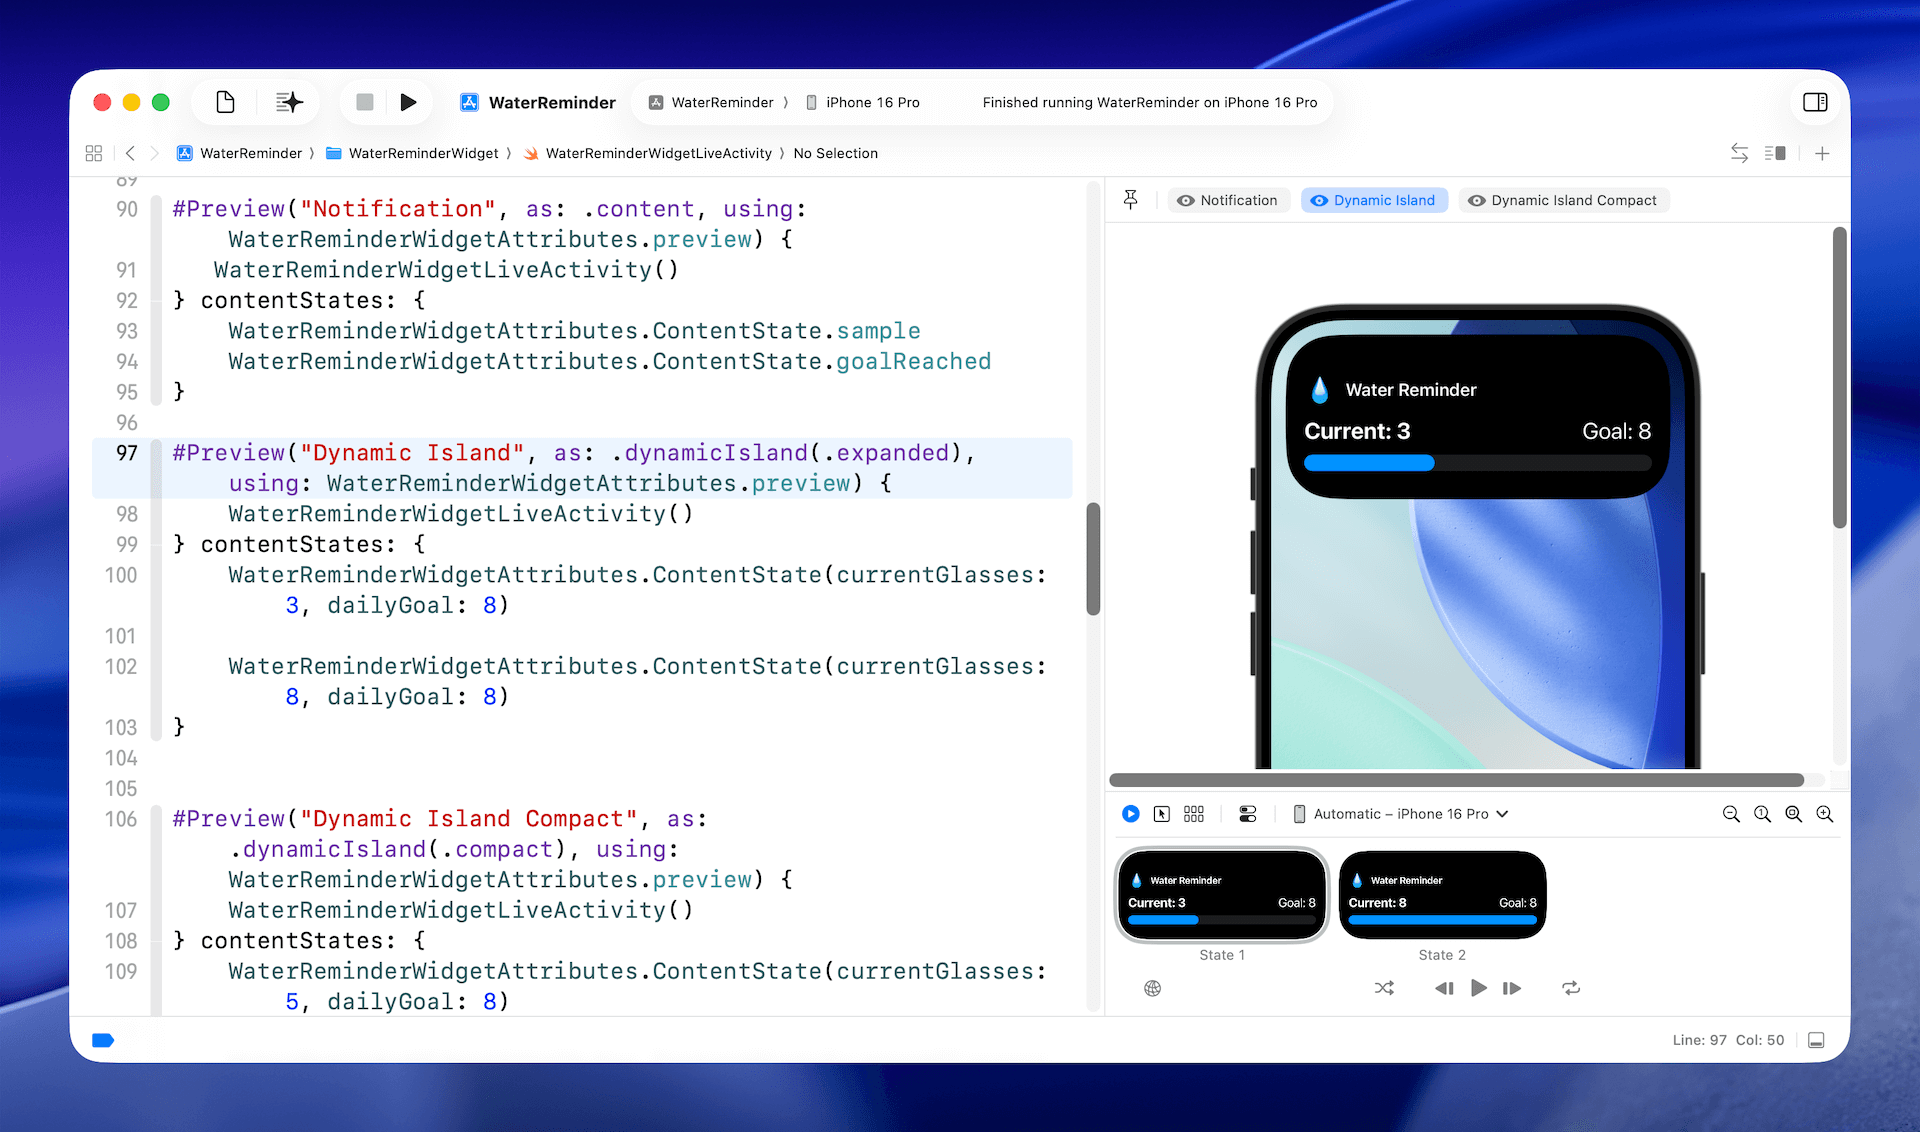
最後,我們加上一些預覽程式碼,用來渲染 Live Activity 的預覽畫面:
#Preview("Notification", as: .content, using: WaterReminderWidgetAttributes.preview) {
   WaterReminderWidgetLiveActivity()
} contentStates: {
    WaterReminderWidgetAttributes.ContentState.sample
    WaterReminderWidgetAttributes.ContentState.goalReached
}

#Preview("Dynamic Island", as: .dynamicIsland(.expanded), using: WaterReminderWidgetAttributes.preview) {
    WaterReminderWidgetLiveActivity()
} contentStates: {
    WaterReminderWidgetAttributes.ContentState(currentGlasses: 3, dailyGoal: 8)

    WaterReminderWidgetAttributes.ContentState(currentGlasses: 8, dailyGoal: 8)
}

#Preview("Dynamic Island Compact", as: .dynamicIsland(.compact), using: WaterReminderWidgetAttributes.preview) {
    WaterReminderWidgetLiveActivity()
} contentStates: {
    WaterReminderWidgetAttributes.ContentState(currentGlasses: 5, dailyGoal: 8)
Xcode 可讓你在不同狀態下預覽 Live Activity,而無需在模擬器或實體裝置上執行應用程式。透過設定多個預覽程式碼片段,你可以快速測試 Live Activity 在鎖定畫面與動態島上的呈現方式。
管理 Live Activities
既然我們已經準備好 Live Activity 的檢視,接下來要做的就是在使用者點擊 Add Glass 按鈕時觸發它。為了讓程式碼更有條理,我們會建立一個名為 LiveActivityManager 的輔助類別,用來管理 Live Activity 的生命週期。
import Foundation
import ActivityKit
import SwiftUI

@Observable
class LiveActivityManager {
    private var liveActivity: Activity<WaterReminderWidgetAttributes>?

    var isLiveActivityActive: Bool {
        liveActivity != nil
    }

    // MARK: - Live Activity Management

    func startLiveActivity(currentGlasses: Int, dailyGoal: Int) {
        guard ActivityAuthorizationInfo().areActivitiesEnabled else {
            print("Live Activities are not enabled")
            return
        }

        // End any existing activity first
        endLiveActivity()

        let attributes = WaterReminderWidgetAttributes(activityName: "Water Reminder")
        let contentState = WaterReminderWidgetAttributes.ContentState(
            currentGlasses: currentGlasses,
            dailyGoal: dailyGoal
        )

        do {
            liveActivity = try Activity<WaterReminderWidgetAttributes>.request(
                attributes: attributes,
                content: ActivityContent(state: contentState, staleDate: nil),
                pushType: nil
            )
            print("Live Activity started successfully")
        } catch {
            print("Error starting live activity: \(error)")
        }
    }

    func updateLiveActivity(currentGlasses: Int, dailyGoal: Int) {
        guard let liveActivity = liveActivity else { return }

        Task {
            let contentState = WaterReminderWidgetAttributes.ContentState(
                currentGlasses: currentGlasses,
                dailyGoal: dailyGoal
            )

            await liveActivity.update(ActivityContent(state: contentState, staleDate: nil))
            print("Live Activity updated: \(currentGlasses)/\(dailyGoal)")
        }
    }

    func endLiveActivity() {
        guard let liveActivity = liveActivity else { return }

        Task {
            await liveActivity.end(nil, dismissalPolicy: .immediate)
            self.liveActivity = nil
            print("Live Activity ended")
        }
    }

}
這段程式碼會搭配先前定義的 WaterReminderWidgetAttributes,用來管理 Live Activity 的狀態。
當新的 Live Activity 啟動時,程式碼會先檢查裝置上是否已啟用 Live Activities,並清除任何重複項目。接著設定屬性,並使用 request 方法向系統要求建立新的 Live Activity。
更新 Live Activity 很直接:只要更新屬性的內容狀態,並在 Live Activity 物件上呼叫 updatemethod。
最後,這個類別包含一個輔助方法,可在需要時結束目前作用中的 Live Activity。
使用 Live Activity Manager
設定好 Live Activity Manager 之後,我們現在可以更新 WaterTracker 類別以與其配合。首先,在類別中宣告一個屬性來持有 LiveActivityManager 物件:
let liveActivityManager = LiveActivityManager()接著,像這樣更新 addGlass() 方法:
func addGlass() {
    guard currentGlasses < dailyGoal else { return }

    currentGlasses += 1

    if currentGlasses == 1 {
        liveActivityManager.startLiveActivity(currentGlasses: currentGlasses, dailyGoal: dailyGoal)
    } else {
        liveActivityManager.updateLiveActivity(currentGlasses: currentGlasses, dailyGoal: dailyGoal)
    }
}
當按鈕首次被點擊時,我們呼叫 startLiveActivity 方法來啟動 live activity。之後的點擊,我們只需更新 live activity 的內容狀態。
當使用者點擊重設按鈕時,應結束該 live activity。因此,像下面這樣更新 resetDaily 方法:
func resetDaily() {
    currentGlasses = 0

    liveActivityManager.endLiveActivity()
}
就是這樣!我們已完成所有程式碼變更。
更新 Info.plist
在你的應用程式能執行 Live Activities 之前,我們必須在主應用程式的 Info.plist 檔案中新增一個名為 Supports Live Activities 的項目。將其值設為 YES 以啟用 Live Activities。
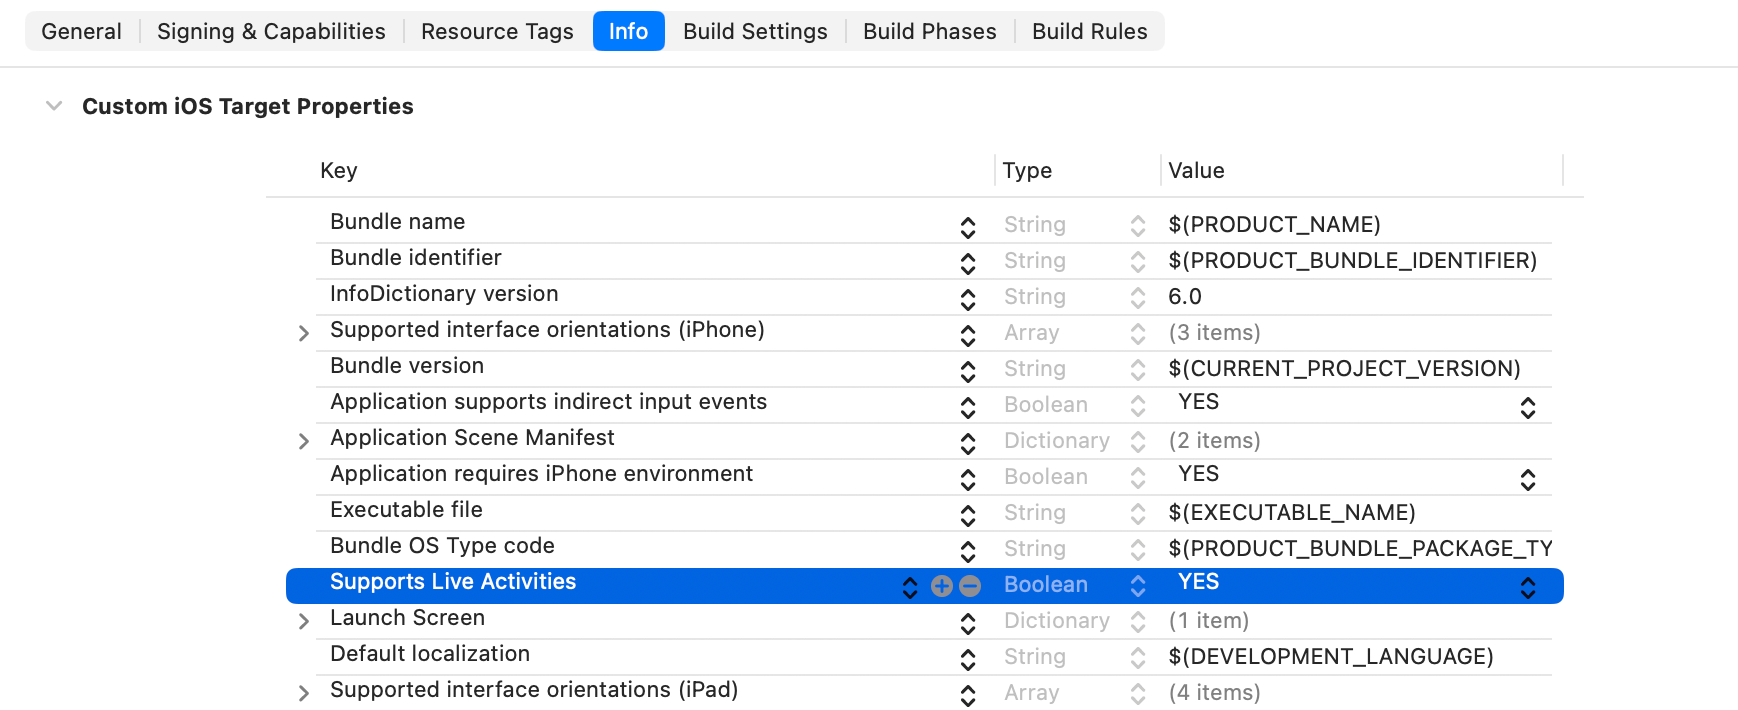
現在你可以在模擬器中或直接在實體裝置上試用 Live Activities。
總結
在本教學中,我們探索了如何將 Live Activities 加入 SwiftUI 應用程式。你已學會這些功能如何透過直接將即時資訊呈現在鎖定畫面與動態島上來提升使用者參與度,並降低使用者重新開啟你的應用程式的需求。
我們涵蓋了整個流程,包括建立資料模型、設計使用者介面,以及管理 Live Activity 的生命週期。我們鼓勵你將 Live Activities 整合到現有或未來的應用程式中,以提供更豐富且更便利的使用者體驗。


