

Vision 框架在 2017 年推出,目的是為了讓行動 App 開發者輕鬆利用電腦視覺演算法。具體來說,Vision 框架中包含了許多預先訓練好的深度學習模型,同時也能充當包裹器 (wrapper) 來快速執行你客製化的 Core ML 模型。
Apple 在 iOS 13 推出了文字辨識 (Text Recognition) 和 VisionKit 來增強 OCR 之後,現在將重點轉向了 iOS 14 Vision 框架中的運動與動作分類上。
在之前的文章中,我們說過 Vision 框架可以做輪廓偵測 (Contour Detection)、光流請求 (Optical Flow Request),並提供一系列離線影片處理 (offline video processing) 的工具。不過更重要的是,我們現在可以進行手部與身體姿勢估測 (Hand and Body Pose Estimation) ,這無疑為擴增實境 (augmented reality) 與電腦視覺帶來了更多可能性。
在這篇文章中,我們會以手勢估測功能來建構一個 iOS App,在無接觸 (touchless) 的情況下 ,App 也能夠感應手勢。
我之前已經發表過一篇文章,展示如何使用 ML Kit 的臉部偵測 API,來建構無接觸滑動的 iOS App。我覺得這個雛型 (prototype) 非常好用,可以整合到像是 Tinder 或 Bumble 等這種約會 App 中。不過,這種方式可能會因為持續眨眼和轉動頭部,而造成眼睛疲勞或頭痛。
因此,我們簡單地擴展這個範例,透過手勢代替觸摸,來往左或往右滑動。畢竟近年來說,使用手機來生活得更懶惰、或是練習社交距離也是合理的。在我們深入研究之前,先來看看如何在 iOS 14 中創建一個視覺手勢請求。
視覺手勢估測
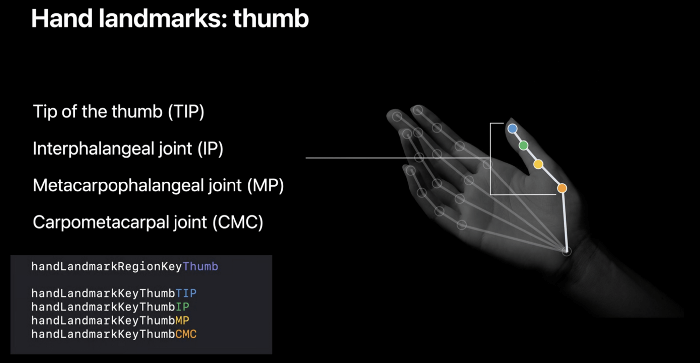
這個新的 VNDetectHumanHandPoseRequest,是一個基於影像的視覺請求,用來偵測一個人的手勢。在型別為 VNHumanHandPoseObservation 的實例當中,這個請求會在每隻手上回傳 21 個標記點 (Landmark Point)。我們可以設定 maximumHandCount 數值,來控制在視覺處理過程之中,每張幀最多可以偵測的數量。
我們可以簡單地在實例中如此使用列舉 (enum),來獲得每隻手指的標記點陣列 (array):
try observation.recognizedPoints(.thumb)
try observation.recognizedPoints(.indexFinger)
try observation.recognizedPoints(.middleFinger)
try observation.recognizedPoints(.ringFinger)
try observation.recognizedPoints(.littleFinger)
這裡也有一個手腕的標記點,位置就在手腕的中心點位置。它並不屬於上述的任何群組,而是在 all 群組之中。你可以透過下列方式獲得它:
let wristPoints = try observation.recognizedPoints(.all)我們拿到上述的標記點陣列後,就可以這樣將每個點獨立抽取出來:
guard let thumbTipPoint = thumbPoints[.thumbTip],
let indexTipPoint = indexFingerPoints[.indexTip],
let middleTipPoint = middleFingerPoints[.middleTip],
let ringTipPoint = ringFingerPoints[.ringTip],
let littleTipPoint = littleFingerPoints[.littleTip],
let wristPoint = wristPoints[.wrist]else {return}thumbIP、thumbMP、thumbCMC 是可以在 thumb 群組中獲取的其他標記點,這也適用於其他手指。
每個獨立的標記點物件,都包含了它們在 AVFoundation 座標系統中的位置及 confidence 閥值 (threshold)。
接著,我們可以在點跟點之間找到距離或角度的資訊,來創建手勢處理器。舉例來說,在 Apple 的範例 App 中,他們計算拇指與食指指尖的距離,來創建一個捏 (pinch) 的手勢。
開始動工
現在我們已經了解視覺手勢請求的基礎知識,可以開始深入研究如何實作了!
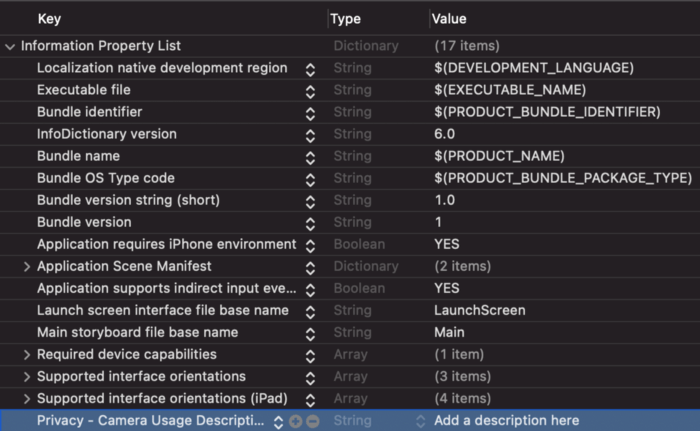
開啟 Xcode 並創建一個新的 UIKit App,請確認你有將開發目標設定為 iOS 14,並在 Info.plist 設置 NSCameraUsageDescription 字串。
我在前一篇文章介紹過如何建立一個帶有動畫的 Tinder 樣式卡片,現在可以直接參考當時的最終程式碼。
同樣地,你可以在這裡參考 StackContainerView.swift 類別的程式碼,這個類別是用來儲存多個 Tinder 卡片的。
利用 AVFoundation 設置相機
接下來,讓我們利用 Apple 的 AVFoundation 框架來建立一個客製化相機。
以下是 ViewController.swift 檔案的程式碼:
class ViewController: UIViewController, HandSwiperDelegate{

    //MARK: - Properties
    var modelData = [DataModel(bgColor: .systemYellow),
                         DataModel(bgColor: .systemBlue),
                         DataModel(bgColor: .systemRed),
                         DataModel(bgColor: .systemTeal),
                         DataModel(bgColor: .systemOrange),
                         DataModel(bgColor: .brown)]

    var stackContainer : StackContainerView!


    var buttonStackView: UIStackView!
    var leftButton : UIButton!, rightButton : UIButton!
    var cameraView : CameraView!

    //MARK: - Init
    override func loadView() {
        view = UIView()
        stackContainer = StackContainerView()
        view.addSubview(stackContainer)
        configureStackContainer()
        stackContainer.translatesAutoresizingMaskIntoConstraints = false

        addButtons()
        configureNavigationBarButtonItem()
        addCameraView()
    }

    override func viewDidLoad() {
        super.viewDidLoad()
        title = "HandPoseSwipe"
        stackContainer.dataSource = self
    }

    private let videoDataOutputQueue = DispatchQueue(label: "CameraFeedDataOutput", qos: .userInteractive)
    private var cameraFeedSession: AVCaptureSession?
    private var handPoseRequest = VNDetectHumanHandPoseRequest()
    let message = UILabel()
    var handDelegate : HandSwiperDelegate?

    func addCameraView()
    {
        cameraView = CameraView()
        self.handDelegate = self
        view.addSubview(cameraView)

        cameraView.translatesAutoresizingMaskIntoConstraints = false
        cameraView.bottomAnchor.constraint(equalTo: view.bottomAnchor).isActive = true
        cameraView.centerXAnchor.constraint(equalTo: view.centerXAnchor).isActive = true
        cameraView.widthAnchor.constraint(equalToConstant: 150).isActive = true
        cameraView.heightAnchor.constraint(equalToConstant: 150).isActive = true
    }

    //MARK: - Configurations
    func configureStackContainer() {
        stackContainer.centerXAnchor.constraint(equalTo: view.centerXAnchor).isActive = true
        stackContainer.centerYAnchor.constraint(equalTo: view.centerYAnchor, constant: -60).isActive = true
        stackContainer.widthAnchor.constraint(equalToConstant: 300).isActive = true
        stackContainer.heightAnchor.constraint(equalToConstant: 400).isActive = true
    }

    func addButtons()
    {
        //full source of UI setup at the end of this article
    }

    @objc func onButtonPress(sender: UIButton){


        UIView.animate(withDuration: 2.0,
                                   delay: 0,
                                   usingSpringWithDamping: CGFloat(0.20),
                                   initialSpringVelocity: CGFloat(6.0),
                                   options: UIView.AnimationOptions.allowUserInteraction,
                                   animations: {
                                    sender.transform = CGAffineTransform.identity
                                   },
                                   completion: { Void in()  })

        if let firstView = stackContainer.subviews.last as? TinderCardView{
            if sender.tag == 0{
                firstView.leftSwipeClicked(stackContainerView: stackContainer)
            }
            else{
                firstView.rightSwipeClicked(stackContainerView: stackContainer)
            }
        }
    }

    func configureNavigationBarButtonItem() {
        navigationItem.rightBarButtonItem = UIBarButtonItem(title: "Reset", style: .plain, target: self, action: #selector(resetTapped))
    }

    @objc func resetTapped() {
        stackContainer.reloadData()
    }

    override func viewDidAppear(_ animated: Bool) {
        super.viewDidAppear(animated)
        do {
            if cameraFeedSession == nil {
                cameraView.previewLayer.videoGravity = .resizeAspectFill
                try setupAVSession()
                cameraView.previewLayer.session = cameraFeedSession
            }
            cameraFeedSession?.startRunning()
        } catch {
            AppError.display(error, inViewController: self)
        }
    }

    override func viewWillDisappear(_ animated: Bool) {
        cameraFeedSession?.stopRunning()
        super.viewWillDisappear(animated)
    }

    func setupAVSession() throws {
        // Select a front facing camera, make an input.
        guard let videoDevice = AVCaptureDevice.default(.builtInWideAngleCamera, for: .video, position: .front) else {
            throw AppError.captureSessionSetup(reason: "Could not find a front facing camera.")
        }

        guard let deviceInput = try? AVCaptureDeviceInput(device: videoDevice) else {
            throw AppError.captureSessionSetup(reason: "Could not create video device input.")
        }

        let session = AVCaptureSession()
        session.beginConfiguration()
        session.sessionPreset = AVCaptureSession.Preset.high

        // Add a video input.
        guard session.canAddInput(deviceInput) else {
            throw AppError.captureSessionSetup(reason: "Could not add video device input to the session")
        }
        session.addInput(deviceInput)

        let dataOutput = AVCaptureVideoDataOutput()
        if session.canAddOutput(dataOutput) {
            session.addOutput(dataOutput)
            // Add a video data output.
            dataOutput.alwaysDiscardsLateVideoFrames = true
            dataOutput.videoSettings = [kCVPixelBufferPixelFormatTypeKey as String: Int(kCVPixelFormatType_420YpCbCr8BiPlanarFullRange)]
            dataOutput.setSampleBufferDelegate(self, queue: videoDataOutputQueue)
        } else {
            throw AppError.captureSessionSetup(reason: "Could not add video data output to the session")
        }
        session.commitConfiguration()
        cameraFeedSession = session
    }

}
在上面的程式碼中包含了許多步驟,讓我們一一來分析:
CameraView是一個客製化的 UIView 類別,用來在畫面上呈現相機的內容。之後我們會進一步講解這個類別。- 我們會在
setupAVSession()設置前置相機鏡頭,並將它設置為AVCaptureSession的輸入。 - 接著,我們在
AVCaptureVideoDataOutput上呼叫setSampleBufferDelegate。
而 ViewController 類別要遵循 HandSwiperDelegate 協定:
protocol HandSwiperDelegate {
  func thumbsDown()
  func thumbsUp()
}
當偵測到手勢後,我們將會觸發相對應的方法。現在,讓我們來看看要如何在捕捉到的影像中執行視覺請求。
在捕捉到的影像中執行視覺手勢請求
在以下程式碼中,我們為上述的 ViewController 創建了一個擴展 (extension),而這個擴展遵循 AVCaptureVideoDataOutputSampleBufferDelegate 協定:
extension ViewController: AVCaptureVideoDataOutputSampleBufferDelegate {
    public func captureOutput(_ output: AVCaptureOutput, didOutput sampleBuffer: CMSampleBuffer, from connection: AVCaptureConnection) {

        var thumbTip: CGPoint?
        var wrist: CGPoint?

        let handler = VNImageRequestHandler(cmSampleBuffer: sampleBuffer, orientation: .up, options: [:])
        do {

            // Perform VNDetectHumanHandPoseRequest
            try handler.perform([handPoseRequest])
            guard let observation = handPoseRequest.results?.first else {
                cameraView.showPoints([])
                return
            }

            // Get points for all fingers
            let thumbPoints = try observation.recognizedPoints(.thumb)
            let wristPoints = try observation.recognizedPoints(.all)
            let indexFingerPoints = try observation.recognizedPoints(.indexFinger)
            let middleFingerPoints = try observation.recognizedPoints(.middleFinger)
            let ringFingerPoints = try observation.recognizedPoints(.ringFinger)
            let littleFingerPoints = try observation.recognizedPoints(.littleFinger)

            // Extract individual points from Point groups.
            guard let thumbTipPoint = thumbPoints[.thumbTip],
                  let indexTipPoint = indexFingerPoints[.indexTip],
                  let middleTipPoint = middleFingerPoints[.middleTip],
                  let ringTipPoint = ringFingerPoints[.ringTip],
                  let littleTipPoint = littleFingerPoints[.littleTip],
                  let wristPoint = wristPoints[.wrist]
            else {
                cameraView.showPoints([])
                return
            }

            let confidenceThreshold: Float = 0.3
            guard   thumbTipPoint.confidence > confidenceThreshold &&
                    indexTipPoint.confidence > confidenceThreshold &&
                    middleTipPoint.confidence > confidenceThreshold &&
                    ringTipPoint.confidence > confidenceThreshold &&
                    littleTipPoint.confidence > confidenceThreshold &&
                    wristPoint.confidence > confidenceThreshold

            else {
                cameraView.showPoints([])
                return
            }

            // Convert points from Vision coordinates to AVFoundation coordinates.
            thumbTip = CGPoint(x: thumbTipPoint.location.x, y: 1 - thumbTipPoint.location.y)
            wrist = CGPoint(x: wristPoint.location.x, y: 1 - wristPoint.location.y)

            DispatchQueue.main.async {
                self.processPoints([thumbTip, wrist])
            }
        } catch {
            cameraFeedSession?.stopRunning()
            let error = AppError.visionError(error: error)
            DispatchQueue.main.async {
                error.displayInViewController(self)
            }
        }
    }
}值得注意的是,VNObservation 所回傳的標記點是屬於 Vision 座標系統的。我們必須將它們轉換成 UIKit 座標,才能將它們繪製在螢幕上。
因此,我們透過以下方式將它們轉換為 AVFoundation 座標:
wrist = CGPoint(x: wristPoint.location.x, y: 1 - wristPoint.location.y)接著,我們將會把這些標記點傳遞給 processPoints 函式。為了精簡流程,這裡我們只用了拇指指尖與手腕兩個標記點來偵測手勢。
以下是 processPoints 函式的程式碼:
func processPoints(_ points: [CGPoint?]) {

        let previewLayer = cameraView.previewLayer
        var pointsConverted: [CGPoint] = []
        for point in points {
            pointsConverted.append(previewLayer.layerPointConverted(fromCaptureDevicePoint: point!))
        }

        let thumbTip = pointsConverted[0]
        let wrist = pointsConverted[pointsConverted.count - 1]

        let yDistance  = thumbTip.y - wrist.y

        if(yDistance > 50){

            if self.restingHand{
                self.restingHand = false
                self.handDelegate?.thumbsDown()
            }

        }else if(yDistance < -50){

            if self.restingHand{
                self.restingHand = false
                self.handDelegate?.thumbsUp()
            }
        }
        else{
            self.restingHand = true
        }

        cameraView.showPoints(pointsConverted)
    }
我們可以利用以下這行程式碼,將 AVFoundation 座標轉換為 UIKit 座標:
previewLayer.layerPointConverted(fromCaptureDevicePoint: point!)最後,我們會依據兩個標記點之間的絕對閾值距離,觸發對推疊卡片往左或往右滑動的動作。
我們利用 cameraView.showPoints(pointsConverted),在 CameraView 子圖層上繪製一條連接兩個標記點的直線。
以下是 CameraView 類別的完整程式碼:
import UIKit
import AVFoundation

class CameraView: UIView {

    private var overlayThumbLayer = CAShapeLayer()

    var previewLayer: AVCaptureVideoPreviewLayer {
        return layer as! AVCaptureVideoPreviewLayer
    }

    override class var layerClass: AnyClass {
        return AVCaptureVideoPreviewLayer.self
    }

    override init(frame: CGRect) {
        super.init(frame: frame)
        setupOverlay()
    }

    required init?(coder: NSCoder) {
        super.init(coder: coder)
        setupOverlay()
    }

    override func layoutSublayers(of layer: CALayer) {
        super.layoutSublayers(of: layer)
        if layer == previewLayer {
            overlayThumbLayer.frame = layer.bounds
        }
    }

    private func setupOverlay() {
        previewLayer.addSublayer(overlayThumbLayer)
    }

    func showPoints(_ points: [CGPoint]) {

        guard let wrist: CGPoint = points.last else {
            // Clear all CALayers
            clearLayers()
            return
        }

        let thumbColor = UIColor.green
        drawFinger(overlayThumbLayer, Array(points[0...1]), thumbColor, wrist)
    }

    func drawFinger(_ layer: CAShapeLayer, _ points: [CGPoint], _ color: UIColor, _ wrist: CGPoint) {
        let fingerPath = UIBezierPath()

        for point in points {
            fingerPath.move(to: point)
            fingerPath.addArc(withCenter: point, radius: 5, startAngle: 0, endAngle: 2 * .pi, clockwise: true)
        }

        fingerPath.move(to: points[0])
        fingerPath.addLine(to: points[points.count - 1])

        layer.fillColor = color.cgColor
        layer.strokeColor = color.cgColor
        layer.lineWidth = 5.0
        layer.lineCap = .round
        CATransaction.begin()
        CATransaction.setDisableActions(true)
        layer.path = fingerPath.cgPath
        CATransaction.commit()
    }

    func clearLayers() {
        let emptyPath = UIBezierPath()
        CATransaction.begin()
        CATransaction.setDisableActions(true)
        overlayThumbLayer.path = emptyPath.cgPath
        CATransaction.commit()
    }
}
最終成果
最終 App 的成果會是這樣:
結論
我們可以在許多情況下用到 Vision 新的手勢估測請求,包括利用手勢來進行自拍、繪製簽名,甚至是辨識川普在演講當中不同的手勢。
你也可以將視覺請求與身體姿勢請求串接在一起,用來建構更複雜的姿態。
你可以在 Github 儲存庫 參考這個專案的完整程式碼。
這篇文章到此為止,感謝你的閱讀!
LinkedIn: https://www.linkedin.com/in/hengjiewang/
Facebook: https://www.facebook.com/hengjie.wang