

IGListKit + MVVM 是 Instagram 對於 iOS UICollectionView UI 與數據解耦的解決方案,IGListKit 的設計理念是以數據驅動,來解決不同 Team 之間的需求,包含不同的數據與不一樣的 Layout。
有關於 Code 說明與範例,我建議你搭配原始碼參考閱讀 IGListKitArchetype。
原始 UICollectionView 再用戶日益增長的 Instagram 有甚麼問題
Instagram 是一款照片與影片的社交平台,目前月活躍使用者已超過 10 億。隨著 Instagram 的成長,因為越來越多的業務性質,Instagram 也需要更多更複雜的 Cell Layout。
好的架構與解決方案通常都不是一開始就做好的,而是隨著產品的成長與用戶的大規模提升,架構逐漸演進而成的。
原生 UICollectionView 的理念
- 可高度客製化
- 商業邏輯與 UI Code 解耦合
- Cell Reuse 資源可重複利用(我們知道創建 View 的開銷非常大)
下列是模仿 ig 首頁貼文形式的 Layout 畫面:
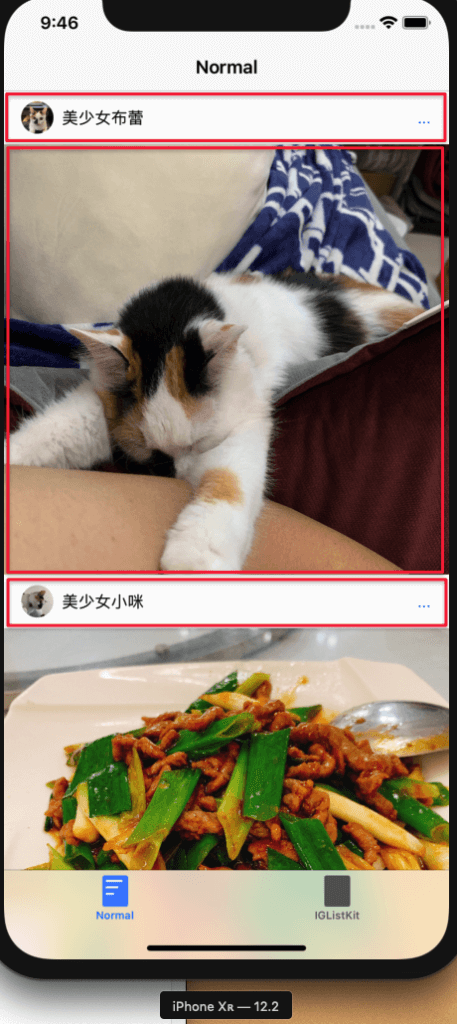
我們可以看到畫面中紅框代表 Cell 元件,目前為止我們有兩種 Cell ,上面負責顯示使用者訊息,下面負責顯示貼文。
讓我們來撰寫程式碼吧!首先,要決定有多少個 Section:
override func numberOfSections(in collectionView: UICollectionView) -> Int {
        return postData.count
    }
一個 Section 先設定回應一個 item:
override func collectionView(_ collectionView: UICollectionView, numberOfItemsInSection section: Int) -> Int {
        return 1
    }
回應對應的 UICollectionViewCell:
- UserInfoViewCell:負責顯示用戶大頭貼、名稱、與更多(對應 View Model – PostViewModel)
- UserImageViewCell:負責顯示用戶貼文圖片(對應 View Model – PostImageViewModel)
override func collectionView(_ collectionView: UICollectionView, cellForItemAt indexPath: IndexPath) -> UICollectionViewCell {

        let section = indexPath.section

        // 判斷資料模型種類
        // 貼文類
        if let postViewModel = postData[section] as? PostViewModel {

            let cell = collectionView.dequeueReusableCell(withReuseIdentifier: cellId, for: indexPath) as! UserInfoViewCell
            cell.updateWith(object: postViewModel)

            return cell

        } else if let postImageViewModel = postData[section] as? PostImageViewModel {

            // 主要照片類別
            let cell = collectionView.dequeueReusableCell(withReuseIdentifier: imageCellId, for: indexPath) as! UserImageViewCell
            cell.updateWith(object: postImageViewModel)

            return cell
        }

        let cell = UICollectionViewCell()
        return cell
}然後,我們要依照不同的 Cell 設定不同的高度:
func collectionView(_ collectionView: UICollectionView, layout collectionViewLayout: UICollectionViewLayout, sizeForItemAt indexPath: IndexPath) -> CGSize {

        if postData[indexPath.section] is PostViewModel {
            return CGSize(width: view.frame.width, height: 50)
        } else if postData[indexPath.section] is PostImageViewModel {
            return CGSize(width: view.frame.width, height: 400)
        }

        return CGSize.zero
    }
當資料是用戶資訊時,我們設定高度為 50;而當資料是貼文照片時,我們設定高度為 400。
當然,完整原始碼位於最上發方說明的位置可以參考 CollectionNormalController 這是一般 CollectionView 的實現過程。
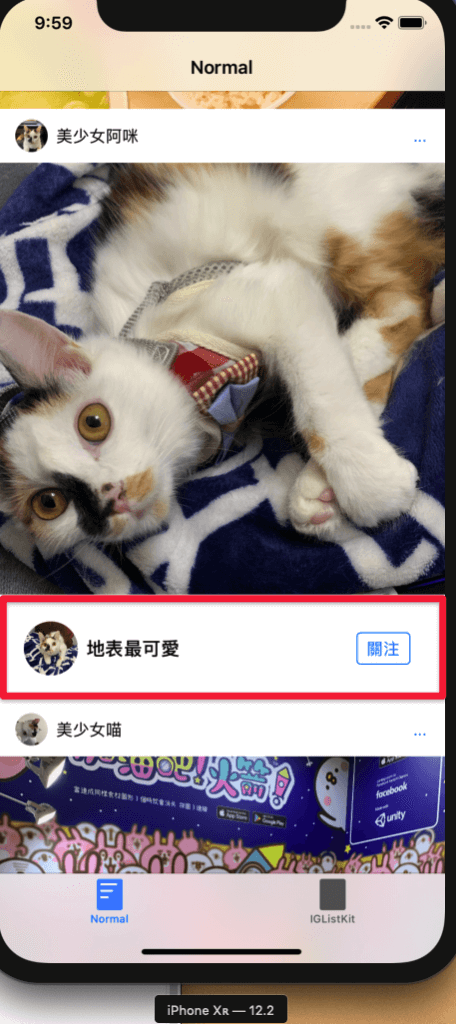
接下來讓我們情境模擬一下,因業務需求我們需要增加下列推薦關注的元件:
那我們需要增加哪些 Code 呢?
- UserFocusViewCell:負責顯示推薦關注(對應 View Model – FocusViewModel)
讓我們增加判斷回應的 Cell:
override func collectionView(_ collectionView: UICollectionView, cellForItemAt indexPath: IndexPath) -> UICollectionViewCell {

        //...以上省略

else if let focusViewModel = postData[section] as? FocusViewModel {

            // 關注類
            let cell = collectionView.dequeueReusableCell(withReuseIdentifier: focusCellId, for: indexPath) as! UserFocusViewCell
            cell.updateWith(object: focusViewModel)

            return cell
        }

       //...以下省略
    }
並修改應返回的高度:
func collectionView(_ collectionView: UICollectionView, layout collectionViewLayout: UICollectionViewLayout, sizeForItemAt indexPath: IndexPath) -> CGSize {

        //...以上省略
else if postData[indexPath.section] is FocusViewModel {
            return CGSize(width: view.frame.width, height: 100)
        }

        //...以下省略
    }
看起來修改的幅度並不多,但是這裡出了幾個問題!
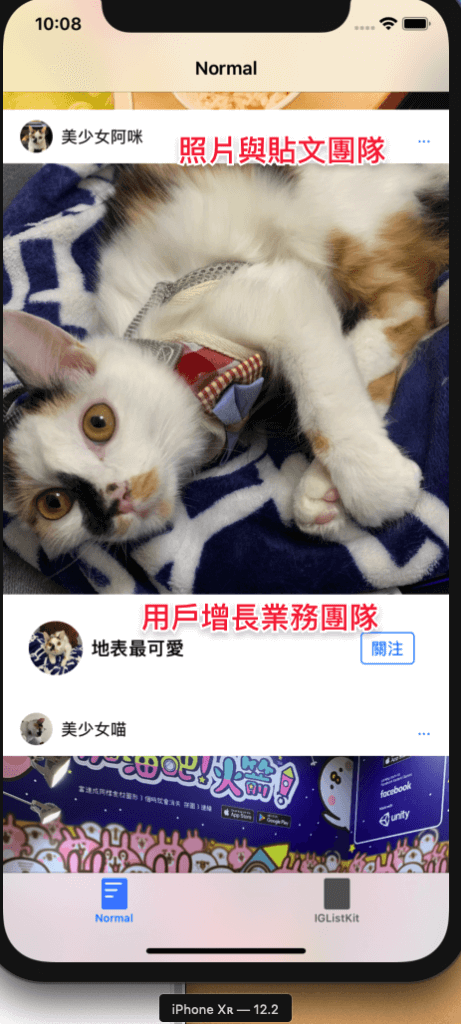
- 多人合作時,大家需要在同樣的 Function 反覆添加與修改邏輯
- Controller 越來越臃腫
- 因業務需求新增 UI 需要修改多個團隊的代碼,職責分權不明確
- 可讀性及可維護性下降
- 業務邏輯與設計需求耦合
- 難以增加 A/B Test 代碼
因這些業務與成長需求,ig 不得不另外尋找解決方案,而 IGListKit 就是透過這些需求演化而成的。
IGListKit 的理念
- 增加一層
SectionController,拆分商業邏輯與UI - 提升
Code的可重用度 - 高性能更新畫面機制 (
O(n))
IGListKit 主要提供了這些功能:
- 不需要一次次調用
performBatchUpdates(_:, completion:)或reloadData() - 具有可重複使用的
Cell和Components - 創建具有多種數據類型的集合
- 自定義模型的差異行為
- 只依賴
UICollectionView - 可擴充的
API - 使用
Objective-C編寫,並完整支援Swift
IGListKit 簡單範例使用
為了表示 IGListKit 擴充性與可重用性,我們沿用上面製作好的 UI 與 ViewModel:
- CollectionIGListKitController 為 IGListKit 使用方式
- UserInfoViewCell:負責顯示用戶大頭貼、名稱、與更多(對應 View Model – PostViewModel)
- UserImageViewCell:負責顯示用戶貼文圖片(對應 View Model – PostImageViewModel)
- UserFocusViewCell:負責顯示推薦關注(對應 View Model – FocusViewModel)
- PostData:模擬資料來源
ViewModel 的實作
要使用 IGListKit,我們的 ViewModel 必須遵守 ListDiffable 協定。我們先了解一下這個協定吧!ListDiffable 必須實現兩個 function:
func diffIdentifier() -> NSObjectProtocol:用於定義辨識項目func isEqual(toDiffableObject object: ListDiffable?) -> Bool:用於辨識兩者是否為同一個 Model
現在,我們可以開始實作了!首先,建立一個專屬的辨識協定 PostPageProtocol:
protocol PostPageProtocol: ListDiffable {
    var identifier: UUID { get }
}
這個協定很簡單,遵守 ListDiffable,並且規定必須實作 identifier 用於資源比較。然後,在我們的 PostViewModel 中加入 headerImage、headerTitle、和 headerRightButtonTitle,用於顯示用戶資訊。
class PostViewModel: PostPageProtocol {

    let identifier = UUID.init()
    let headerImage: String
    let headerTitle: String
    let headerRightButtonTitle: String

    init(headerImage: String, headerTitle: String , headerRightButtonTitle: String) {
        self.headerImage = headerImage
        self.headerTitle = headerTitle
        self.headerRightButtonTitle = headerRightButtonTitle
    }

    func diffIdentifier() -> NSObjectProtocol {
        return identifier as NSObjectProtocol
    }

    func isEqual(toDiffableObject object: ListDiffable?) -> Bool {
        guard let object = object as? PostViewModel else {
            return false
        }
        return self.identifier == object.identifier
    }
}
再製作兩個 ViewModel PostImageViewModel 和 PostImageViewModel,用於貼文照片與推薦關注。其中 PostImageViewModel 只加入屬性 mainImage,用於顯示照片;而 FocusViewModel 就加入屬性 headerImage、headerTitle、和 headerRightButtonTitle,用於顯示推薦關注的資訊。
class PostImageViewModel: PostPageProtocol {

    let identifier = UUID.init()
    let mainImage: String

    init(mainImage: String) {
        self.mainImage = mainImage
    }

    func diffIdentifier() -> NSObjectProtocol {
        return identifier as NSObjectProtocol
    }

    func isEqual(toDiffableObject object: ListDiffable?) -> Bool {
        guard let object = object as? PostImageViewModel else {
            return false
        }
        return self.identifier == object.identifier
    }
}

class FocusViewModel: PostPageProtocol {

    let identifier = UUID.init()
    let headerImage: String
    let headerTitle: String
    let headerRightButtonTitle: String

    init(headerImage: String, headerTitle: String , headerRightButtonTitle: String) {
        self.headerImage = headerImage
        self.headerTitle = headerTitle
        self.headerRightButtonTitle = headerRightButtonTitle
    }

    func diffIdentifier() -> NSObjectProtocol {
        return identifier as NSObjectProtocol
    }

    func isEqual(toDiffableObject object: ListDiffable?) -> Bool {
        guard let object = object as? FocusViewModel else {
            return false
        }
        return self.identifier == object.identifier
    }
}
Controller 製作
接下來,我們來製作 Controller 吧!我們先以下列程式碼建立一個 UIViewController,注意不是 UICollectionViewController。
//MARK:- MainViewController
class CollectionIGListKitController: UIViewController {

    // 生成 CollectionView
    let layout = UICollectionViewFlowLayout()
    lazy var collectionView = UICollectionView(frame: .zero, collectionViewLayout: layout)

    // 生成 updater 與 adapter
    let updater = ListAdapterUpdater()

    // 綁定 adapter
    lazy var adapter = ListAdapter(updater: updater, viewController: self)

    override func viewDidLoad() {
        super.viewDidLoad()

        // 定義 adapter 的 dataSource 與 collectionView
        adapter.dataSource = self
        adapter.collectionView = collectionView

        view.addSubview(collectionView)
        collectionView.fillToSuperview()

        collectionView.backgroundColor = .white
    }
}
我們首先生成一個 UICollectionView,再生成 ListAdapterUpdater 與 ListAdapter。ListAdapterUpdater 負責 row 與 section 的更新,而 ListAdapter 負責控制 CollectionView。
ListAdapterDataSource 的實作
因為我們的 adapter.dataSource 是指定 CollectionIGListKitController,所以必須實作 ListAdapterDataSource。
//MARK:- ListAdapterDataSource
extension CollectionIGListKitController: ListAdapterDataSource {
    // 資料來源
    func objects(for listAdapter: ListAdapter) -> [ListDiffable] {
        return PostData.postData
    }

    // 返回合適的 ListSectionController
    func listAdapter(_ listAdapter: ListAdapter, sectionControllerFor object: Any) -> ListSectionController {

        if object is PostViewModel {
            return UserInfoViewController()
        } else if object is PostImageViewModel {
            return UserImageViewController()
        } else if object is FocusViewModel {
            return FocusViewModelViewController()
        }

        return ListSectionController()
    }

    func emptyView(for listAdapter: ListAdapter) -> UIView? {
        return nil
    }
}
返回合適的 ListSectionController,就如同一開始我們返回適合的 Cell 一樣。
所以,我們必須實作這三個 SectionController。這個步驟並不複雜,首先先定義了他們本身需要的 Model。sizeForItem 定義了這個 Cell 需要的大小,而 cellForItem 則定義了要返回哪一個 UICollectionViewCell。
//MARK:- UserInfoView
class UserInfoViewController: ListSectionController {
var currentUserInfo: PostViewModel?
override func didUpdate(to object: Any) {
guard let userInfo = object as? PostViewModel else {
return
}
currentUserInfo = userInfo
}
override func numberOfItems() -> Int {
return 1
}
override func sizeForItem(at index: Int) -> CGSize {
return CGSize(width: collectionContext!.containerSize.width, height: 50)
}
override func cellForItem(at index: Int) -> UICollectionViewCell {
let cell = collectionContext!.dequeueReusableCell(of: UserInfoViewCell.self, for: self, at: index) as! UserInfoViewCell
if let currentUserInfo = currentUserInfo {
cell.updateWith(object: currentUserInfo)
}
return cell
}
}
//MARK:- UserImageView
class UserImageViewController: ListSectionController {
var currentUserImage: PostImageViewModel?
override func didUpdate(to object: Any) {
guard let userImage = object as? PostImageViewModel else {
return
}
currentUserImage = userImage
}
override func numberOfItems() -> Int {
return 1
}
override func sizeForItem(at index: Int) -> CGSize {
return CGSize(width: collectionContext!.containerSize.width, height: 400)
}
override func cellForItem(at index: Int) -> UICollectionViewCell {
let cell = collectionContext!.dequeueReusableCell(of: UserImageViewCell.self, for: self, at: index) as! UserImageViewCell
if let currentUserImage = currentUserImage {
cell.updateWith(object: currentUserImage)
}
return cell
}
}
//MARK:- FocusViewModelView
class FocusViewModelViewController: ListSectionController {
var currentFocus: FocusViewModel?
override func didUpdate(to object: Any) {
guard let focus = object as? FocusViewModel else {
return
}
currentFocus = focus
}
override func numberOfItems() -> Int {
return 1
}
override func sizeForItem(at index: Int) -> CGSize {
return CGSize(width: collectionContext!.containerSize.width, height: 100)
}
override func cellForItem(at index: Int) -> UICollectionViewCell {
let cell = collectionContext!.dequeueReusableCell(of: UserFocusViewCell.self, for: self, at: index) as! UserFocusViewCell
if let currentFocus = currentFocus {
cell.updateWith(object: currentFocus)
}
return cell
}
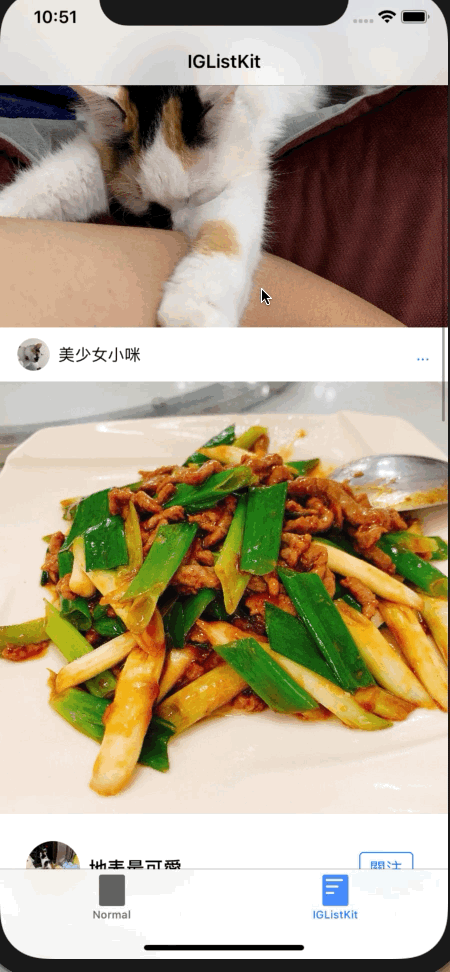
}此時,運行後應該會有一樣的畫面:
我們使用 IGListKit 後解決了甚麼問題
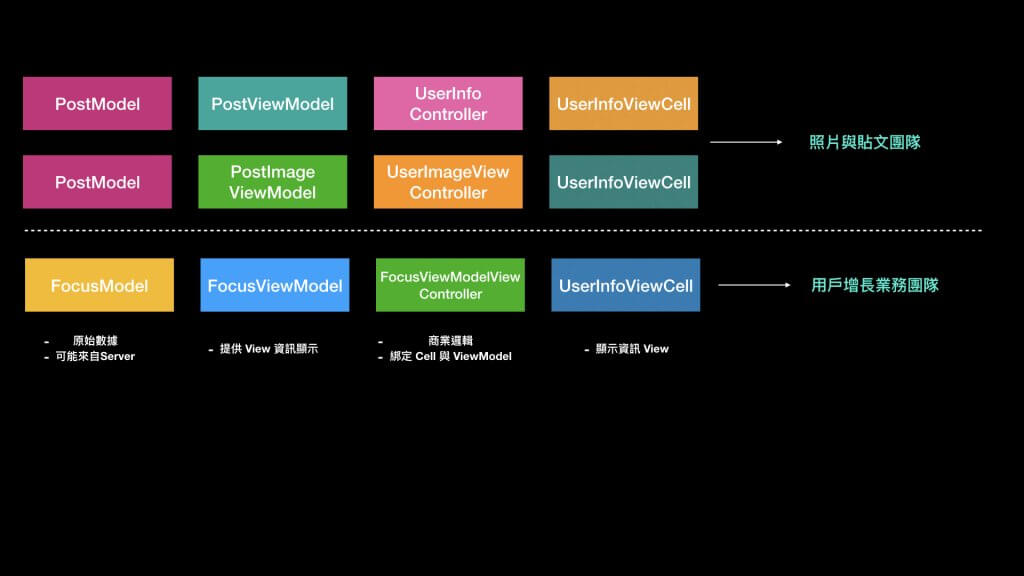
其實就是一開始 ig 團隊遇到的問題:
- 不同業務團隊只需負責自己的業務邏輯;
- 商業邏輯分離至
ListSectionController,解決越來越臃腫的 Controller,細分成許多 Child Controller。
總結
隨著業務與用戶規模的成長,App 一定會遇到許多複雜問題,而我們一定要透過架構的演進來解決新的問題。能跟著產品成長的團隊,才是好團隊!今天的範例說明了 IG 團隊在業務增長上所誕生的 IGListKit。
IGListKit 使很多團隊可以專注在自己業務邏輯面的開發,並且讓職責更加明確,大大提高可擴展性、易讀性、與易維護性,同時也為 A/B Test 做好準備。
好的架構並不是一蹴而就,更多的是演化打磨與取捨。架構如此,人的成長也如此。感謝你的閱讀,亦強烈建議你搭配範例閱讀 IGListKitArchetype。