

看過了許多 Firebase 的開發應用( Email / Facebook 登入、即時資料庫存取),你是否疑惑如何用 Firebase 上傳圖片或影片等檔案呢? 今天來跟大家分享在 Firebase 中比較少被我們用到的 Storage 功能。
我們先來看看官方的影片吧:
這次我們就以上傳照片為主,開發一款當使用者從手機選擇照片上傳後,會在我們 CollectionView 上顯示出來的 App。
其實再加上以往所學的註冊登入功能,基本上就是一款簡易版的 Instagram 囉!(有這麼簡單?(誤))
你即將開發的範例App
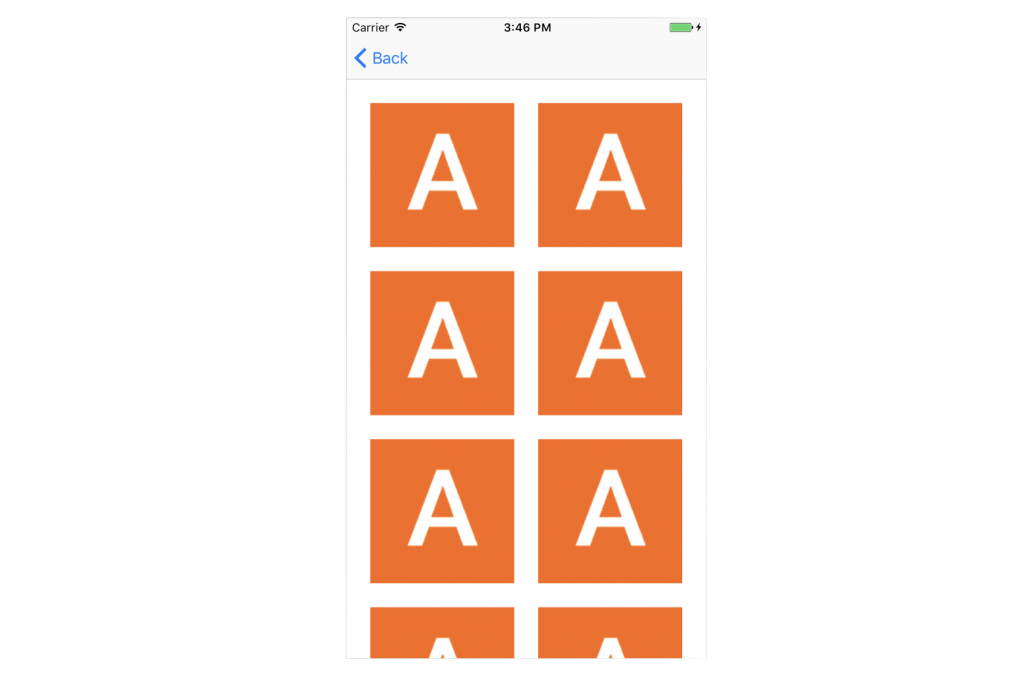
未開始寫程式碼之前,先來看看最終成果:

不錯吧?
範例App背後的運作方式
為了讓大家更了解背後 Firebase 與 App 的運作方式,我畫了一張示意圖:

簡單來說,就是利用Firebase的Storage存放照片,而照片連結則存放在Firebase的Database。首先,我們要把欲上傳的照片傳到 Storage 存放,成功後會收到 Storage 回傳的照片連結,再將連結寫入資料庫中方便日後存取。這樣你就可以利用Firebase存取照片。
我想你現在應該明白運作原理,那就讓我們一起來實作!
實作範例App
初始設置
先在 StoryBoard 建立兩個畫面,第一頁的 ViewController 放上兩顆按鈕(標題分別是「上傳照片」與「圖片庫」)並嵌入 Navigation Controller,第二頁我們直接拉出 CollectionViewController 並將它與第一頁「圖片庫」按鈕用 Show (e.g. Push) 的 segue 連上,在 CollectionViewCell 上拉入一個 UIImageView。我這邊也附上 [Starter 初始專案] 給你們。

再來新增客製 CollectionViewController 與 CollectionViewCell 類別的兩個檔案,指定於 StoryBoard 的 CollectionViewController 和 CollectionViewCell 上,也記得要給 CollectionViewCell 一個專屬的 identifier(在這邊我用 「Cell」)。

拉一張圖片進來專案,測試 FireCollectionViewController 可不可以 Work,在這之前記得先把 CollectionViewCell 上的 UIImageView 建立起 Outlet 連結:
import UIKit

class FireCollectionViewCell: UICollectionViewCell {

    @IBOutlet weak var fireImageView: UIImageView!

}
由於我們已經在 StoryBoard 上建立 CollectionViewController 與 CollectionViewCell 的連結,所以可以直接刪除系統在 FireCollectionViewController 類別檔案 viewDidLoad 裡預設的 RegisterClass 那行程式。
直接在 FireCollectionViewController 的 DataSource 裡設定測試的圖片與數量:
// MARK: UICollectionViewDataSource

    override func numberOfSections(in collectionView: UICollectionView) -> Int {
        // #warning Incomplete implementation, return the number of sections
        return 1
    }


    override func collectionView(_ collectionView: UICollectionView, numberOfItemsInSection section: Int) -> Int {
        // #warning Incomplete implementation, return the number of items
        return 25
    }

    override func collectionView(_ collectionView: UICollectionView, cellForItemAt indexPath: IndexPath) -> UICollectionViewCell {
        let cell = collectionView.dequeueReusableCell(withReuseIdentifier: reuseIdentifier, for: indexPath) as! FireCollectionViewCell

        // Configure the cell
        cell.fireImageView.image = UIImage(named: "appcoda.png")

        return cell
    }
完成後執行模擬器,點擊「圖片庫」按鈕應該會出現以下畫面,表示所有初始設定都已經完成囉!可以開始接 Firebase 了!
Firebase Storage 設定
要使用Firebase Storage存放圖片,我們首先要在Firebase進行一些簡單的設定。
- 進入 Firebase 首頁 並點選 Get Started For Free(或者你已經在 Firebase 的 Console ),點選 Create New Project。
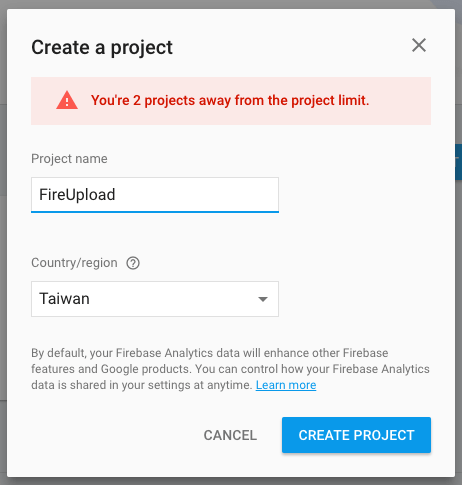
- 將專案命名、選擇地區並按下 Create Project後,會進入專案的管理頁面。
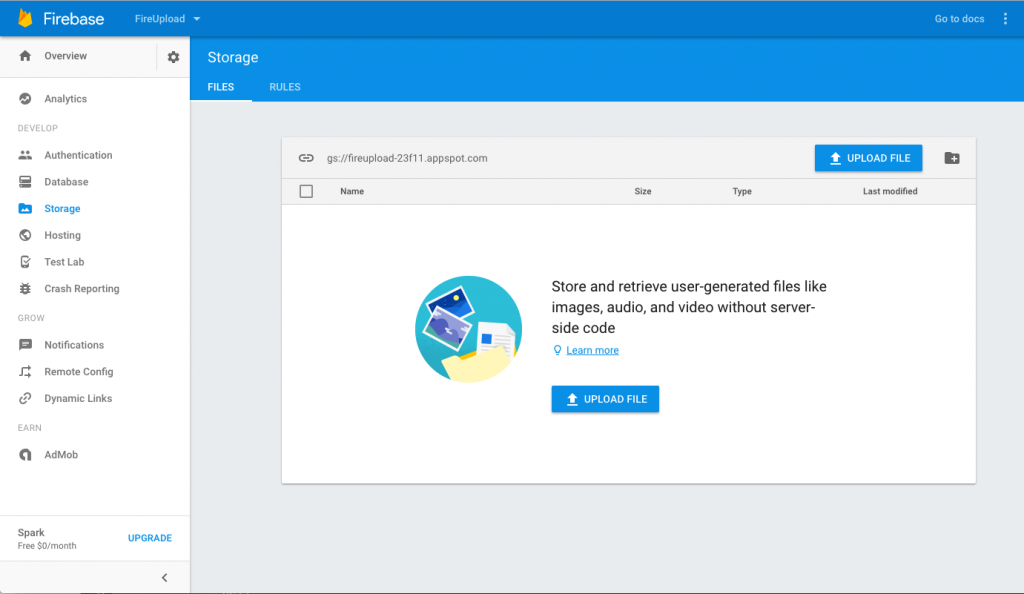
- 在左手邊的選單,點選 Storage 區塊,進入的畫面會直接是一個像下方這樣的圖。
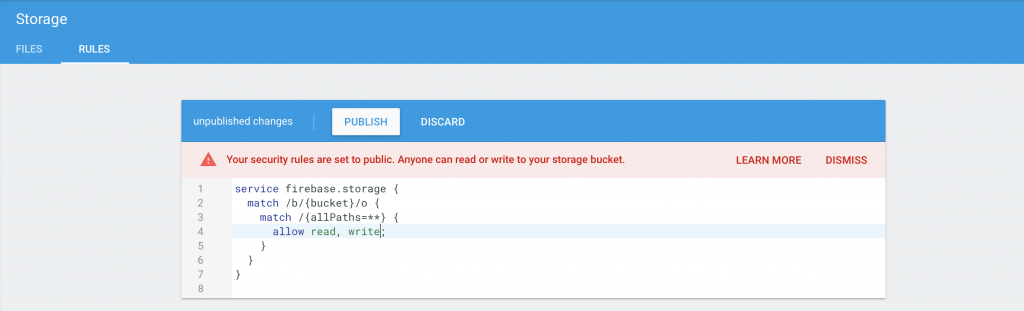
- 之後,點選上方的 Rules 權限區塊,你會見到以下設定:
- 直接用滑鼠將 Read, Write 後方的 if 判斷刪除,並按下上方的 Publish。Firebase 會警告你任何有你此網址的人都可以讀寫你的 Firebase。 由於是範例關係,我們是為了方便,把所有權限都打開。這樣比較方便開發,記得別把 Data 區塊的網址連結公布出去即可。
service firebase.storage {
  match /b/{bucket}/o {
    match /{allPaths=**} {
      allow read, write: if request.auth != null;
    }
  }
}
安裝Firebase SDK
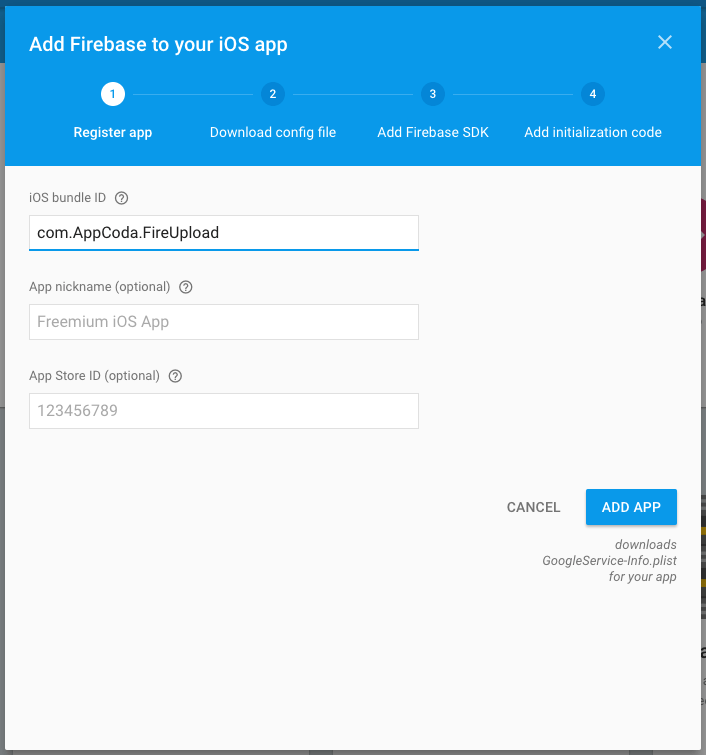
好了!完成Firebase設定之後,是時候回到專案管理頁面 。
- 選擇 iOS 並跟著指示一步步完成設定 。先輸入 Xcode 專案的 Bundle ID:
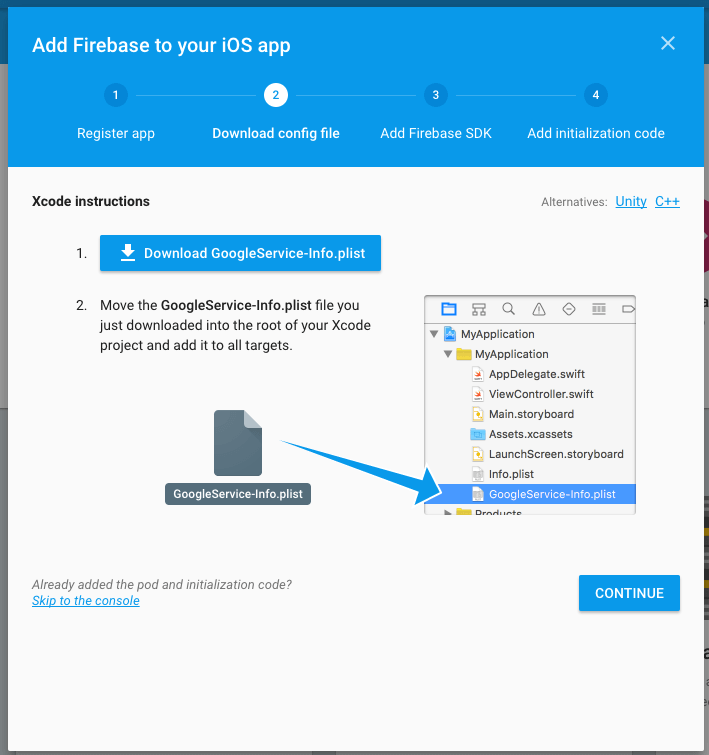
- 將下載下來的 GoogleService-Info.plist 拉進 Xcode 專案。
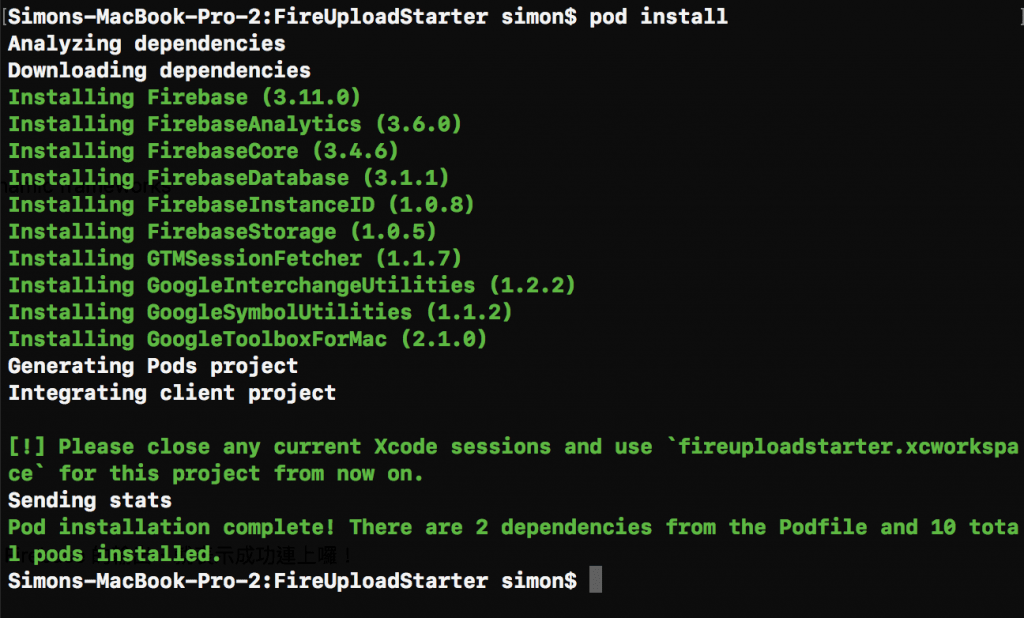
- 我習慣用 CocoaPods 安裝Firebase套件。如你不知道如何使用CocoaPods,可以參考 CocoaPods 官方教學,或者先前關於 Firebase 的教學文章。在這邊,先建立一個
Podfile,另外加上兩行,分別是 Firebase/Storage 與 Firebase/Database,以安裝所需的SDK,讓我們後續開發可以直接使用。 - 最後執行
pod install讓CocoaPods下載並安裝相關SDK。 - 安裝完畢後在 Xcode 專案的 AppDelegate 中加入 Firebase 的啟動設定。
# Uncomment the next line to define a global platform for your project
# platform :ios, '9.0'

target 'FireUploadStarter' do
  # Comment the next line if you're not using Swift and don't want to use dynamic frameworks
  use_frameworks!

  # Pods for FireUploadStarter
  pod 'Firebase/Storage'
  pod 'Firebase/Database'

end
import UIKit
import Firebase

@UIApplicationMain
class AppDelegate: UIResponder, UIApplicationDelegate {

    var window: UIWindow?

    func application(_ application: UIApplication, didFinishLaunchingWithOptions launchOptions: [UIApplicationLaunchOptionsKey: Any]?) -> Bool {

        FIRApp.configure()

        return true
    }

    func applicationWillResignActive(_ application: UIApplication) {
        // Sent when the application is about to move from active to inactive state. This can occur for certain types of temporary interruptions (such as an incoming phone call or SMS message) or when the user quits the application and it begins the transition to the background state.
        // Use this method to pause ongoing tasks, disable timers, and invalidate graphics rendering callbacks. Games should use this method to pause the game.
    }

    func applicationDidEnterBackground(_ application: UIApplication) {
        // Use this method to release shared resources, save user data, invalidate timers, and store enough application state information to restore your application to its current state in case it is terminated later.
        // If your application supports background execution, this method is called instead of applicationWillTerminate: when the user quits.
    }

    func applicationWillEnterForeground(_ application: UIApplication) {
        // Called as part of the transition from the background to the active state; here you can undo many of the changes made on entering the background.
    }

    func applicationDidBecomeActive(_ application: UIApplication) {
        // Restart any tasks that were paused (or not yet started) while the application was inactive. If the application was previously in the background, optionally refresh the user interface.
    }

    func applicationWillTerminate(_ application: UIApplication) {
        // Called when the application is about to terminate. Save data if appropriate. See also applicationDidEnterBackground:.
    }


}
完成以上步驟後,回到 Xcode 執行程式應該會在 Console 看到一些關於連上 Firebase 的輸出,就表示成功連上囉!
2017-04-20 17:40:32.025 FireUploadStarter[11627:1451900] Firebase automatic screen reporting is enabled. Call +[FIRAnalytics setScreenName:setScreenClass:] to set the screen name or override the default screen class name. To disable automatic screen reporting, set the flag FirebaseAutomaticScreenReportingEnabled to NO in the Info.plist 2017-04-20 17:40:32.089 FireUploadStarter[11627][Firebase/Core][I-COR000001] Configuring the default app. 2017-04-20 17:40:32.106 FireUploadStarter[11627:] Firebase Analytics v.3600000 started 2017-04-20 17:40:32.106 FireUploadStarter[11627:] To enable debug logging set the following application argument: -FIRAnalyticsDebugEnabled (see http://goo.gl/Y0Yjwu) 2017-04-20 17:40:32.109 FireUploadStarter[11627:] Successfully created Firebase Analytics App Delegate Proxy automatically. To disable the proxy, set the flag FirebaseAppDelegateProxyEnabled to NO in the Info.plist 2017-04-20 17:40:32.115: FIRInstanceID AppDelegate proxy enabled, will swizzle app delegate remote notification handlers. To disable add "FirebaseAppDelegateProxyEnabled" to your Info.plist and set it to NO 2017-04-20 17:40:32.127 FireUploadStarter[11627] [Firebase/Core][I-COR000018] Already sending logs. 2017-04-20 17:40:32.363 FireUploadStarter[11627:] The AdSupport Framework is not currently linked. Some features will not function properly. Learn more at http://goo.gl/9vSsPb 2017-04-20 17:40:32.488 FireUploadStarter[11627] [Firebase/Core][I-COR000019] Clearcut post completed. 2017-04-20 17:40:32.562 FireUploadStarter[11627] [Firebase/Core][I-COR000019] Clearcut post completed. 2017-04-20 17:40:32.838 FireUploadStarter[11627:] Firebase Analytics enabled
實作照片上傳
終完成準備工作,現在可以實作照片上傳的部分,我們會利用Firebase SDK將照片上傳至Storage。
- 假如你不是用我提供的初始案,你需要將 StoryBoard ViewController 上的 「上傳照片」按鈕與 ViewController 類別檔案建立起 IBAction 連結,並在裡面加入 UIImagePickerController 讓我們可以選擇要從「照片圖庫」或「相機」上傳照片:
- 新增
UIImagePickerControllerDelegate與UINavigationControllerDelegate,如此一來才能取得在照片圖庫或相機的圖片。在這邊我是用 ViewController extension 的方式將 UIImagePickerController 需要的協定放在 class 外方便整理。
@IBAction func uploadBtnAction(_ sender: UIButton) {

      // 建立一個 UIImagePickerController 的實體
      let imagePickerController = UIImagePickerController()

      // 委任代理
      imagePickerController.delegate = self

      // 建立一個 UIAlertController 的實體
      // 設定 UIAlertController 的標題與樣式為 動作清單 (actionSheet)
      let imagePickerAlertController = UIAlertController(title: "上傳圖片", message: "請選擇要上傳的圖片", preferredStyle: .actionSheet)

      // 建立三個 UIAlertAction 的實體
      // 新增 UIAlertAction 在 UIAlertController actionSheet 的 動作 (action) 與標題
      let imageFromLibAction = UIAlertAction(title: "照片圖庫", style: .default) { (Void) in

          // 判斷是否可以從照片圖庫取得照片來源
          if UIImagePickerController.isSourceTypeAvailable(.photoLibrary) {

              // 如果可以,指定 UIImagePickerController 的照片來源為 照片圖庫 (.photoLibrary),並 present UIImagePickerController
              imagePickerController.sourceType = .photoLibrary
              self.present(imagePickerController, animated: true, completion: nil)
          }
      }
      let imageFromCameraAction = UIAlertAction(title: "相機", style: .default) { (Void) in

          // 判斷是否可以從相機取得照片來源
          if UIImagePickerController.isSourceTypeAvailable(.camera) {

              // 如果可以,指定 UIImagePickerController 的照片來源為 照片圖庫 (.camera),並 present UIImagePickerController
              imagePickerController.sourceType = .camera
              self.present(imagePickerController, animated: true, completion: nil)
          }
      }

      // 新增一個取消動作,讓使用者可以跳出 UIAlertController
      let cancelAction = UIAlertAction(title: "取消", style: .cancel) { (Void) in

          imagePickerAlertController.dismiss(animated: true, completion: nil)
      }

      // 將上面三個 UIAlertAction 動作加入 UIAlertController
      imagePickerAlertController.addAction(imageFromLibAction)
      imagePickerAlertController.addAction(imageFromCameraAction)
      imagePickerAlertController.addAction(cancelAction)

      // 當使用者按下 uploadBtnAction 時會 present 剛剛建立好的三個 UIAlertAction 動作與
      present(imagePickerAlertController, animated: true, completion: nil)
  }
 extension ViewController: UIImagePickerControllerDelegate, UINavigationControllerDelegate {

    func imagePickerController(_ picker: UIImagePickerController, didFinishPickingMediaWithInfo info: [String : Any]) {

        var selectedImageFromPicker: UIImage?

        // 取得從 UIImagePickerController 選擇的檔案
        if let pickedImage = info[UIImagePickerControllerOriginalImage] as? UIImage {

            selectedImageFromPicker = pickedImage
        }

        // 可以自動產生一組獨一無二的 ID 號碼,方便等一下上傳圖片的命名
        let uniqueString = NSUUID().uuidString

        // 當判斷有 selectedImage 時,我們會在 if 判斷式裡將圖片上傳
        if let selectedImage = selectedImageFromPicker {

            print("\(uniqueString), \(selectedImage)")
        }

        dismiss(animated: true, completion: nil)
    }
}
完成後執行程式會像這樣:
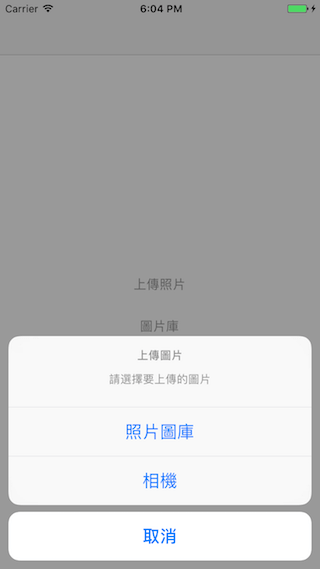
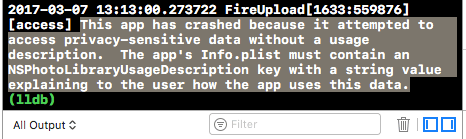
但當你選擇其中一項時程式可能會 Crash 並顯示如圖的原因,是要你在 Info.plist 中加入存取使用者相機或圖庫的 Key,如此一來才會告知使用者 App 要存取資料並符合蘋果的隱私權規定。我的起始專案已經幫各位完成這個處理了,理論上是不會有隱私權與 Crash 的問題。
讓我們進到左側專案目錄的 Info.plist 裡,並加入兩個 Information Property List,分別是:”Privacy – Camera Usage Description” 與 “Privacy – Photo Library Usage Description”。
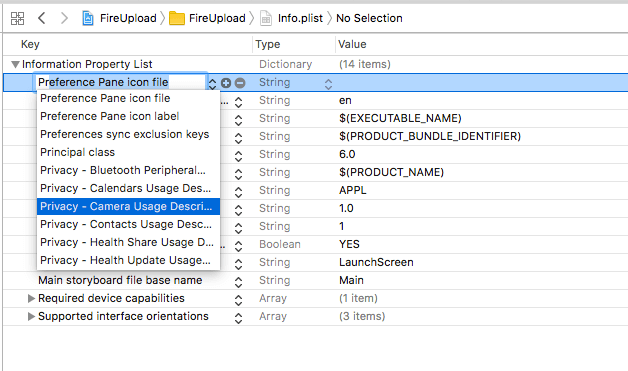
再執行一次應該就可以順利存取相機或者圖片庫囉!注意,相機的部分只有實機可以測試。
好了,開始寫有關照片上傳的程式碼。首先在ViewController.swift 引入 FirebaseStorage。
import FirebaseStorage
回到 UIImagePickerControllerDelegate 的 didFinishPickingMediaWithInfo 裡,我們要在最後取得 selectedImage 的 if 判斷式裡上傳該照片。先修改程式,我之後再慢慢解釋運作:
if let selectedImage = selectedImageFromPicker {

    let storageRef = FIRStorage.storage().reference().child("AppCodaFireUpload").child("\(uniqueString).png")

    if let uploadData = UIImagePNGRepresentation(selectedImage) {
        // 這行就是 FirebaseStorage 關鍵的存取方法。
        storageRef.put(uploadData, metadata: nil, completion: { (data, error) in

            if error != nil {

                // 若有接收到錯誤,我們就直接印在 Console 就好,在這邊就不另外做處理。
                print("Error: \(error!.localizedDescription)")
                return
            }

            // 連結取得方式就是:data?.downloadURL()?.absoluteString。
            if let uploadImageUrl = data?.downloadURL()?.absoluteString {

                // 我們可以 print 出來看看這個連結事不是我們剛剛所上傳的照片。
                print("Photo Url: \(uploadImageUrl)")
            }
        })
    }
}
一開始我們先建立存取 FirebaseStorage 的實體:FIRStorage.storage().reference()。再從該實體指定讀寫的位置:.child(“欲寫入的位置”),此處新增一個名叫 AppCodaFireUpload 的位置。由於 FirebaseStorage 要求上傳的檔案都需要檔名,所以我們直接使用上方已經產生的獨立 UUID 字串當作檔名,並一併寫上副檔名 (.png),如此以來才不會造成覆蓋檔案的錯誤與問題。
再來將 selectedImage 用 UIImagePNGRepresentation 轉換成 Data 形式,如此才能上傳。由於轉換後的 Data 是 optional 的,所以在用 if let 的方法解包取得可以轉換的 Data: uploadData。 而 storageRef.put(uploadData, metadata: nil, completion {()} 這行就是 FirebaseStorage 關鍵的存取方法。
之後,使用剛剛建立的 FirebaseStorage 實體,將轉換成 png 的圖片 Data 放入。該方法會回傳一個 completion,裡面包含回傳成果的相關資料,與錯誤時回傳的錯誤資訊。
如果回傳成功,FirebaseStorage 會將已上傳照片的連結回傳出來。並使用回傳 data 的 downloadURL() 取得該連結。
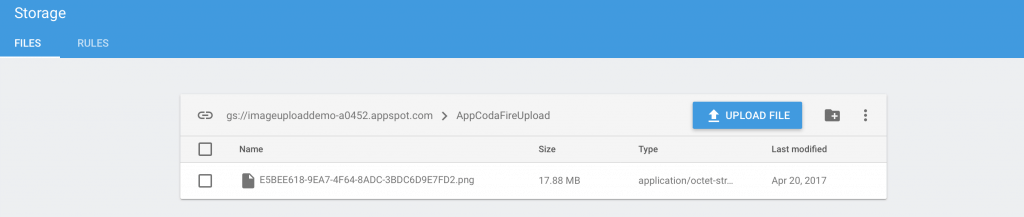
你可以試試在瀏覽器貼上回傳的照片連結,如顯示的圖跟你一開始選擇上傳的照片是一樣的,那就恭喜你完成上傳照片到 FirebaseStorage 的步驟了!
另外,你可以回到 Firebase console 的 Storage 裡面確認檔案是否已經成功上傳。你可以在 Storage 裡看到多了一個 AppCodaFireUpload 的資料夾,點進去就可以看到成功上傳的圖片囉!
將已上傳的圖片連結寫進 Firebase Database
還記得我們最後要在 CollectionView 中顯示那些我們上傳到 Firebase Storage 的照片嗎?其實要下載照片或顯示照片可以直接使用 Firebase Storage 的 SDK,但我這邊傾向將檔案與 API 分開,將上傳到 Storage 的照片網址存入 Firebase Database 方便日後管理與存取。
實作程式前,你需要進去 Firebase Console 點進左側的 Database 區塊,為了開發方便同樣將上方 Rules 的 .read & .write 都改成 true,才可以直接讀寫資料庫:
{
  "rules": {
    ".read": true,
    ".write": true
  }
}
再來讓我們在同樣的 ViewController 檔案裡 import FirebaseDatabase 模組:
import FirebaseDatabase
修改imagePickerController(_:didFinishPickingMediaWithInfo:)內的程式碼如下(加入的部分以黃色作標示):
func imagePickerController(_ picker: UIImagePickerController, didFinishPickingMediaWithInfo info: [String : Any]) {

    var selectedImageFromPicker: UIImage?

    // 取得從 UIImagePickerController 選擇的檔案
    if let pickedImage = info[UIImagePickerControllerOriginalImage] as? UIImage {

        selectedImageFromPicker = pickedImage
    }

    // 可以自動產生一組獨一無二的 ID 號碼,方便等一下上傳圖片的命名
    let uniqueString = NSUUID().uuidString

    // 當判斷有 selectedImage 時,我們會在 if 判斷式裡將圖片上傳
    if let selectedImage = selectedImageFromPicker {

        let storageRef = FIRStorage.storage().reference().child("AppCodaFireUpload").child("\(uniqueString).png")

        if let uploadData = UIImagePNGRepresentation(selectedImage) {
            // 這行就是 FirebaseStroge 關鍵的存取方法。
            storageRef.put(uploadData, metadata: nil, completion: { (data, error) in

                if error != nil {

                    // 若有接收到錯誤,我們就直接印在 Console 就好,在這邊就不另外做處理。
                    print("Error: \(error!.localizedDescription)")
                    return
                }

                // 連結取得方式就是:data?.downloadURL()?.absoluteString。
                if let uploadImageUrl = data?.downloadURL()?.absoluteString {

                    // 我們可以 print 出來看看這個連結事不是我們剛剛所上傳的照片。
                    print("Photo Url: \(uploadImageUrl)")

                    let databaseRef = FIRDatabase.database().reference().child("AppCodaFireUpload").child(uniqueString)

                    databaseRef.setValue(uploadImageUrl, withCompletionBlock: { (error, dataRef) in

                        if error != nil {

                            print("Database Error: \(error!.localizedDescription)")
                        }
                        else {

                            print("圖片已儲存")
                        }

                    })
                }
            })
        }
    }

    dismiss(animated: true, completion: nil)
}
我們在剛剛取得 Storage 回傳的網址 if let 裡面加上 FirebaseDatabase 的實體,目的就是要將照片連結寫進 Firebase 資料庫中 。建立 Database 實體的方式跟建立 Storage 一樣,我們給他一個指定寫入資料的位置:AppCodaFireUpload,再將下一層位置指定為先前建立的獨立 ID,如此一來我們每一張上傳的圖片連結就會被放在這個獨立 ID 的位置下。
之後,將回傳的照片網址寫入 FirebaseDatabase 裡:
- 寫入的方法就用
setValue,將uploadImageUrl傳入。 - Database 方法同樣會回傳一個 completion,裡面一樣放著可能會有的錯誤資訊跟上傳資訊。但在這邊我們就單純判斷如果沒有錯誤就直接 print 「圖片已儲存」即可。
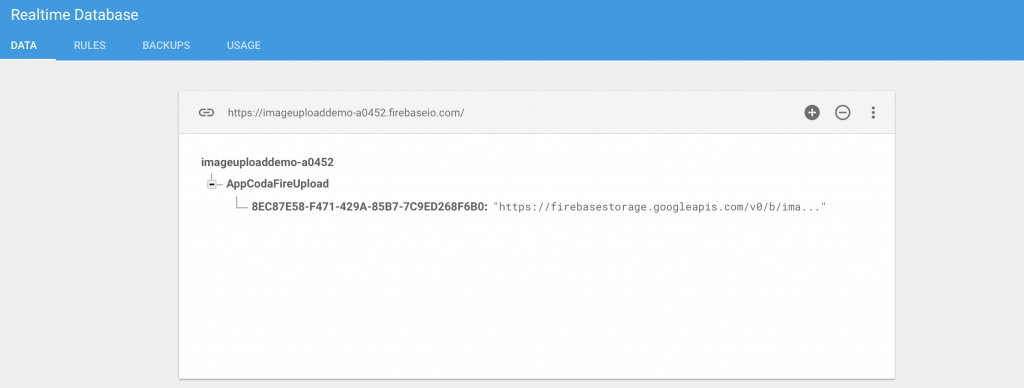
執行程式看看,有成功了嗎? 如果有成功你可以直接到 Firebase console 左側的 Database 看看是不是已經把圖片成功寫入資料庫了:
在 CollectionView 上顯示 Firebase 上的照片:
最後的一個步驟,就是在Collection View顯示我們之前上傳至Firebase Storage的照片。先回到我們的 FireCollectionViewController 裡,引入FirebaseDatabase並在 viewDidLoad 上方新增一個全域變數 fireUploadDic,形別為 [String:Any] 的 Dictionary:
import FirebaseDatabase

class FireCollectionViewController: UICollectionViewController {

    var fireUploadDic: [String:Any]?

    override func viewDidLoad() { ... }
}
目的是要暫存從 Firebase Database 抓下來的資料
之後,在 viewDidLoad 裡新增 Firebase Database 的實體並指定位置,再從 observe 的方法裡取得我們放在資料庫裡的檔案:
  override func viewDidLoad() {
        super.viewDidLoad()

        let databaseRef = FIRDatabase.database().reference().child("AppCodaFireUpload")

        databaseRef.observe(.value, with: { [weak self] (snapshot) in

            if let uploadDataDic = snapshot.value as? [String:Any] {

                self?.fireUploadDic = uploadDataDic
                self?.collectionView!.reloadData()
            }
        })
  }
讓我們看看以上程式的運作:
observe方法裡指定要監聽的資料種類:.value(它也可以指定當資料庫的值被改變、刪除…等狀態)- 之後會回傳一個 Block 給我們,讓我們可以取得資料庫回傳的資料:snapshot。
- 在 Block 裡我們轉換回傳資料值 (.value) 的形別為 [String:Any](因為我們存在 Firebase 上的資料就是這樣的形別)。
- 如果成功轉換,我們就把從 Firebase 回傳的資料放進全域變數
fireUploadDic裡,並在完成時重新整理 CollectionView 讓他可以讀取並顯示圖片。
在 Block 裡面你會發現我用 [weak self] 而非原先可以直接呼叫的 self,原因在於如果不用 weak self,在 Firebase 的 Block 裡會無法釋放 self 而產生 retain cycle,造成大量的記憶體問題。(可以在網上查詢更多關於 weak self 的資訊)
再來改變一下 CollectionView DataSource 的 numberOfItemsInSection 內的資料。用一個 if let 判斷是否可以解包 optional 的全域變數 fireUploadDic,如果可以就回傳內部圖片資料的數量給 CollectionView ; 不行的話就回傳 0。
override func collectionView(_ collectionView: UICollectionView, numberOfItemsInSection section: Int) -> Int {
    if let dataDic = fireUploadDic {

        return dataDic.count
    }

    return 0
}
最後在 CollectionView cellForItemAt 內設定 cell 上面 UIImageView 要顯示的照片:
override func collectionView(_ collectionView: UICollectionView, cellForItemAt indexPath: IndexPath) -> UICollectionViewCell {
    let cell = collectionView.dequeueReusableCell(withReuseIdentifier: reuseIdentifier, for: indexPath) as! FireCollectionViewCell

    // Configure the cell
    if let dataDic = fireUploadDic {
        let keyArray = Array(dataDic.keys)
        if let imageUrlString = dataDic[keyArray[indexPath.row]] as? String {
            if let imageUrl = URL(string: imageUrlString) {

                URLSession.shared.dataTask(with: imageUrl, completionHandler: { (data, response, error) in

                    if error != nil {

                        print("Download Image Task Fail: \(error!.localizedDescription)")
                    }
                    else if let imageData = data {

                        DispatchQueue.main.async {

                            cell.fireImageView.image = UIImage(data: imageData)
                        }
                    }

                }).resume()
            }
        }
    }

    return cell
}
在函式裡我們同樣用一個 if let 確認是否可以解包 fireUploadDic。如果成功解包,我們建立一個 Array 並放入所有透過 Dictionary.keys 方法所取得 fireUploadDic (dataDic) 裡面的 Key (也就是每一個我們從 Firebase 資料庫抓下來的 UUID)。之後,再透過 indexPath.row 抓出 keyArray 中每一個 key,並用該 key 取得位於 dataDic 裡面的 value(也就是我們的圖片連結),並轉型為 String。
成功取得 imageUrlString 以後,再嘗試將它轉為 URL。之後透過 URLSession dataTask 去解析圖片的 URL 網址,這裡也會傳三個參數:
- 解析完的資料(data)
- 網路回應(response)
- 錯誤(error)
當遇到錯誤,一如往常我們簡單的把它 print 出來就好。倘若成功取得解析的 data,我們將 optional 的 data 解包成 imageData,並將它轉為 UIImage 後設定在 cell 上方 fireImageView。
由於 UI 處理不應該被網路解析的處理給凍結,所以我們將設定 UIImage 的地方搬回 mainQueue 主執行緒裡。如此一來當網路處理完某一筆網路圖片的解析後就會直接先放上 cell 的 fireImageView 上,而不會等所有圖片網址都解析完以後再一次放上去而造成畫面凍結。
執行看看吧!點進圖片庫裡有沒有看到剛剛上傳到 Storage 的圖片呀?成功的話會有像這樣的結果:
呼~ 恭喜完成小小的圖片上傳程式啦!有任何問題的話歡迎一起討論哦~
也歡迎你分享實作的結果或類似的應用!
最後再附上完整專案,再麻煩讀者從 Firebase 的專案下載 GoogleService-Info 拉進專案即可使用。