
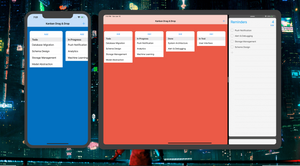
當建構一個讓使用者在螢幕上移動數據的 App 時,拖放 (Drag and Drop) 就是一種很自然的使用者交互 (User Interaction)。這樣的互動方式在 Trello、Jira 等相關 App 中廣泛使用,以在版面之間移動數據。
在 iOS 11 發佈之前,以拖放互動方式來建立一個 iOS app 並不是簡單。以我過往的經驗來說,我們會要手動實作許多乏味的步驟,像是:
- 在想要拖動的視圖中加入長壓手勢辨識器 (recognizer)。
- 當使用者開始拖動時,建立一個快照視圖 (snapshot)。
- 當使用者在螢幕上拖動快照視圖時,處理快照視圖座標的更新。
- 偵測並處理使用者放開物件到一個座標位置的行動。
- 同步放開數據的目的地及拖動數據的來源,並且在使用者介面 (UI) 作對應的更新。
就算你完成了上面這麼多任務,也很難讓拖放互動方式順利的運行。值得慶幸的是,隨著 iOS 11 的發佈,Apple 終於在 Cocoa Touch SDK 中提供了 Drag and Drop API。雖然 iOS 12 是最新的行動作業系統版本,但 iOS 11 是 iPad 自 2010 年推出以來最大的作業系統更新。iPad 作為 PC 和智慧型手機之間的第三個設備,支援多任務處理 (multitasking),你可以在 Split Screen 和 Slide Over 界面上同時執行多個 App。另外也推出來自 macOS 的 Dock,允許使用者容製化喜歡的或最近使用過的 App。
Drag and Drop API 是 App 之間最好的溝通方式,以下列出了拖放互動方式的主要特點:
- 支援 iOS 系統層級的拖放,像是使用 Split View 在 Apps 之間移動文字、圖片和檔案,或是在 Dock 拖動 App 圖示。
- 在拖放視圖的時候,API 會自動處理所有動畫,開發者只需要實作協定,來獲得更高的彈性及客製化的需求。
- 支援拖動多個項目,使用者只需拖動一個物件並點擊其他物件來選擇。
快速導覽 Drag and Drop API
根據 Apple 的 Documentation 頁面,以下列出了 Drag and Drop API 的概述:
- 拖放功能可以在單一 App 或是多個 App 之間實作。在 iPhone 的環境之中,拖放功能只限於在單一 App 中使用。如果是在多個 App 的環境中實作,使用者開始拖動視圖的 App 將成為來源 App (Source App),而使用者將視圖拖動到的位置就會是 目的 App (Destination App)。
- 當使用者做出拖放的動作時,系統會初始化
Drag Activity。系統也會透過Drag Session管理使用者正在拖放的物件的狀態。 - 我們可以使用實作
UIDragDelegate及UIDropDelegate兩個協定的物件,來設置UIView支援物件的拖放功能。而UIDragDelegate及UIDropDelegate兩個協定也各自擁有獨立的視圖屬性及協定,來處理每個單元 (cell) 的拖放行為。API 為我們提供彈性,來客製化拖放功能。 - 系統也會透過
UTI (Uniform Type Identifier)自動且安全地處理 App 之間的數據移動及載入,包含文字、圖像和聯絡人等。
我們將要建立的 App
在這篇教學之中,我們將會使用 Drag and Drop API 來建立一個類似 Trello 的 App,包含下列功能:
- 創建記事板 (board)。
- 將項目加入到記事板。
- 透過拖放功能在記事板之間移動項目。
為了創造這些功能,以下是我們將要在專案中實作的任務:
- App 流程圖
- 在 Xcode 創建並設置初始專案
- 為記事板創建模型,並列出所包含的項目
- 設置 UI 佈局
- 設置視圖控制器與單元
- 透過 UITableViewDragDelegate 處理 UITableView 內拖動項目的行為
- 透過 UITableViewDropDelegate 處理將項目置放 UITableView 的行為
你可以在 GitHub 複製我們最終完成的專案。
事不宜遲,我們來瞭解 App 流程圖吧!
App 流程圖
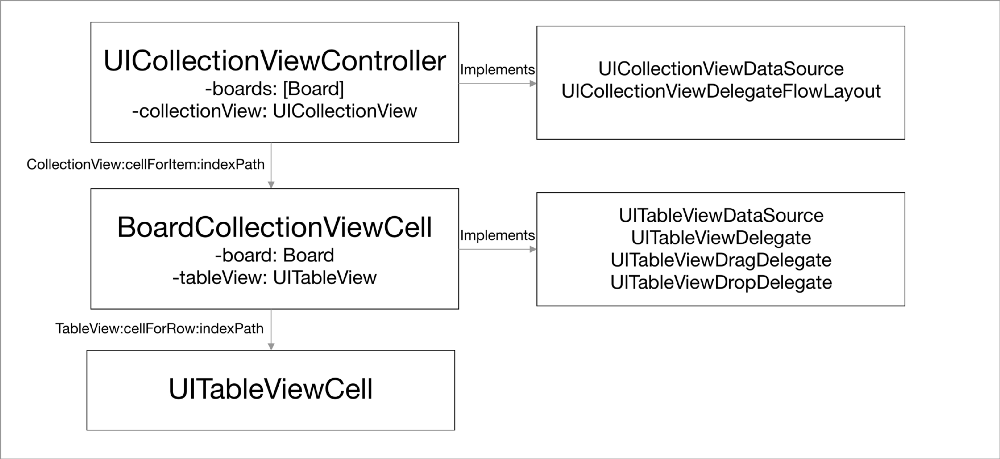
為了建立一個能顯示包含項目記事板集合的 App,我們需要幾個 UIKit 元件來規劃我們的策略。以下是整個流程的總覽:
- 我們會使用
UICollectionViewController和UICollectionViewFlowLayout來建構主螢幕。 - 我們會設置
UICollectionViewCell的滾動方向屬性為Horizontal,這樣我們就能夠以水平的方式來滾動記事板。 - 我們會以
UITableView作為ContentView來創建一個UICollectionViewCell的原型,每當UICollectionView從佇列 (queue) 中提取一個單元,UICollectionViewController將會傳遞記事板模型的參考。 - 我們以
UICollectionViewCell為datasource及 UITableView 的delegate,它也會在UITableView提取單元格時為項目提供數據。 - 我們將會設定
UITableView的屬性來啟用拖動互動 (drag interaction),並將UICollectionViewCell設置為UITableView的UITableViewDragDelegate及UITableViewDropDelegate。
開始處理 Xcode 專案
首先,打開 Xcode 並創建一個新專案,選擇 Single View App 作為模板,並取消勾選 use unit tests 及 Core Data 選項。任意為專案取一個名稱,並按下 confirm 來創建專案。
刪除 ViewController.swift,然後在 main.storyboard 中也刪除 UIViewController.swift。我們待會會回來 storyboard 設定 App 的 UI。下一步,我們將會創建模型來呈現一個包含項目列表的記事板。
為記事板創建模型
新建一個名為 Board.swift 的檔案,並且在檔案中宣告一個同名的類別。
class Board: Codable {

    var title: String
    var items: [String]

    init(title: String, items: [String]) {
        self.title = title
        self.items = items
    }
}
在類別的宣告中,我們用初始化器 (initializer) 宣告了兩個實例 (instant) 屬性:
- 宣告記事板的標題為字串 (
String) - 宣告項目列表為字串陣列 (
[String])
這樣模型就完成了。為了突顯這篇教學文章的主題,我們盡量保持文章簡潔清晰。
設置 UI 佈局
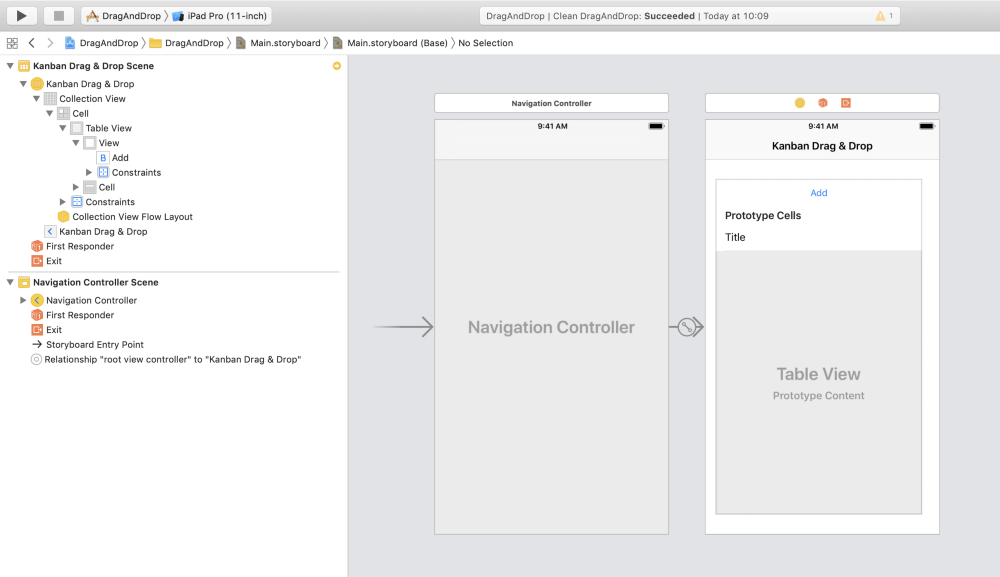
讓我們為 App 創解 UI 吧!先打開 main.storyboard 並跟著下列步驟操作:
- 從物件函式庫 (object library) 中點選並拖動
Collection View Controller。 - 點擊它,並到
Editor中單擊嵌入Navigation Controller,將它設置為Initial View Controller。 - 在
Collection View Controller中選擇Collection View。 - 在
Attribute Inspector中,將Scroll Direction屬性設定為Horizontal,同時把background的顏色設定為#0070BF。 - 到
Size Inspector中,將Cells和Lines的min spacing都改為10。接著將所有方向的Section Insets都改為0,最後把Cell Size的寬度改為320,高度改為480。 - 選擇
Collection View Cell並將它的identifier設定為Cell。 - 打開物件函式庫,把一個
Table View拖動到Collection View Cell之中。 - 將
TableView的leading、trailing、top、bottom的自動佈局屬性設置為0,請確認你有取消勾選Constrain to margins的選項。 - 把一個
Table View Cell從物件函式庫拖到Table View裡,同時將它的identifier設定為Cell,並將style設定為Basic。 - 把一個
UIView拖到TableView Header View,並將高度設定為44。 - 把一個
UIButton拖到剛剛創建的TableView Header View中,並且把所有方向的約束設置為0。最後,把標題文字設為Add。
操作完上述所有步驟之後,你的 storyboard 看起來應該像是這樣。
設定記事板集合視圖單元格
新建一個名為 BoardCollectionViewCell 的檔案,並把下面這段程式碼輸入到檔案之中。
import UIKit
class BoardCollectionViewCell: UICollectionViewCell {

    @IBOutlet weak var tableView: UITableView!
    var board: Board?
    weak var parentVC: BoardCollectionViewController?

    override func awakeFromNib() {
        super.awakeFromNib()

        self.layer.masksToBounds = true
        self.layer.cornerRadius = 10.0
tableView.dataSource = self
        tableView.delegate = self
        tableView.tableFooterView = UIView()
    }

    func setup(with board: Board) {
        self.board = board
        tableView.reloadData()
    }

    @IBAction func addTapped(_ sender: Any) {
        let alertController = UIAlertController(title: "Add Item", message: nil, preferredStyle: .alert)
        alertController.addTextField(configurationHandler: nil)
        alertController.addAction(UIAlertAction(title: "Add", style: .default, handler: { (_) in
            guard let text = alertController.textFields?.first?.text, !text.isEmpty else {
                return
            }

            guard let data = self.board else {
                return
            }

            data.items.append(text)
            let addedIndexPath = IndexPath(item: data.items.count - 1, section: 0)

            self.tableView.insertRows(at: [addedIndexPath], with: .automatic)
            self.tableView.scrollToRow(at: addedIndexPath, at: UITableView.ScrollPosition.bottom, animated: true)
        }))

        alertController.addAction(UIAlertAction(title: "Cancel", style: .cancel, handler: nil))
        parentVC?.present(alertController, animated: true, completion: nil)
    }
}
extension BoardCollectionViewCell: UITableViewDataSource, UITableViewDelegate {

    func tableView(_ tableView: UITableView, numberOfRowsInSection section: Int) -> Int {
        return board?.items.count ?? 0
    }

    func tableView(_ tableView: UITableView, titleForHeaderInSection section: Int) -> String? {
        return board?.title
    }

    func tableView(_ tableView: UITableView, cellForRowAt indexPath: IndexPath) -> UITableViewCell {
        let cell = tableView.dequeueReusableCell(withIdentifier: "Cell", for: indexPath)
        cell.textLabel?.text = "\(board!.items[indexPath.row])"
        return cell
    }

    func tableView(_ tableView: UITableView, didSelectRowAt indexPath: IndexPath) {
        tableView.deselectRow(at: indexPath, animated: true)
    }

}
以下簡單解釋了這段程式碼:
- 創建一個
UICollectionViewCell的子類別,命名為BoardCollectionViewCell。 - 宣告三個實例屬性:
tableView、board模型、及BoardCollectionViewCell的weak引用。 - 覆寫
awakeFromNib方法,讓我們可以設定單元格的圖層,以添加輕微的圓角效果。接著,我們把 tableView 的delegate和datasource設定為BoardCollectionViewCell。 - 創建一個
IBAction方法,使用者點擊 Add 按鈕時就會觸發這個方法。在這個方法之中,我們以alert風格創建一個UIAlertController,並添加一個UITextField,以輸入即將添加到記事板中的項目名稱。當使用者加入項目時,我們只要把它附加到記事板模型的項目陣列即可。接著,我們告訴Table View在底層插入新的行列,並且滾動到特定的IndexPath。 - 創建接受
Board模型為參數的setupWithBoard方法,它把傳遞過來的記事板儲存為實例屬性,並觸發Table View的reloadData方法來更新視圖。 - 創建一個實作
UITableViewDataSource及UITableViewDelegate的擴展 (extenstion)。 - 對於
tableView:numberOfRowsInSection:,我們只回傳記事板中的項目數量。 - 在
tableView:cellForRowAtIndexPath:中,我們以 storyboard 設定的識別字將Table View Cell取出佇列,使用記事板項目的IndexPath列來取得項目,並以項目來設定單元格textLabel的文字屬性來顯示它。
完成了!確認一下你有在 storyboard 中設定 UICollectionViewCell 類別為 BoardCollectionViewCell,並連結 Add 按鈕的 touchUpInside 行為到 addTapped: 選擇器 (selector) 之中。
設定記事板集合視圖控制器
新建一個名為 BoardCollectionViewController 的檔案,並把下面這段程式碼輸入到檔案之中。
import UIKit
class BoardCollectionViewController: UICollectionViewController, UICollectionViewDelegateFlowLayout {
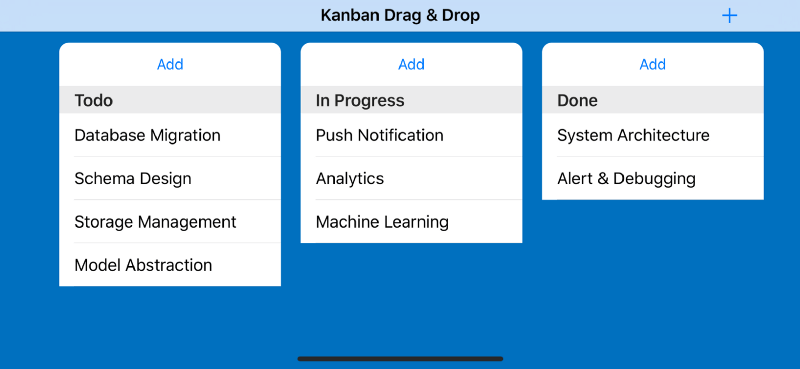
var boards = [
Board(title: "Todo", items: ["Database Migration", "Schema Design", "Storage Management", "Model Abstraction"]),
Board(title: "In Progress", items: ["Push Notification", "Analytics", "Machine Learning"]),
Board(title: "Done", items: ["System Architecture", "Alert & Debugging"])
]
override func viewDidLoad() {
super.viewDidLoad()
setupAddButtonItem()
updateCollectionViewItem(with: view.bounds.size)
}
override func viewWillTransition(to size: CGSize, with coordinator: UIViewControllerTransitionCoordinator) {
super.viewWillTransition(to: size, with: coordinator)
updateCollectionViewItem(with: size)
}
private func updateCollectionViewItem(with size: CGSize) {
guard let layout = collectionView.collectionViewLayout as? UICollectionViewFlowLayout else {
return
}
layout.itemSize = CGSize(width: 225, height: size.height * 0.8)
}
func setupAddButtonItem() {
let addButtonItem = UIBarButtonItem(barButtonSystemItem: .add, target: self, action: #selector(addListTapped(_:)))
navigationItem.rightBarButtonItem = addButtonItem
}
@objc func addListTapped(_ sender: Any) {
let alertController = UIAlertController(title: "Add List", message: nil, preferredStyle: .alert)
alertController.addTextField(configurationHandler: nil)
alertController.addAction(UIAlertAction(title: "Add", style: .default, handler: { (_) in
guard let text = alertController.textFields?.first?.text, !text.isEmpty else {
return
}
self.boards.append(Board(title: text, items: []))
let addedIndexPath = IndexPath(item: self.boards.count - 1, section: 0)
self.collectionView.insertItems(at: [addedIndexPath])
self.collectionView.scrollToItem(at: addedIndexPath, at: UICollectionView.ScrollPosition.centeredHorizontally, animated: true)
}))
alertController.addAction(UIAlertAction(title: "Cancel", style: .cancel, handler: nil))
present(alertController, animated: true)
}
override func collectionView(_ collectionView: UICollectionView, numberOfItemsInSection section: Int) -> Int {
return boards.count
}
override func collectionView(_ collectionView: UICollectionView, cellForItemAt indexPath: IndexPath) -> UICollectionViewCell {
let cell = collectionView.dequeueReusableCell(withReuseIdentifier: "Cell", for: indexPath) as! BoardCollectionViewCell
cell.setup(with: boards[indexPath.item])
return cell
}
}
讓我簡單地解釋一下這段程式碼:
- 創建一個
UICollectionViewController的子類別,並命名為BoardCollectionViewController。它同時也實作了UICollectionDelegateFlowLayout協定,因為我們在 storyboard 中設定了Collection View Controller使用流動佈局 (Flow Layout)。 - 在
viewDidLoad之中,我們觸發了setupAddButtonItem方法。這個方法把一個UIBarButtonItem加入到NavigationBar右側列按鈕項目之中。我們將target action selector設置為addListTapped:方法。最後,我們觸發updateCollectionViewItem來傳遞view的尺寸,以設定單元格的項目尺寸。 - 在
updateCollectionViewItem方法中,我們計算了Collection View Cell的動態高度為view高度的0.8倍,而單元格的寬度則固定為225點。在螢幕旋轉而view需要計算新尺寸時,這個方法也會被調用。 - 當
addListTapped被調用時,我們建立一個alert風格的UIAlertController。接著,我們添加UITextField,讓使用者輸入想要創建的記事板名字。在使用者填寫完Text Field並確認後,我們創建一個新記事板,以使用者輸入的名稱為標題文字屬性,並將它附加到Board陣列之中。最後,我們告訴Collection View要在最後的indexPath插入一個新項目,並自動滾動到新的位置。 - 對於
collectionView:numberOfItemsInSection:,我們只回傳board陣列的尺寸。 - 對於
collectionView:cellForItemAtIndexPath:,我們以 storyboard 中設定的識別字來將單元格從佇列中提取出來,並將它轉型為BoardCollectionViewCell。接著,我們使用indexPath獲得記事板,並觸發單元格的setupWithBoard:,將記事板傳遞給單元格。
首次執行 App
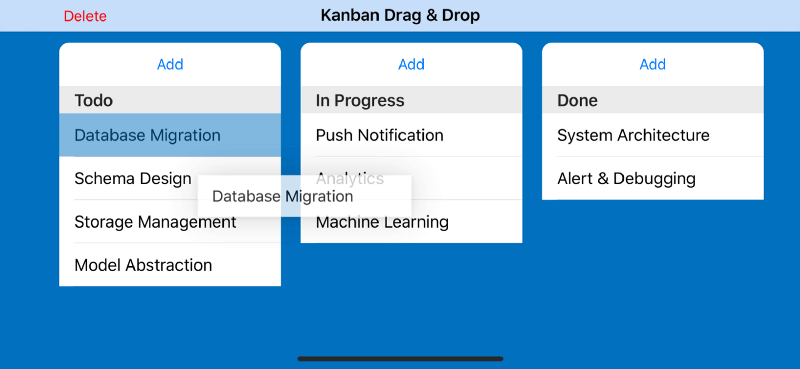
現在我們試著首次建置及執行 App,你應該會看見一個帶有項目的記事板清單。試試加入新的記事板及項目,並水平地滾動螢幕。接著,我們將要在 Table View 之中實作 Drag and Drop API,以在記事板之間移動項目。
使用 UITableViewDragDelegate 處理 UITableView 內的拖動行為
在 Table View 之中加入支援拖動功能其實很簡單。我們所需要做的就只是設定兩個屬性,將 dragInteractionEnabled 設定為 true,並將 dragDelegate 設定為 BoardCollectionViewCell。打開 BoardCollectionViewCell,並到 theawakeFromNib 方法加入下列程式碼:
...
    override func awakeFromNib() {
     ....
   tableView.dragInteractionEnabled = true
      tableView.dragDelegate = self
    }
...
這時編譯器可能會有錯誤,因為 BoardCollectionViewCell 還未實作 UITableViewDragDelegate 協定。因此,我們來到檔案的最底下,以擴展的方式加入下列程式碼。
extension BoardCollectionViewCell: UITableViewDragDelegate {

   func tableView(_ tableView: UITableView, itemsForBeginning session: UIDragSession, at indexPath: IndexPath) -> [UIDragItem] {
        guard let board = board, let stringData = board.items[indexPath.row].data(using: .utf8) else {
            return []
        }

        let itemProvider = NSItemProvider(item: stringData as NSData, typeIdentifier: kUTTypePlainText as String)
        let dragItem = UIDragItem(itemProvider: itemProvider)
        session.localContext = (board, indexPath, tableView)

        return [dragItem]
    }

}
以下就解釋了 UITableViewDragDelegate 實際做了甚麼:
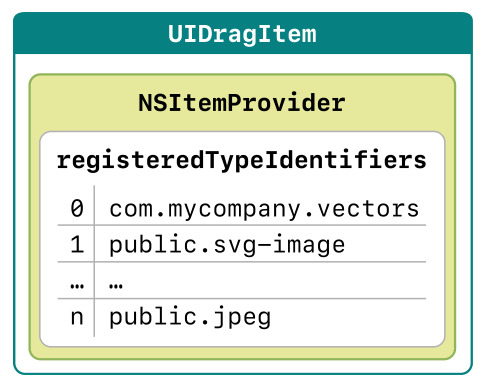
(圖片來源:Apple Inc.)
UITableViewDragDelegate需要委派 (delegate) 去實作tableView:itemsForBeginningSession:atIndexPath:方法,這個方法會回傳一個UIDragItem物件的陣列。它會被Table View用來以indexPath啟動drag session,如果我們想要開始drag session,就需要回傳一個非空 (not empty) 的UIDragItem物件陣列。- 我們藉由傳遞
NSItemProvider來初始化UIDragItem。NSItemProvider是那些我們想拖放項目的數據表示法 (representation),它使用UTIs (Uniform Type Identifiers)來表達數據,像是文字、圖像或名片等。它是拖動來源 App 和置放目標 App 之間的合約/承諾,基於它們的表示法來載入及處理這些數據。 - 在方法之中,我們透過
indexPath從記事板獲得項目,並且使用utf8為編碼方法,將它轉換成Data型別。 - 我們初始化
NSItemProvider來傳遞數據,並將 typeIdentifier 參數設為kUTTypePlainText。為了能夠使用常數 (constant),你需要在檔案最上面匯入MobileCoreServices。 - 接下來,我們使用了 item provider 來初始化
UIDragItem。我們也設定了localContext屬性,來附加拖動項目的額外資訊。這裡,我們指定一個 tuple,當中包含了稍後把項目置放不同Table View時會用到的記事板、indexPath、及 table view。 - 最後,回傳包含我們創建的
UIDragItem的陣列。
試著建置並執行 App,並在記事板中嘗試拖動項目。成功了!你現在可以在螢幕上拖動項目了。當然,目前你還沒有辦法將項目放到任何地方,讓我們馬上就來實作項目的置放行為吧!
使用 UITableViewDropDelegate 處理 UITableView 內的置放行為
接著,我們將要在 Table View 中加入支援置放的功能,這其實跟加入支援拖動的部份很相似,我們只需要設定 Table View 的 dropDelegate 屬性給 BoardCollectionViewCell。到 BoardCollectionViewCell 中的 awakeFromNib 方法,在底部加入以下程式碼。
...
    override func awakeFromNib() {
     ....
      tableView.dropDelegate = self
    }
...
這時編譯器也會跳出錯誤,因為 BoardCollectionViewCell 還未實作 UITableViewDropDelegate 協定。因此,我們來到檔案的最底下,以擴展的方式加入下列程式碼。
extension BoardCollectionViewCell: UITableViewDropDelegate {

    func tableView(_ tableView: UITableView, performDropWith coordinator: UITableViewDropCoordinator) {
        if coordinator.session.hasItemsConforming(toTypeIdentifiers: [kUTTypePlainText as String]) {
            coordinator.session.loadObjects(ofClass: NSString.self) { (items) in
                guard let string = items.first as? String else {
                    return
                }
                var updatedIndexPaths = [IndexPath]()

                switch (coordinator.items.first?.sourceIndexPath, coordinator.destinationIndexPath) {
                case (.some(let sourceIndexPath), .some(let destinationIndexPath)):
                    // Same Table View
                    if sourceIndexPath.row < destinationIndexPath.row {
                        updatedIndexPaths =  (sourceIndexPath.row...destinationIndexPath.row).map { IndexPath(row: $0, section: 0) }
                    } else if sourceIndexPath.row > destinationIndexPath.row {
                        updatedIndexPaths =  (destinationIndexPath.row...sourceIndexPath.row).map { IndexPath(row: $0, section: 0) }
                    }
                    self.tableView.beginUpdates()
                    self.board?.items.remove(at: sourceIndexPath.row)
                    self.board?.items.insert(string, at: destinationIndexPath.row)
                    self.tableView.reloadRows(at: updatedIndexPaths, with: .automatic)
                    self.tableView.endUpdates()
                    break

                case (nil, .some(let destinationIndexPath)):
                    // Move data from a table to another table
                    self.removeSourceTableData(localContext: coordinator.session.localDragSession?.localContext)
                    self.tableView.beginUpdates()
                    self.board?.items.insert(string, at: destinationIndexPath.row)
                    self.tableView.insertRows(at: [destinationIndexPath], with: .automatic)
                    self.tableView.endUpdates()
                    break


                case (nil, nil):
                    // Insert data from a table to another table
                    self.removeSourceTableData(localContext: coordinator.session.localDragSession?.localContext)
                    self.tableView.beginUpdates()
                    self.board?.items.append(string)
                    self.tableView.insertRows(at: [IndexPath(row: self.board!.items.count - 1 , section: 0)], with: .automatic)
                    self.tableView.endUpdates()
                    break

                default: break

                }
            }
        }
    }

    func removeSourceTableData(localContext: Any?) {
        if let (dataSource, sourceIndexPath, tableView) = localContext as? (Board, IndexPath, UITableView) {
            tableView.beginUpdates()
            dataSource.items.remove(at: sourceIndexPath.row)
            tableView.deleteRows(at: [sourceIndexPath], with: .automatic)
            tableView.endUpdates()
        }
    }

    func tableView(_ tableView: UITableView, dropSessionDidUpdate session: UIDropSession, withDestinationIndexPath destinationIndexPath: IndexPath?) -> UITableViewDropProposal {
        return UITableViewDropProposal(operation: .move, intent: .insertAtDestinationIndexPath)
    }

}
以下就解釋了這段程式碼:
- 我們實作必要的
tableView:dropSessionDidUpdateSession:withDestinationIndexPath:方法。這個方法所做的就是要告訴系統,每當使用者在Table View拖動項目時,我們想要如何透過特定的indexPath內的UITableViewDragProposal來消耗置放項目的數據。 UITableViewDragProposal接受三種類型的操作:copy、move或是cancel。就我們的情況而言,我們只想要移動 (move) 數據,所以我們將move作為操作類型回傳UITableViewDragProposal,並且將intent設定為insertAtDestinationIndexPath。- 最後,我們需要實作
tableView:performDropWithCoordinator:,這個方法將會在使用者的手指離開螢幕時被觸發。在方法中,我們有機會從 coordinator 的 session 中載入拖動項目的數據表示法。我們也需要處理數據源的同步問題。接著,我們要求Table View執行移動操作的動畫。請記住,我們可以在不同的 Table View 之間拖動項目。 - 在方法之中,我們要求 coordinator 的 session 判斷是否有項目遵從
kUTTypePlainText,如果有的話,我們就使用傳遞NSString為型別的loadObjectOfClass方法來載入物件,系統將會執行拖動項目數據的載入,並將它傳到封包之中。 - 我們對拖動的項目來源
indexPath和 session 目標indexPath使用switch條件敘述。 - 如果來源 indexPath 和目標 indexPath 都存在,則代表使用者正在同一 Table View 中進行拖放。在這裡,我們只使用來源 indexPath 從記事板刪除來源項目,接著使用目標 indexPath 插入項目。最後,我們告訴
Table View重新載入來源和目標 indexPath 之間的列。 - 如果來源 indexPath 為
nil而目標 indexPath 存在,則代表使用者在同一個 App 內的不同 Table View 拖動項目。要處理這個情況,我們可以透過附加在UITableViewDragDelegate中drag session的localContext方法,來恢復來源 Table View、來源 indexPath、及來源記事板。我們使用來源 indexPath 將項目從來源記事板移除,並且告訴來源 Table View 要刪除該列。最後,我們使用目標 indexPath 將項目插入目標記事板,並告訴目標 Table View 插入該列。 - 最後一種情況,是當目標及來源的 indexPath 都是
nil。這種情況代表使用者從其他 App 拖動文字到我們的 App 中。在這種情況下,我們只需要將項目插入到目標記事板中,並告訴 Table View 插入該項目就可以了。
試著建置並執行 App,你應該能夠在記事板之間使用拖放來移動項目了!如果你想要更多的挑戰,可以查看 GitHub 上的專案,看看如何使用 UIDragDelegate 將項目拖放到客製化 UIView 刪除項目。
總結
恭喜,你成功了!我們已經透過 Drag and Drop API 完成了一個類似 Trello 的 App。這個 API 真的簡單又強大,而我們只是學會了它一部分的功能,其實還有更多功能等著你去探索,像是當置放項目需要花點時間時創建佔位符 (placeholder)、拖放多個項目、和其他非常好用的功能。所以你還在等甚麼?讓我們繼續學習、創建新的東西,用科技改善我們的世界吧!