
本教程是上週設計模式 (Design Patterns) 系列教程的第二部分。人稱「四人幫」(Gang of Four, GoF)的 Erich Gamma、Richard Helm、 Ralph Johnson 及 John Vlissides 所著的 “Design Patterns: Elements of Reusable Object-Oriented Software”,開創、收集、並解釋了目前常見的 23 種經典軟體開發設計模式。今天,我們將集中討論「行為 (Behavioral)」類別中的兩種模式:觀察者模式 (Observer) 和備忘錄模式 (Memento)。
軟體開發是一種致力將現實世界情境模組化的過程,希望能夠建立工具來加強這個情境裡的使用者體驗。在財務管理方面的工具,例如銀行 App 或是購物工具如 Amazon 或 eBay 的 iOS App 等,絕對讓現在的生活比十年前來得方便。再想想我們至今走過的道路,雖然軟體 App 的功能越來越強大,對使用者亦更簡單易用;但對開發者來說,這種 App 的開發也變得更加複雜。
因此,開發者建立了一系列管理複雜性的最佳實作方式,一些較熱門的例子像是物件導向程式設計 (Object-Oriented Programming)、協定導向程式設計 (Protocol-Oriented Programming)、數值語義 (Value Semantics)、Local Reasoning、拆分大型函式為多個有良好定義介面的小型函式(像是 Swift Extension)、語法糖 (Syntactic Sugar) 等。還有一個在眾多最佳實作最值得關注的,就是設計模式的使用。
設計模式
設計模式是一個非常重要的工具,讓開發者可以管理複雜的程式碼。要將其概念化的話,可以說它是一種樣版技術,而每個樣版都是量身訂做來解決相對應、重複出現、又容易識別的問題。你可以把它們用於構思程式情境的最佳實作清單,在構思的過程中你會反覆查看它們,像是如何從物件家族中建立物件、而不必了解物件家族的所有詳細實作細節。設計模式的重點便是它們適用於常見的場景上,因為它們是泛用的,所以可以重複使用。讓我舉一個具體的例子。
設計模式並不是特定於某些使用案例,像是迭代 (Iterating) 一個有 11 個整數 (Int) 的 Swift 陣列。舉例來說,四人幫定義迭代器 (Iterator) 模式來提供一個通用介面,以穿透集合裡的所有項目,而無需知道集合裡的複雜性(像是型別)。設計模式並不是編寫語言程式碼,而是一個解決常見軟體開發情境的一套準則或或經驗法則。
還記得我在 AppCoda 上談論過的 “Model-View-ViewModel” (MVVM) 設計模式,以及受到 Apple 與許多 iOS 開發者青睞的 “Model-View-Controller” (MVC) 設計模式嗎?
這兩個模式通常被應用在整個 App 上。MVVM 與 MVC 是架構 (Architectural) 設計模式,旨在將使用者界面 (UI) 與 App 的資料和呈現邏輯的程式碼分開,同時也將 App 的資料與核心資料處理及/或商業邏輯分開。四人幫的設計模式在性質上更為具體,旨在解決在 App 的程式庫裡更具體的問題。你可以在一個 App 裡使用三個、或七個、甚至十二個四人幫的設計模式。還記得我的迭代範例吧?雖然這不在四人幫的設計模式清單裡,但是代理 (Delegation) 是另一個很棒的設計模式。
雖然四人幫的書對很多開發者來說就如聖經,但是亦有批評者存在的。我們將會在本篇文章的結論中討論這一點。
設計模式類別
四人幫將 23 個設計模式分為「創建 (Creational)」、「結構 (Structural)」及「行為 (Behavioral)」三大類別。本教程將討論行為類別中的兩種模式,而這個類別的目的,是對 class 和 struct(行為者)的行為加入安全、合乎常理、及一致的最佳實踐。我們希望整個應用程式內的行為者 (classes/structs) 都能獲得良好、一致、且可預測的行為;亦希望行為者在內部、以及與不同行為者之間有良好的互動。我們應該在編譯之前和編譯時考慮它們之間的行為互動關係;而在運行時,我們在 class/struct 裡面有很多實例 (instances),除了在做自己的事情外,它們也不斷地與其它物件進行交互/溝通。由於實例之間的通信提升了軟體複雜性,因此制定一致、高效和安全的通信規則至關重要,但在構建每個 class/struct 時,這個概念不應減少對良好設計實踐的需求。由於我們專注於「行為」,因此在將責任分配給行為者以及它們的關連文件時,必須記住使用一致的模式。
在深入介紹理論前,先讓我提供實際例子,我將通過 Swift 程式碼實現的深入實踐來展示理論。在本教程中,我們將看到如何一致地分配維護行為者狀態的責任,以及如何一致地為行為者 (subject) 分配責任,向許多行為者的觀察者 (observer) 發送通知;另一方面,我們也會介紹如何一致地將責任分配給觀察者以便註冊獲得通知。
在討論設計模式時,一致性的概念應該是不言而喻的。請記住上回教程的重點、亦是我們介紹更多設計模式時將反覆提及的重點: 隱藏複雜度(封裝),這是聰明開發者的最終目標。例如,物件導向 (OOP) 類別能夠提供非常複雜而強大的功能,但不需要開發者了解關於類別內部的運作;同樣,Swift 協定導向 (POP) 亦是在控制複雜性方面,一種非常重要的技術。管理複雜性是開發人員最大的負擔,但現在我們就要談論如何馴服這頭野獸!
關於本教程定義的註釋
針對本教程,我將解釋濃縮於範例 App 程式碼註釋中。我將簡要介紹設計模式概念,希望讀者查看我的程式碼、閱讀當中的註解、並能夠完全內化我分享的技術。畢竟,如果你只能談論、而不能編寫程式碼,那麼你將無法通過面試,而且無法成為真正的核心開發人員。
你可能已經注意到我對行為設計模式的定義,是遵循 Apple 官方文件的:
通常一個 Class 的實例稱為物件。然而在 Swift 中,Class 和 Structure 的關係要比在其他語言中更密切,本章中所討論的大部分功能都適用於 Class 和 Structure 上。因此,我們會使用更通用的術語實例,而不是物件。
我也在編譯時將 Class 和 Struct 稱為「行為者 (actors)」。
觀察者模式 (The observer design pattern)
你可能在使用 Apple 行動裝置時見過觀察者模式,亦可能在編寫 iOS App 時也注意到它。每當我住的地方下雨,不論 iPhone 是否為屏幕鎖定狀態,我們都會收到螢幕上彈出的推送通知,就如下圖所示:
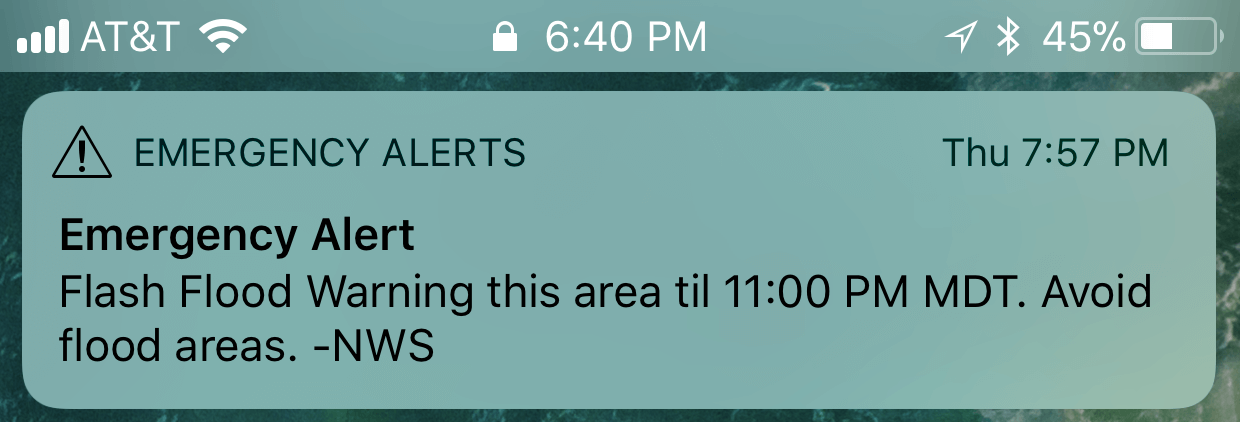
訊息來源是由 Apple 代表國家氣象局向數千台 iPhone 發送廣播通知,警告大家所在地區有可能水浸。更具體來說,就像在 iOS App 中,一個實例 subject 將狀態轉變通知(許多)其他實例觀察者,而參與這個廣播類型通信的實例不需要互相知道彼此;這是鬆耦合 (loose coupling) 一個很好的例子。
Subject 實例 ── 通常是單個關鍵訊息源 ── 將關於其狀態更改的通知,廣播到依賴它的多個觀察者實例 (observer instances);其中,有興趣的觀察者必須訂閱以獲取通知。
值得慶幸的是,iOS 具有內置且眾所周知的功能,可用於啟用觀察者模式: NotificationCenter 。這點我就留給你們參考此處,自己研究一下。
觀察者設計模式的應用範例
我在 GitHub 上的觀察者範例專案,展示了這種廣播類型通信的運作。
我知道這並不符合 iOS 的 Human Interface Guidelines,但這裡需要一個實作範例,所以請不要太在意。假設我們採取主動方法,讓一個 Subject 實例負責監視網路連接。要實作這樣的 Broadcaster,你只需讓一個行為者採用我的 ObservedProtocol 即可。
假設有多個觀察者實例,例如一個 Image downloader(圖片下載)的 class、一個通過 REST API 驗證用戶憑證的 login 實例、以及一個訂閱 Subject 以獲得網絡連接狀態通知的 App 內瀏覽器,要實作這幾個實例,你可以使用任何類,並使其成為我採用 ObserverProtocol 的抽象 (abstract) Observer class 的繼承者。(我稍後會解釋將範例觀察者程式碼限制在一個 Class 中的原因。)
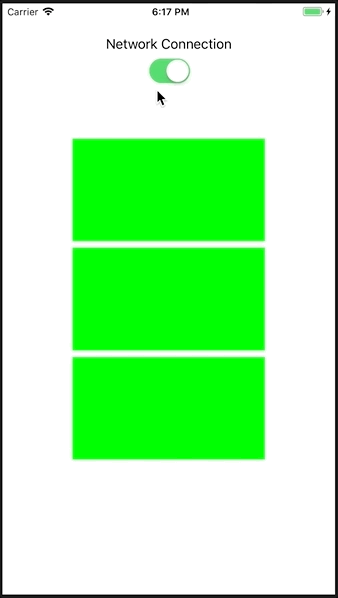
為實作範例專案中的觀察者設計模式,我創建了 NetworkConnectionHandler class。當這個 concrete class 的實例收到 NetworkConnectionStatus.connected 的通知時,它們將 UIView 實例變為綠色;當他們收到 NetworkConnectionStatus.disconnected 的通知時,則會將 UIView 實例變為紅色。
這是我在 iPhone 8 Plus 上編譯、安裝和運行範例程式碼的結果:
這是與以上動畫對應的 Xcode 控制台輸出:
觀察者設計模式 App 的範例程式碼
要查閱我在上一節中所指有大量註釋的程式碼,請查看範例專案中的 Observable.swift 文件:
import Foundation

import UIKit

// Make notification names consistent and avoid stringly-typing.
// Try to use constants instead of strings or numbers.
extension Notification.Name {

    static let networkConnection = Notification.Name("networkConnection")
    static let batteryStatus = Notification.Name("batteryStatus")
    static let locationChange = Notification.Name("locationChange")

}

// Various network connection states -- made consistent.
enum NetworkConnectionStatus: String {

    case connected
    case disconnected
    case connecting
    case disconnecting
    case error

}

// The key to the notification's "userInfo" dictionary.
enum StatusKey: String {
    case networkStatusKey
}

// This protocol forms the basic design for OBSERVERS,
// entities whose operation CRTICIALLY depends
// on the status of some other, usually single, entity.
// Adopters of this protocol SUBSCRIBE to and RECEIVE
// notifications about that critical entity/resource.
protocol ObserverProtocol {

    var statusValue: String { get set }
    var statusKey: String { get }
    var notificationOfInterest: Notification.Name { get }
    func subscribe()
    func unsubscribe()
    func handleNotification()

}

// This template class abstracts out all the details
// necessary for an entity to SUBSCRIBE to and RECEIVE
// notifications about a critical entity/resource.
// It provides a "hook" (handleNotification()) in which
// subclasses of this base class can pretty much do whatever
// they need to do when specific notifications are received.
// This is basically an "abstract" class, not detectable
// at compile time, but I felt this was an exceptional case.
class Observer: ObserverProtocol {

    // This specific state reported by "notificationOfInterest."
    // I use String for maximum portability. Yeah, yeah...
    // stringly-typed...
    var statusValue: String
    // The key to the notification's "userInfo" dictionary, with
    // which we can read the specific state and store in "statusValue."
    // I use String for maximum portability. Yeah, yeah...
    // stringly-typed...
    let statusKey: String
    // The name of the notification this class has registered
    // to receive whenever messages are broadcast.
    let notificationOfInterest: Notification.Name

    // Initializer which registers/subscribes/listens for a specific
    // notification and then watches for a specific state as reported
    // by notifications when received.
    init(statusKey: StatusKey, notification: Notification.Name) {

        self.statusValue = "N/A"
        self.statusKey = statusKey.rawValue
        self.notificationOfInterest = notification

        subscribe()
    }

    // We're registering self (this) with NotificationCenter to receive
    // all notifications with the name stored in "notificationOfInterest."
    // Whenever one of those notifications is received, the
    // "receiveNotification(_:)" method is called.
    func subscribe() {
        NotificationCenter.default.addObserver(self, selector: #selector(receiveNotification(_:)), name: notificationOfInterest, object: nil)
    }

    // It's a good idea to un-register from notifications when we no
    // longer need to listen, but this is more of a historic curiosity
    // as, since iOS 9.0, the OS does some type of cleanup.
    func unsubscribe() {
        NotificationCenter.default.removeObserver(self, name: notificationOfInterest, object: nil)
    }

    // Called whenever a message labelled "notificationOfInterest"
    // is received. This is our chance to do something when the
    // state of that critical resource we're observing changes.
    // This method "must have one and only one argument (an instance
    // of NSNotification)."
    @objc func receiveNotification(_ notification: Notification) {

        if let userInfo = notification.userInfo, let status = userInfo[statusKey] as? String {

            statusValue = status
            handleNotification()

            print("Notification \(notification.name) received; status: \(status)")

        }

    } // end func receiveNotification

    // YOU MUST OVERRIDE THIS METHOD; YOU MUST SUBCLASS THIS CLASS.
    // I've MacGyvered this class into being "abstract" so you
    // can subclass and specialize as much as you want and not
    // have to worry about NotificationCenter details.
    func handleNotification() {
        fatalError("ERROR: You must override the [handleNotification] method.")
    }

    // Be kind and stop tapping a resource (NotificationCenter)
    // when we don't need to anymore.
    deinit {
        print("Observer unsubscribing from notifications.")
        unsubscribe()
    }

} // end class Observer

// An example of an observer, usually one of several
// (many?) that are all listening for notifications
// from some usually single critical resource. Notice that
// it's brief and can serve as a model for creating
// handlers for all sorts of notifications.
class NetworkConnectionHandler: Observer {

    var view: UIView

    // As long as you call "super.init" with valid
    // NotificationCenter-compatible values, you can
    // create whatever type of initializer you want.
    init(view: UIView) {

        self.view = view

        super.init(statusKey: .networkStatusKey, notification: .networkConnection)
    }

    // YOU MUST OVERRIDE THIS METHOD, but that
    // gives you the chance to handle notifications
    // in whatever way you deem fit.
    override func handleNotification() {

        if statusValue == NetworkConnectionStatus.connected.rawValue {
            view.backgroundColor = UIColor.green
        }
        else {
            view.backgroundColor = UIColor.red
        }

    } // end func handleNotification()

} // end class NetworkConnectionHandler

// An template for a subject, usually a single
// critical resource, that broadcasts notifications
// about a change in its state to many
// subscribers that depend on that resource.
protocol ObservedProtocol {
    var statusKey: StatusKey { get }
    var notification: Notification.Name { get }
    func notifyObservers(about changeTo: String) -> Void
}

// When an adopter of this ObservedProtocol
// changes status, it notifies ALL subsribed
// observers. It BROADCASTS to ALL SUBSCRIBERS.
extension ObservedProtocol {

    func notifyObservers(about changeTo: String) -> Void {
       NotificationCenter.default.post(name: notification, object: self, userInfo: [statusKey.rawValue : changeTo])
    }

} // end extension ObservedProtocol
我本來打算將大部分觀察者通知處理邏輯放入 ObserverProtocol 的 extension 中,但在設置 #selector 時遇到 @objc。所以,我想到使用 addObserver(forName:object:queue:using:) 的 block-based 版本,接著傳遞一個 notification handler closure ⋯⋯ 作為一個抽象類別,我決定讓我的通知處理程式碼更容易理解、更具有教育意義。
我也意識到 Swift 沒有 抽象類別的正式概念,但是你可能已經知道有一個常用的解決方法。因此,為了簡化解釋觀察者模式的目標,我透過強制 override 其 handleNotification() 方法,使 Observer class 「抽象化」。這樣一來,當你的 Observer 子類別實例收到通知時,你就有機會注入任何想執行的專屬邏輯。
下面是範例專案的 ViewController.swift 文件,展示了如何在 Observable.swift 中使用剛剛討論並審閱過的核心邏輯:
import UIKit

// By adopting the ObservedProtocol, this view controller
// gains the capability for broadcasting notifications via
// NotificationCenter to ANY entities throughout this
// WHOLE APP whom are interested in receiving those notifications.
// Notice how little this class needs to do to gain
// notification capability?
class ViewController: UIViewController, ObservedProtocol {

    @IBOutlet weak var topBox: UIView!
    @IBOutlet weak var middleBox: UIView!
    @IBOutlet weak var bottomBox: UIView!

    // Mock up three entities whom are dependent upon a
    // critical resource: network connectivity. They need
    // to observe the status of the critical resource.
    var networkConnectionHandler0: NetworkConnectionHandler?
    var networkConnectionHandler1: NetworkConnectionHandler?
    var networkConnectionHandler2: NetworkConnectionHandler?

    // ObservedProtocol conformance -- two properties.
    let statusKey: StatusKey = StatusKey.networkStatusKey
    let notification: Notification.Name = .networkConnection

    override func viewDidLoad() {
        super.viewDidLoad()
        // Do any additional setup after loading the view, typically from a nib.

        // Here are three entities now listening for notifications
        // from the enclosing ViewController class.
        networkConnectionHandler0 = NetworkConnectionHandler(view: topBox)
        networkConnectionHandler1 = NetworkConnectionHandler(view: middleBox)
        networkConnectionHandler2 = NetworkConnectionHandler(view: bottomBox)
    }

    override func didReceiveMemoryWarning() {
        super.didReceiveMemoryWarning()
        // Dispose of any resources that can be recreated.
    }

    // Mock up a critical resource whose state can change.
    // I'm pretending that this ViewController is
    // responsible for network reachability/connectivity.
    // When we have a network connection, all interested
    // listeners are informed. When network access is lost,
    // all interested listeners are informed.
    @IBAction func switchChanged(_ sender: Any) {

        let swtich:UISwitch = sender as! UISwitch

        if swtich.isOn {
            notifyObservers(about: NetworkConnectionStatus.connected.rawValue)
        }
        else {
            notifyObservers(about: NetworkConnectionStatus.disconnected.rawValue)
        }

    } // end func switchChanged

} // end class ViewController
備忘錄 設計模式 (The memento design pattern)
大多數 iOS 開發人員都熟悉備忘錄模式,例如用於 Archives 和 Serialization 的 iOS 工具,它允許你「將物件和數值在屬性列表、JSON、及其他 Flat Binary 表示法之間相互轉換」。又例如 iOS 狀態保存和恢復功能,可以在「你的 App 被系統終止之後,記住並返回之前的狀態」。
備忘錄設計模式用於捕獲、表示、和儲存一個實例在特定時間點的內部狀態,然後允許你在稍後時間查找該實例的狀態、並恢復它。當你在恢復實例的狀態時,它應該準確反映被捕獲時的狀態。雖然這聽起來很簡單,但你應該確保在捕獲和恢復期間,所有實例屬性的訪問級別都有遵守到,例如:public 數據應該恢復到 public 屬性,而 private 數據應恢復到 private 屬性。
為讓事情簡單一點,我使用了 iOS 的 UserDefaults 作為實例狀態儲存和復原的核心。
備忘錄設計模式應用範例
雖然我知道 iOS 已經具備 archiving 和 serialization 功能,但我還是編寫了可以保存和恢復 Class 狀態的範例程式碼。我的程式碼可以很好地抽象化 archiving(封存)和 de-archiving(解壓縮),讓你可以儲存和恢復具有不同屬性的各種實例狀態。但我的例子不適合商業化產品使用,這只是一個用於解釋備忘錄模式的教學實例。
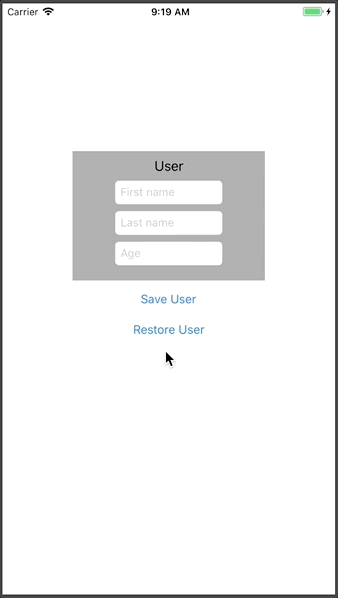
我在 GitHub 上的備忘錄範例專案,展示了一個包含了firstName、lastName 和 age 屬性的 User class 實例,其狀態如何可以永久保存到 UserDefaults 內,然後稍後再恢復。在開始時,我們沒有 User 實例可用於恢復,所以我輸入一組資料並將它儲存,然後就可以點擊 Restore User 恢復它,就像是這樣:
這是與上一個動畫對應的控制台輸出:
Empty entity.

lastName: Adams
age: 87
firstName: John

lastName: Adams
age: 87
firstName: John
備忘錄設計模式 App 的範例程式碼
我的備忘錄程式碼很簡單。它提供了 Memento 協定 (protocol) 和協定擴展 (protocol extension),用於處理並抽象化所有採用 Memento 協定的 Class 成員屬性其封存和解壓縮的所有細節。這個擴展還允許你在任何特定時間點,將物件的整個狀態打印到控制台。我使用了一個 Dictionary<String, String> 封存資料,將採用 Class 的屬性名稱作為儲存的 key、而屬性內容儲存為值,我亦將值存為 String 以保持我的實作簡單易懂,因為有許多其他範例會要求你封存和解壓縮更複雜的屬性類型,但這只是一個關於設計模式的教程,而不是商業化 App 的程式碼。
請注意,我將 persist() 和 recover() 方法添加到 Memento 協定中,它們必須由任何採用 Memento 協定的 class 來實現。這些方法為開發者提供了機會,來按名稱封存和解壓縮採用 Memento 協定的特定 類別屬性。換句話說,Dictionary<String, String> 類型的 state 屬性元素,可以與採用 Memento 協定的類別屬性一對一匹配。每個屬性的名稱對應於 dictionary 元素的 key,而且每個屬性值對應於所述 key 匹配的 dictionary 元素的值。看看程式碼你就會明白了!
由於 persist() 和 recover() 方法必須由採用 Memento 協定的 Class 實現,所以可以通過這些方法,查看和訪問所有訪問級別的屬性如 public、private 和 fileprivate。
你可能會問,為什麼我只使用 Memento 協定類別?我這樣做是因為那可怕的 Swift 編譯器訊息:”Cannot use mutating member on immutable value: ‘self’ is immutable”。這個討論已超出了本教程的範圍,但如果你想折磨自己,歡迎在此處閱讀相關描述。
這是我實作備忘錄設計模式的核心邏輯,你可以在範例應用程式的文件 Memento.swift 中找到:
import Foundation

// I've only limited this protocol to reference types because of the
// "Cannot use mutating member on immutable value: ‘self’ is immutable"
// conundrum.
protocol Memento : class {

    // Key for accessing the "state" property
    // from UserDefaults.
    var stateName: String { get }

    // Current state of adopting class -- all
    // property names (keys) and property values.
    var state: Dictionary { get set }

    // Save "state" property with key as specified
    // in "stateName" into UserDefaults ("generic" save).
    func save()

    // Retrieve "state" property using key as specified
    // in "stateName" from UserDefaults ("generic" restore).
    func restore()

    // Customized, "specific" save of "state" dictionary with
    // keys corresponding to member properties of adopting
    // class, and save of each property value (class-specific).
    func persist()

    // Customized, "specific" retrieval of "state" dictionary using
    // keys corresponding to member properties of adopting
    // class, and retrieval of each property value  (class-specific).
    func recover()

    // Print all adopting class's member properties by
    // traversing "state" dictionary, so output is of
    // format:
    //
    // Property 1 name (key): property 1 value
    // Property 2 name (key): property 2 value ...
    func show()

} // end protocol Memento

extension Memento {

    // Save state into dictionary archived on disk.
    func save() {
        UserDefaults.standard.set(state, forKey: stateName)
    }

    // Read state into dictionary archived on disk.
    func restore() {

        if let dictionary = UserDefaults.standard.object(forKey: stateName) as! Dictionary? {
            state = dictionary
        }
        else {
            state.removeAll()
        }

    } // end func restore()

    // Storing state in dictionary makes display
    // of object state so easy and intuitive.
    func show() {

        var line = ""

        if state.count > 0 {

            for (key, value) in state {
                line += key + ": " + value + "\n"
            }

            print(line)

        }

        else {
            print("Empty entity.\n")
        }

    } // end func show()

} // end extension Memento

// By adopting the Memento protocol, we can, with relative
// ease, save the state of an entire class to persistant
// storage and then retrieve that state at a later time, i.e.,
// across different instances of this app running.
class User: Memento {

    // These two properties are required by Memento.
    let stateName: String
    var state: Dictionary

    // These properties are specific to a class that
    // represents some kind of system user account.
    var firstName: String
    var lastName: String
    var age: String

    // Initializer for persisting a new user to disk, or for
    // updating an existing user. The key value used for accessing
    // persistent storage is property "stateName."
    init(firstName: String, lastName: String, age: String, stateName: String) {

        self.firstName = firstName
        self.lastName = lastName
        self.age = age

        self.stateName = stateName
        self.state = Dictionary()

        persist()

    } // end init(firstName...

    // Initializer for retrieving a user from disk, if one
    // exists. The key value used for retrieving state from
    // persistent storage is property "stateName."
    init(stateName: String) {

        self.stateName = stateName
        self.state = Dictionary()

        self.firstName = ""
        self.lastName = ""
        self.age = ""

        recover()

    } // end init(stateName...

    // Save the user's properties to persistent storage.
    // We intuitively save each property value by making
    // the keys in the dictionary correspond one-to-one with
    // this class's property names.
    func persist() {

        state["firstName"] = firstName
        state["lastName"] = lastName
        state["age"] = age

        save() // leverage protocol extension

    } // end func persist()

    // Read existing user's properties from persistent storage.
    // After retrieving the "state" dictionary from UserDefaults,
    // we easily restore each property value because
    // the keys in the dictionary correspond one-to-one with
    // this class's property names.
    func recover() {

        restore() // leverage protocol extension

        if state.count > 0 {
            firstName = state["firstName"]!
            lastName = state["lastName"]!
            age = state["age"]!
        }
        else {
            self.firstName = ""
            self.lastName = ""
            self.age = ""
        }

    } // end func recover

} // end class User
這是實現之前提及的備忘錄設計模式範例的程式碼(封存和解壓 User 類別的實例),就如在範例應用程式中的 ViewController.swift 文件:
import UIKit

class ViewController: UIViewController {

    @IBOutlet weak var firstNameTextField: UITextField!
    @IBOutlet weak var lastNameTextField: UITextField!
    @IBOutlet weak var ageTextField: UITextField!

    override func viewDidLoad() {
        super.viewDidLoad()
        // Do any additional setup after loading the view, typically from a nib.
    }

    override func didReceiveMemoryWarning() {
        super.didReceiveMemoryWarning()
        // Dispose of any resources that can be recreated.
    }

    // Called when "Save User" button is tapped. Stores
    // "User" class instance properties to UserDefaults
    // based on stateName property value of "userKey" (but
    // use whatever lights your fire).
    @IBAction func saveUserTapped(_ sender: Any) {

        if firstNameTextField.text != "" &&
            lastNameTextField.text != "" &&
            ageTextField.text != "" {

            let user = User(firstName: firstNameTextField.text!,
                            lastName: lastNameTextField.text!,
                            age: ageTextField.text!,
                            stateName: "userKey")
            user.show()

        }

    } // end func saveUserTapped

    // Called when "Restore User" button is tapped. Retrieves
    // "User" class instance properties from UserDefaults
    // based on stateName property value of "userKey," if
    // a key/value pair with key "userKey" exists.
    @IBAction func restoreUserTapped(_ sender: Any) {

        let user = User(stateName: "userKey")
        firstNameTextField.text = user.firstName
        lastNameTextField.text = user.lastName
        ageTextField.text = user.age
        user.show()

    }

} // end class ViewController
總結
一些評論說使用設計模式就證明了程式語言的不足之處,而且經常在程式碼看到模式出現不太好;我並不同意這看法。期待程式語言擁有所有功能是不切實際的,而且可能會導致本來已經很巨大的程式語言如 C++ 變得更巨大、更複雜,以致難以學習、使用和維護。了解並解決經常發生的問題是一個積極的特質,值得積極鼓勵。設計模式是人類從歷史中學到的成功範例。針對常見問題來寫出摘要並提出標準解決方法,讓這些解決方法可以被移植及分散出去。
像 Swift 這般的簡潔程式語言與最佳實踐範例(像是設計模式)結合,是一個理想而有趣的媒介。一致的程式碼通常都是可讀且可維護的。還要記住,隨著數百萬開發者不斷討論及分享想法,設計模式仍不斷發展。藉由網際網路連結在一起,這種開發者的討論就形成了不斷自我調整的集體智慧。
FB : https://www.facebook.com/yishen.chen.54
Twitter : https://twitter.com/YeEeEsS