

Core Image 是 Cocoa Touch 中威力強大的內建 API ,同時也是 iOS SDK 中很重要的一部分,不過卻經常被人忽略。在本文中,我們將會介紹 Core Image 的人臉偵測( Face Detection )功能,並且展示如何在自己的 iOS App 中使用這項技術!
我們即將打造……
在 iOS 5 (大約在 2011 年)的時候就已經有人臉偵測的功能了,但是卻經常被忽略。人臉偵測 API 不僅可以讓開發者偵測人臉,還能夠檢查人臉的特徵,例如表情是否包含微笑或者是否眨眼睛。
首先,我們會建立一個從照片中辨識人臉並以方塊標記的簡單 App ,藉此介紹 Core Image 的人臉偵測技術。在第二個範例中,我們會更進一步允許使用者拍照、偵測人臉,並且取得使用者的臉部座標。這樣我們就可以學會如何使用 iOS 這組強大但是卻經常被人遺忘的人臉偵測 API 。
讓我們開始動手吧!
設定專案
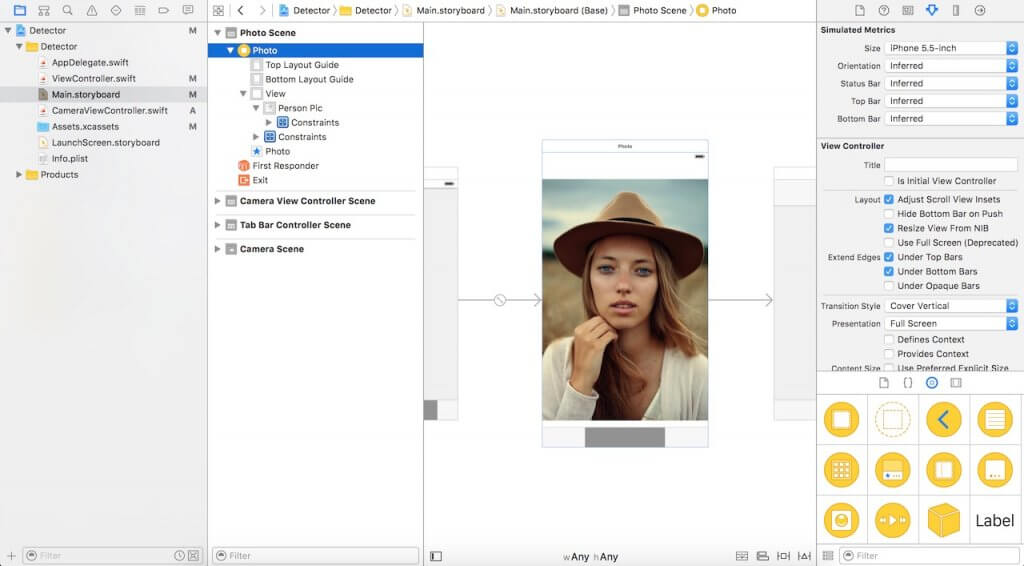
下載啟始專案,並且在 Xcode 中打開。如你所見,只有一個簡單的 Storyboard ,內含 imageView 和 IBOutlet 連線。
要開始使用 Core Image 的人臉偵測功能,必須先匯入 Core Image 程式庫。來到 ViewController.swift 檔案,在開頭處插入下列程式碼:
import CoreImage
使用 Core Image 偵測人臉
在啟始專案中,我們的 Storyboard 裡面有一個 imageView ,此元件已經透過 IBOutlet 與程式碼連結。接著,我們將實作人臉偵測的部分。將下列的程式碼插入到 ViewController.swift 檔案中,我們稍後將會逐行講解:
func detect() {

    guard let personciImage = CIImage(image: personPic.image!) else {
        return
    }

    let accuracy = [CIDetectorAccuracy: CIDetectorAccuracyHigh]
    let faceDetector = CIDetector(ofType: CIDetectorTypeFace, context: nil, options: accuracy)
    let faces = faceDetector?.features(in: personciImage)

    for face in faces as! [CIFaceFeature] {

        print("Found bounds are \(face.bounds)")

        let faceBox = UIView(frame: face.bounds)

        faceBox.layer.borderWidth = 3
        faceBox.layer.borderColor = UIColor.red.cgColor
        faceBox.backgroundColor = UIColor.clear
        personPic.addSubview(faceBox)

        if face.hasLeftEyePosition {
            print("Left eye bounds are \(face.leftEyePosition)")
        }

        if face.hasRightEyePosition {
            print("Right eye bounds are \(face.rightEyePosition)")
        }
    }
}
讓我們來看一下到底發生了什麼事:
- 第 #3 行:我們建立了名為 personciImage 的變數,用來擷取 Storyboard 中 UIImageView 的 UIImage ,並將之轉換成 CIImage ,以便在 Core Image 中使用。
- 第 #7 行:我們建立了名為 accuracy 的變數,並且設定為 CIDetectorAccuracyHigh 。數值範圍從 CIDetectorAccuracyHigh (處理能力最強)到 CIDetectorAccuracyLow (處理能力最低)。本文基於示範的目的,選擇的是 CIDetectorAccuracyHigh ,因為我們希望能夠有較高的精確度。
- 第 #8 行:我們定義了名為 faceDetector 的變數,並且設定為 CIDetector 類別,然後傳遞給前面所建立的 accuracy 變數。
- 第 #9 行:透過呼叫 faceDetector 的 features(in:) 函式,偵測器會找出指定影像中的人臉。最後,將會傳回所有偵測結果的人臉陣列。
- 第 #11 行:利用迴圈處理人臉陣列,並且將每個偵測到的人臉轉型為 CIFaceFeature 。
- 第 #15 行:我們建立了名為 faceBox 的 UIView ,並將其外框設定為 faces.first 傳回的外框維度。這麼做的目的是繪製矩形,將偵測到的人臉標記起來。
- 第 #17 行:將 faceBox 的框線寬度設定為 3 。
- 第 #18 行:將框線顏色設定為紅色。
- 第 #19 行:背景顏色設定為透明( Clear ),意味著此視圖的背景是看不見的。
- 第 #20 行:最後,我們將此視圖新增到 personPic imageView 中。
- 第 #22-28 行:這組 API 除了可以協助偵測人臉之外,偵測器還能夠偵測人臉的左眼和右眼。我們不會標記影像中的眼睛。此處我們只是想要向你展示 CIFaceFeature 的相關屬性。
我們將在 viewDidLoad 中呼叫 detect 函式。現在就讓我們來插入下列這 2 行程式碼吧:
detect()
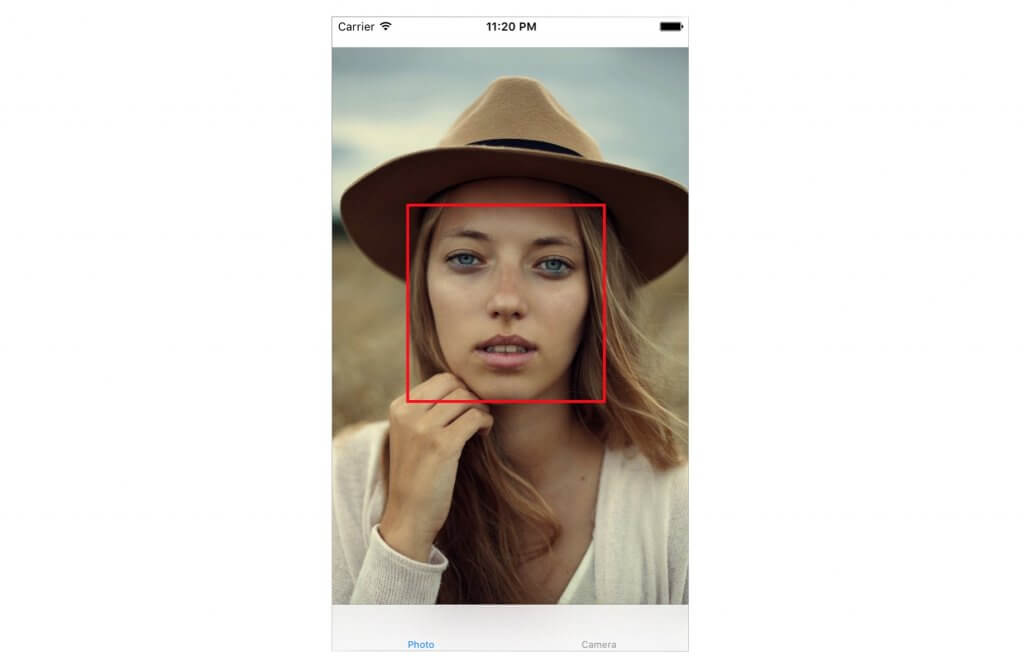
編譯並執行此 App 。將可以獲得如下圖所示的結果:
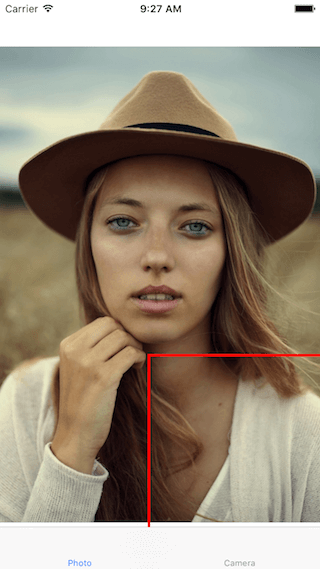
根據主控台的輸出,看起來偵測器似乎能夠偵測到人臉了:
Found bounds are (177.0, 415.0, 380.0, 380.0)
在目前的實作中,有幾個議題尚未處理:
- 人臉偵測是套用於原始影像,其解析度比 imageView 來得高。而我們已將 imageView 的內容模式設定為符合縮放比例( Aspect Fit )。為了正確繪製矩形,我們必須計算人臉位於 imageView 中的實際位置與大小。
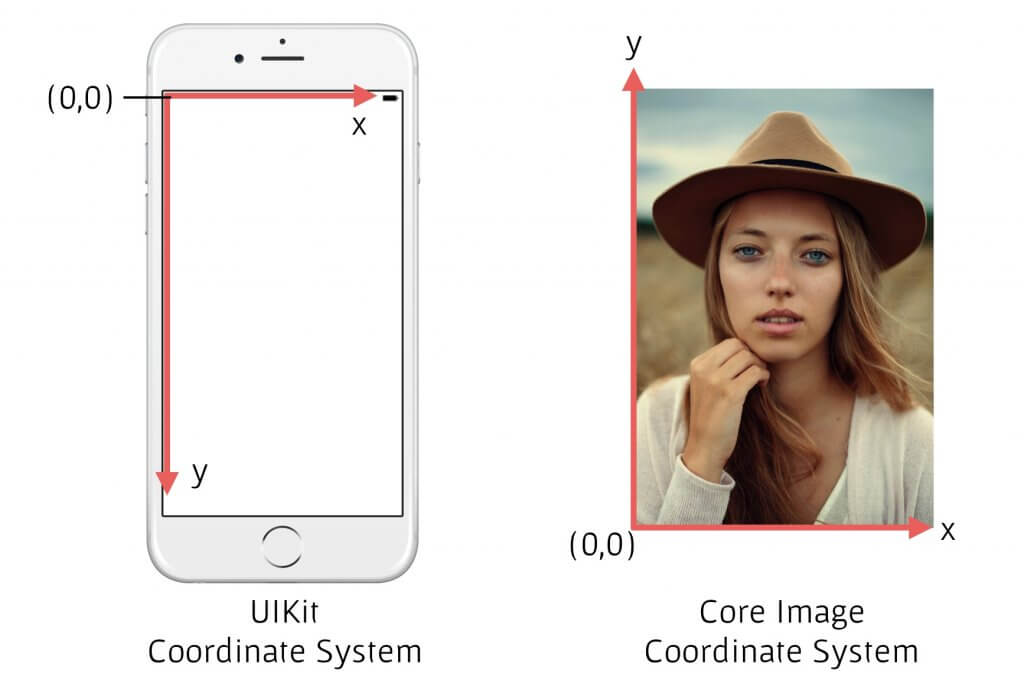
- 此外,Core Image 和 UIView (或 UIKit )使用的是 2 種截然不同的座標系統(請見下圖)。我們必須提供兩者座標系統轉換的實作。
現在,將 detect() 函式替換成如下所示的程式碼:
func detect() {

    guard let personciImage = CIImage(image: personPic.image!) else {
        return
    }

    let accuracy = [CIDetectorAccuracy: CIDetectorAccuracyHigh]
    let faceDetector = CIDetector(ofType: CIDetectorTypeFace, context: nil, options: accuracy)
    let faces = faceDetector?.features(in: personciImage)

    // 用來將 Core Image 座標轉換成 UIView 座標
    let ciImageSize = personciImage.extent.size
    var transform = CGAffineTransform(scaleX: 1, y: -1)
    transform = transform.translatedBy(x: 0, y: -ciImageSize.height)

    for face in faces as! [CIFaceFeature] {

        print("Found bounds are \(face.bounds)")

        // 套用座標轉換實作
        var faceViewBounds = face.bounds.applying(transform)

        // 計算矩形在 imageView 中的實際位置和大小
        let viewSize = personPic.bounds.size
        let scale = min(viewSize.width / ciImageSize.width,
                        viewSize.height / ciImageSize.height)
        let offsetX = (viewSize.width - ciImageSize.width * scale) / 2
        let offsetY = (viewSize.height - ciImageSize.height * scale) / 2

        faceViewBounds = faceViewBounds.applying(CGAffineTransform(scaleX: scale, y: scale))
        faceViewBounds.origin.x += offsetX
        faceViewBounds.origin.y += offsetY

        let faceBox = UIView(frame: faceViewBounds)

        faceBox.layer.borderWidth = 3
        faceBox.layer.borderColor = UIColor.red.cgColor
        faceBox.backgroundColor = UIColor.clear
        personPic.addSubview(faceBox)

        if face.hasLeftEyePosition {
            print("Left eye bounds are \(face.leftEyePosition)")
        }

        if face.hasRightEyePosition {
            print("Right eye bounds are \(face.rightEyePosition)")
        }
    }
}
上述被更動到的程式碼將以黃色標註。首先,我們使用仿射變換( Affine Transform )來轉換 Core Image 和 UIKit 兩者的座標。接著,我們撰寫額外的程式碼,以便計算矩形視圖的實際位置和大小。
現在再度執行此 App 。應該會看見人臉被方框圈選起來。太棒了!你已經成功利用 Core Image 實現了人臉偵測。
建構具有人臉偵測功能的照相 App
請想像你有個可以拍照的相機/相片 App 。你希望在取得影像之後馬上進行人臉偵測,判斷內容是否包含人臉。假使有發現的話,或許會想要在照片上面加上分類標籤之類的。雖然本文的主要目的不是打造照相 App ,不過我們將以實際的相機 App 來進行實驗。基於此目的,我們會需要整合 UIImagePicker 類別,並且在拍完照之後立刻執行我們的人臉偵測程式碼。
在前述的啟始專案中,我已經建立了 CameraViewController 類別。將其更新成如下所示,以便實現相機功能:
class CameraViewController: UIViewController, UIImagePickerControllerDelegate, UINavigationControllerDelegate {
    @IBOutlet var imageView: UIImageView!
    let imagePicker = UIImagePickerController()

    override func viewDidLoad() {
        super.viewDidLoad()
        imagePicker.delegate = self
    }

    @IBAction func takePhoto(_ sender: AnyObject) {

        if !UIImagePickerController.isSourceTypeAvailable(.camera) {
            return
        }

        imagePicker.allowsEditing = false
        imagePicker.sourceType = .camera

        present(imagePicker, animated: true, completion: nil)
    }

    func imagePickerController(_ picker: UIImagePickerController, didFinishPickingMediaWithInfo info: [String : Any]) {

        if let pickedImage = info[UIImagePickerControllerOriginalImage] as? UIImage {
            imageView.contentMode = .scaleAspectFit
            imageView.image = pickedImage
        }

        dismiss(animated: true, completion: nil)
        self.detect()
    }

    func imagePickerControllerDidCancel(_ picker: UIImagePickerController) {
        dismiss(animated: true, completion: nil)
    }

}
前面幾行將會設定 UIImagePicker 的委派。在 didFinishPickingMediaWithInfo 函式中(此為 UIImagePicker 的委派函式),我們將 imageView 設定成由此函式所傳入的影像。隨後關閉此選取器,並且呼叫 detect 函式。
我們尚未實作 detect 函式。所以請插入下列的程式碼,示範如下:
func detect() {
    let imageOptions =  NSDictionary(object: NSNumber(value: 5) as NSNumber, forKey: CIDetectorImageOrientation as NSString)
    let personciImage = CIImage(cgImage: imageView.image!.cgImage!)
    let accuracy = [CIDetectorAccuracy: CIDetectorAccuracyHigh]
    let faceDetector = CIDetector(ofType: CIDetectorTypeFace, context: nil, options: accuracy)
    let faces = faceDetector?.features(in: personciImage, options: imageOptions as? [String : AnyObject])

    if let face = faces?.first as? CIFaceFeature {
        print("found bounds are \(face.bounds)")

        let alert = UIAlertController(title: "Say Cheese!", message: "We detected a face!", preferredStyle: UIAlertControllerStyle.alert)
        alert.addAction(UIAlertAction(title: "OK", style: UIAlertActionStyle.default, handler: nil))
        self.present(alert, animated: true, completion: nil)

        if face.hasSmile {
            print("face is smiling");
        }

        if face.hasLeftEyePosition {
            print("Left eye bounds are \(face.leftEyePosition)")
        }

        if face.hasRightEyePosition {
            print("Right eye bounds are \(face.rightEyePosition)")
        }
    } else {
        let alert = UIAlertController(title: "No Face!", message: "No face was detected", preferredStyle: UIAlertControllerStyle.alert)
        alert.addAction(UIAlertAction(title: "OK", style: UIAlertActionStyle.default, handler: nil))
        self.present(alert, animated: true, completion: nil)
    }
}
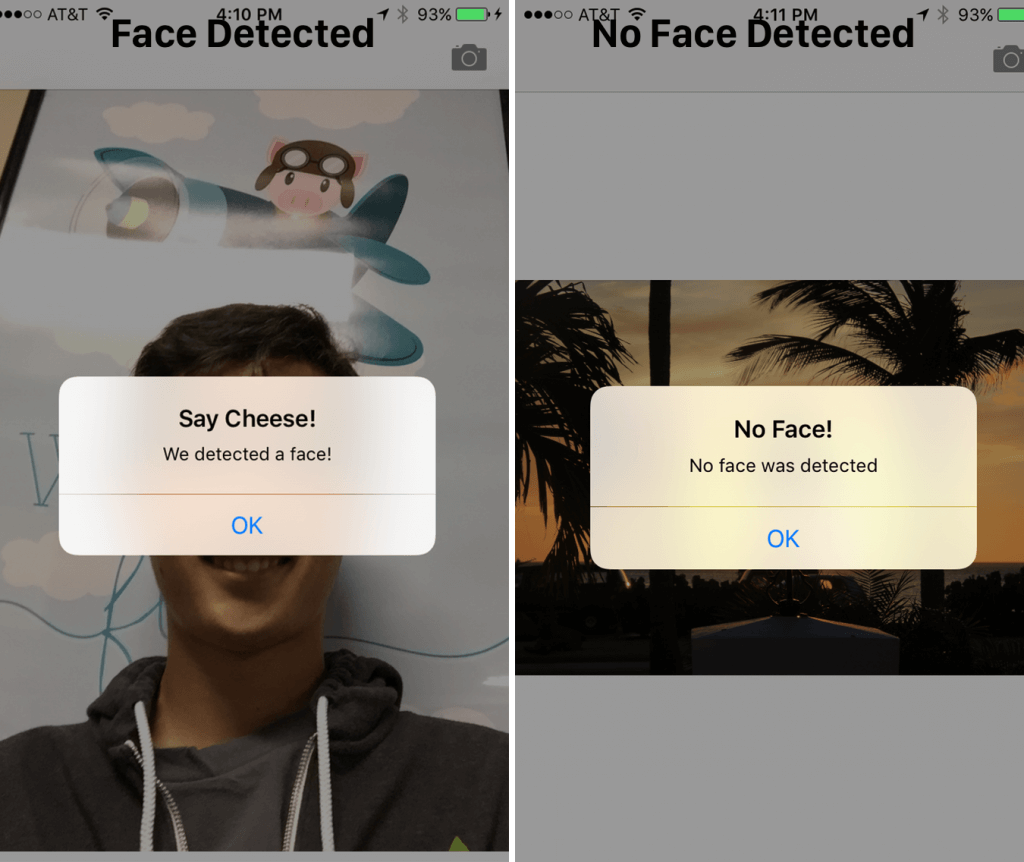
我們的 detect() 函式跟先前的實作非常類似。不過這次我們是在擷取的影像中使用。當偵測到人臉時,我們會顯示一個「 We detected a face! 」(偵測到人臉!)警示訊息。反之如果沒有的話,則顯示「 No Face! 」(沒有人臉!)訊息。
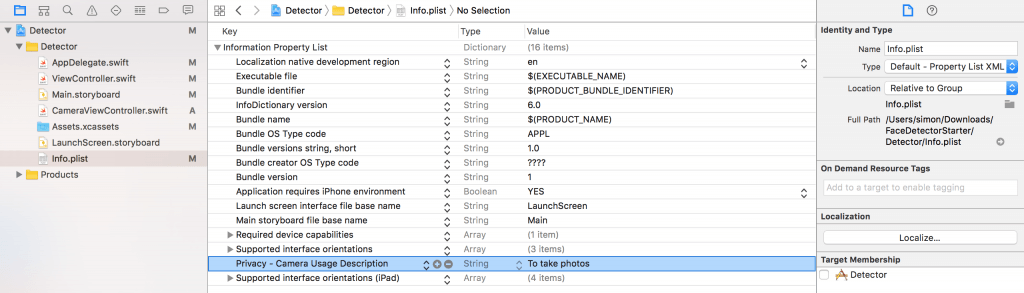
由iOS 10開始,如你的app需要啟動內置相機,你必須在Info.plist加入一個叫「Privacy – Camera Usage Description」的key,以說明為何你需要使用相機。現在就開啟Info.plist,在空白的地方按下滑鼠右鍵,然後選擇Add Row。將新加入的key設定為Privacy - Camera Usage Description,而數值設定為to take photos(又或者其他原因)。
好!可以執行此 App 趕緊來試試看吧。
我們已經看過 CIFaceFeature 的幾個屬性和函式了。舉例而言,如果想要偵測某個人是否正在微笑,可以呼叫 .hasSmile ,其結果會是布林數值。或者,也可以分別呼叫 .hasLeftEyePosition 和 .hasRightEyePosition 來檢查是否出現左眼和右眼。
此外我們也可以呼叫 hasMouthPosition 來檢查是否出現嘴巴。如果有偵測到嘴巴的話,我們接著可以透過如下的 mouthPosition 屬性來取得其座標位置:
if (face.hasMouthPosition) {
     print("mouth detected")
}
如你所見,利用 Core Image 來實現人臉偵測的功能實在令人難以置信地簡單。除了能夠偵測嘴巴、微笑或眼睛位置之外,我們還可以檢查眼睛是睜開或閉上的(分別針對左眼呼叫 leftEyeClosed ,以及針對右眼呼叫 rightEyeClosed )。
結語
在本文中,我們介紹了 Core Image 的人臉偵測 API ,並且說明如何在照相 App 中加以運用。我們透過設定基礎的 UIImagePicker 來進行拍照,並且偵測影像中是否出現人臉。
如你所見, Core Image 的人臉偵測是威力非常強大的 API ,可以運用於許多地方!希望本文能夠讓你受惠,讓你好好運用這組比較不為人知的 iOS API !
由此下載本文的完整專案。


